

Preparation of cotton plug is a common practice in microbiology laboratories. In this method, a suitable piece of dry non-absorbent cotton wool is taken and shaped by folding and rolling. The folded portion is then inserted into the mouth of a culture tube (test tube) or conical flask (Erlenmeyer flask). It is mainly used during the preparation and handling of microbial cultures.
The cotton plug should fit firmly in the neck of the vessel. It should not fall out easily. The plug must also be easy to remove and replace without losing its shape. Cotton wool acts as a barrier against dust and airborne microorganisms while allowing the movement of air and gases. Non-absorbent cotton is preferred because it does not become wet easily.
In microbiology practicals, both temporary and permanent cotton plugs are prepared. Temporary plugs are made from folded and rolled cotton wool, whereas permanent plugs are usually reinforced with muslin cloth for repeated handling. Cotton plugging is used during aseptic technique, but the preparation of a cotton plug alone does not make the vessel sterile.
What Is a Cotton Plug?
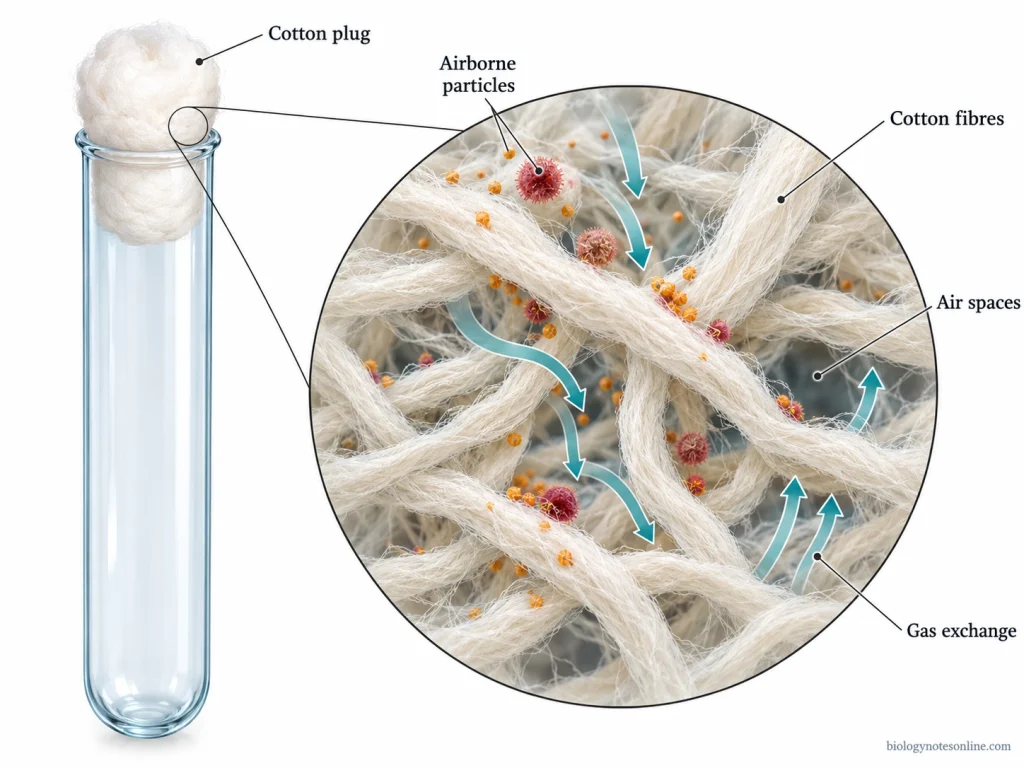
A cotton plug is a laboratory closure made up of cotton wool fibres, which is placed in the mouth of a culture tube or conical flask. It is also known as a cotton wool plug. The cotton fibres are folded and rolled together to form a compact cylindrical shape. One portion of the plug is inserted into the neck of the vessel, while the other portion remains outside for easy removal.
The cotton plug has a dry and porous structure. There are small spaces present between the cotton fibres which allow the passage of air and other gases. It is not an airtight stopper. The closely packed cotton fibres help to prevent dust and airborne microorganisms from entering the vessel.
Non-absorbent cotton wool is generally preferred for plugging microbiological culture vessels. Absorbent cotton becomes wet easily and may lose its effectiveness as a barrier against microbial contamination.
Purpose of Cotton Plugs in Microbiology
The following are the main objectives of cotton plugs in microbiology-
- To prevent the entry of dust particles and airborne microorganisms into the culture tubes and flasks. The cotton fibres trap many of these particles from the air, but do not provide an absolute microbial barrier.
- To allow the exchange of air and gases through the small spaces present between the cotton fibres. It does not form an airtight seal.
- To cover the mouth of test tubes and conical flasks during culture media preparation and sterilization. The porous cotton plug allows steam to pass through during autoclaving and helps protect the sterilized medium from airborne contamination after cooling.
- To prevent contamination of microbial cultures during incubation while allowing the necessary gaseous exchange.
- To maintain aseptic conditions during the inoculation and transfer of microbial cultures. The cotton plug can be removed and replaced easily during the transfer of inoculum.
- To prevent the entry of microorganisms and dust through the upper end of suitable laboratory pipettes. The cotton wool acts as a filter during the handling of sterile liquids.
Materials Required for Cotton Plug Preparation
The following materials are required for the preparation of cotton plugs-
- Non-absorbent cotton wool- Clean and dry cotton wool is used for making the cotton plug. It is folded and rolled to form the required shape and size.
- Test tubes or conical flasks- These are used to prepare and check the fitting of cotton plugs according to the size of the vessel mouth.
- Scissors- Used to cut the cotton wool and cloth into suitable sizes.
- Forceps- It is used for holding and adjusting the cotton wool during preparation, when required.
- Muslin cloth or gauze- It is used to cover the cotton wool for preparing reinforced permanent cotton plugs.
- Thread- Used to tie and secure the muslin cloth around the cotton wool in permanent plugs, where required.
An autoclave or hot air oven is used for subsequent sterilization of suitable plugged vessels. These are not required for the actual shaping and preparation of cotton plugs.
Preparation of Temporary Cotton Plugs
Temporary cotton plugs are prepared using clean and dry non-absorbent cotton wool. There are two different methods of preparing temporary cotton plugs, which are as follows-
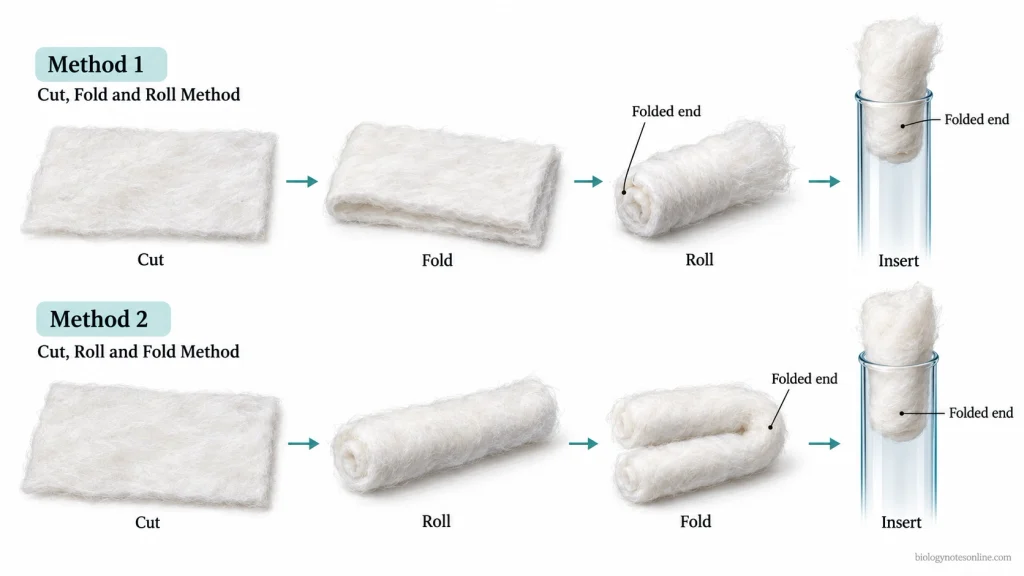
1. Cut, Fold and Roll Method
- Take a roll of non-absorbent cotton wool. Open out the cotton wool carefully.
- With the help of scissors, cut a suitable piece of cotton sheet according to the diameter of the mouth of the culture tube or conical flask.
- Fold the cut cotton piece at the centre.
- The folded cotton is then rolled from one end to form a cylindrical plug. One end of the plug contains the folded portion, while the loose cotton fibres remain at the other end.
- Insert the folded end of the cotton plug into the mouth of the test tube or conical flask. The loose end is kept outside the vessel so that it can be removed easily.
- Check the fitting of the cotton plug. It should be firm but not too tight. If the plug is tight, open it and remove some cotton, then roll it again. In case of a loose plug, some more cotton is added and the fitting is adjusted.
2. Cut, Roll and Fold Method
- A suitable piece of dry cotton sheet is cut according to the size of the mouth of the culture vessel.
- Roll the cotton sheet from one end. In this method, the cotton is rolled first without folding.
- The rolled cotton is then folded at the centre. A double-layered cotton plug is formed.
- The folded end is inserted into the neck of the culture tube or flask, keeping the free ends of the cotton outside the vessel.
The prepared temporary cotton plugs are not sterile. The plugged vessels must undergo suitable sterilization before they are used for sterile microbiological work.
Preparation of Permanent Cotton Plugs
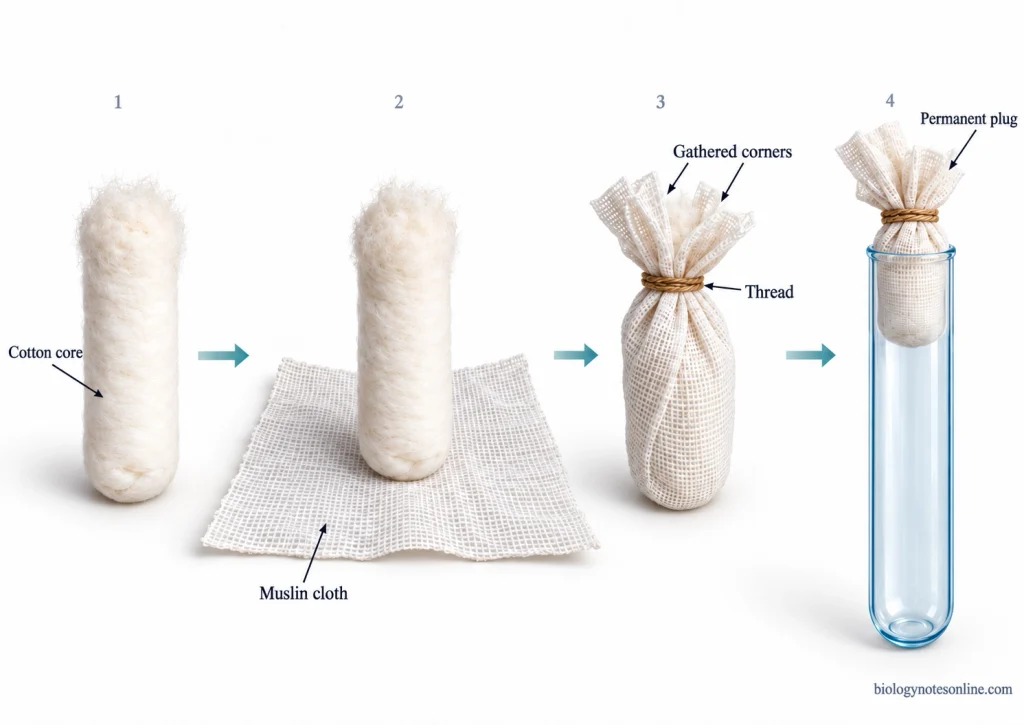
Permanent cotton plugs are prepared by covering the previously prepared cotton plugs with muslin cloth or gauze. The cloth covering holds the cotton fibres together and prevents the plug from losing its shape during repeated handling.
Reinforcement with Muslin Cloth or Gauze
- Take a previously prepared cotton plug made from dry non-absorbent cotton wool. The plug should be of suitable size according to the mouth of the culture tube or conical flask.
- Cut a square piece of clean muslin cloth or gauze with the help of scissors.
- Place the folded end of the cotton plug at the centre of the muslin cloth.
- The muslin cloth is then folded around the cotton plug, covering the folded end and sides of the cotton. Bring the four corners of the cloth towards the unfolded free end of the plug.
- Tie the four corners of the muslin cloth firmly with the help of a thread. The tied portion should remain at the outer end of the plug without disturbing its shape.
- Insert the cloth-covered folded end into the mouth of the test tube or conical flask. The other end remains outside the vessel for easy removal. The plug should fit firmly but not too tightly. The cloth and thread should not obstruct the mouth of the vessel.
- The muslin covering allows the cotton plug to retain its shape during repeated removal and replacement. It can be reused if the cotton and cloth remain dry, undamaged and are properly sterilized before use. Wet, soiled or damaged plugs should not be reused.
Fitting and Checking Cotton Plugs
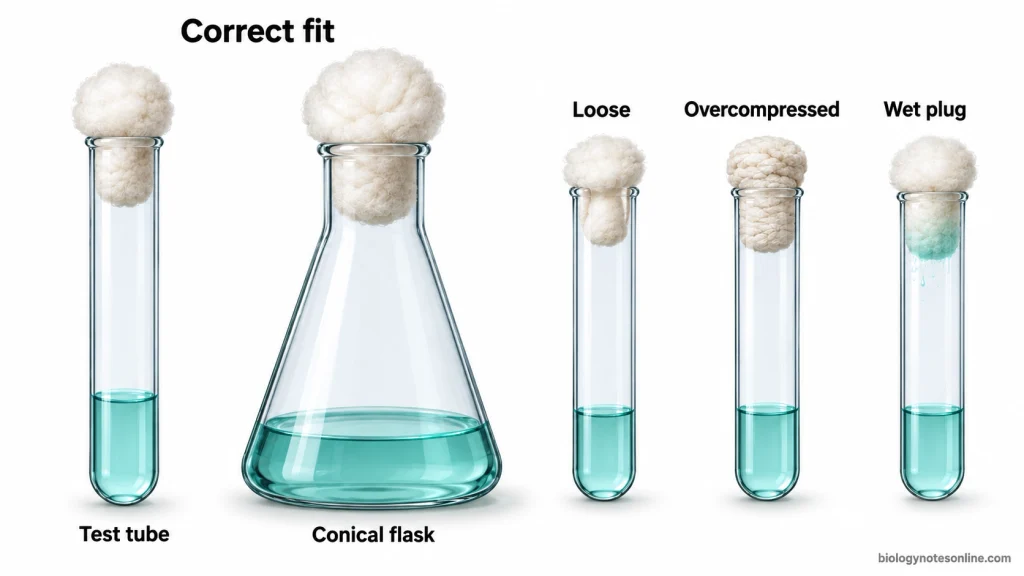
The prepared cotton plug should be checked for proper fitting before it is used in microbiological work. It should fit firmly in the mouth of the culture vessel but should not be too tight. The cotton plug must also allow the passage of air and other gases.
Cotton Plug for Test Tubes
- Take a suitable amount of non-absorbent cotton wool according to the diameter of the test tube mouth. A smaller test tube requires less cotton than a tube having a wider mouth.
- The folded end of the cotton plug is inserted into the mouth of the test tube. A sufficient portion of the plug should remain outside the tube for easy handling.
- Check whether the cotton plug fits properly. It should remain in its position when the test tube is gently tilted. The plug should not fall out easily.
- Try to remove and replace the plug with one hand. It should come out without applying excessive force. If the plug is too loose, some more cotton is added. In case of a tight plug, remove some cotton and adjust the fitting. Excessive compression of cotton may restrict the passage of gases.
- Examine the inner end of the cotton plug. There should not be any loose cotton fibres hanging inside the test tube. The plug should not come in contact with the culture medium.
Cotton Plug for Conical Flasks
- For a conical flask (Erlenmeyer flask), a suitable quantity of cotton wool is taken according to the diameter and shape of the flask neck. A flask having a wider neck generally requires a larger cotton plug.
- Insert the folded end of the cotton plug into the neck of the conical flask. The plug should fit securely without being pushed too deep. The outer portion remains outside the flask for removal and replacement.
- Check the fitting by gently handling the flask. The cotton plug should not become loose or fall out. It should also not be compressed so tightly that the passage of gases is restricted.
- The cotton plug must remain dry and should not touch the culture medium present inside the flask. During handling, care should be taken to prevent liquid from splashing onto the cotton plug. A wet plug should be replaced.
Observation and Result
A properly prepared cotton plug appears dry, compact and cylindrical with the folded end fitted inside the mouth of the culture vessel. The outer portion remains accessible for handling. It stays in position during normal handling and can be removed and replaced without difficulty. No loose cotton fibres should hang into the vessel, and the plug should not touch the culture medium.
Sterilization of Cotton Plugs
The prepared cotton plugs are not sterile. They must be sterilized along with the culture tubes or conical flasks before using them in aseptic microbiological work. The process of folding, rolling and fitting the cotton plug does not make the vessel sterile.
The sterilization of cotton plugs is carried out in the following steps-
- Take the culture tubes or conical flasks fitted with cotton plugs. Check that the cotton is clean, dry and properly fitted in the mouth of each vessel.
- The plugged glass vessels are generally sterilized by autoclaving, if they are suitable for steam sterilization. Place the vessels in an autoclave tray, leaving sufficient space between them for the circulation of steam. The cotton plugs should allow steam to pass through during sterilization.
- Select the appropriate sterilization cycle according to the type of material, size of the vessel and quantity of culture medium present. The temperature, pressure and exposure time are maintained according to the validated laboratory procedure. The required sterilization time may vary with the volume and arrangement of the load.
- For suitable empty glassware, dry heat sterilization can also be carried out using a hot air oven, provided the cotton plugs and other materials are compatible with the selected procedure. It is not used for sterilizing liquid culture media.
- After sterilization, allow the vessels to cool properly before removing them from the sterilizer. Care should be taken to prevent the cotton plugs from becoming wet due to condensation or contact with the culture medium.
- The cotton plugs must remain dry. A wet plug may allow microorganisms to pass through the cotton fibres. If the cotton plug becomes wet or contaminated, it should be replaced and the vessel sterilized again before sterile use.
- Handle the sterilized cotton-plugged vessels under aseptic conditions. Avoid touching the portion of the cotton plug that enters the vessel. The sterilized vessels should be kept in a clean and protected place until use.
Temporary vs Permanent Cotton Plugs
In traditional microbiology practicals, cotton plugs are of two types, temporary and permanent cotton plugs. They differ mainly in their preparation, durability and repeated use. This classification is used in practical laboratory manuals and does not include all types of microbiological closures.
| Features | Temporary Cotton Plugs | Permanent Cotton Plugs |
|---|---|---|
| Construction | Prepared by folding and rolling cotton wool into a suitable shape. | The prepared cotton plug is covered with muslin cloth or gauze and tied with thread. |
| Materials required | Mainly non-absorbent cotton wool. | Non-absorbent cotton wool, muslin cloth or gauze and thread. |
| Durability | Comparatively less durable. The cotton may lose its shape during repeated handling. | More durable due to the cloth covering which holds the cotton fibres together. |
| Preparation | Simple and requires less time. | Requires additional steps of covering and tying the cotton plug. |
| Handling | Can be removed and replaced, but repeated handling may loosen the cotton fibres. | The cloth covering helps maintain the plug shape during repeated removal and replacement. |
| Fitting | Should fit firmly in the vessel mouth without excessive compression. | Also requires proper fitting. The cloth covering should not obstruct the vessel mouth. |
| Reusability | Generally not recommended for repeated reuse after laboratory use. | Can be reused if it remains dry, clean and undamaged, with appropriate sterilization before reuse. Wet or contaminated plugs must be replaced. |
Precautions During Cotton Plug Preparation
The following precautions should be taken during the preparation of cotton plugs-
- Always use clean and dry non-absorbent cotton wool for preparing cotton plugs. Wet or dirty cotton should not be used.
- The cotton wool should be handled with clean hands and scissors. Avoid placing the cotton on dirty laboratory surfaces.
- Take a suitable quantity of cotton according to the diameter of the mouth of the culture tube or flask. Too little cotton may produce a loose plug, while excess cotton makes it difficult to insert and remove.
- The cotton should be folded and rolled properly to form a compact plug. Avoid leaving loose cotton fibres hanging inside the culture vessel.
- Do not press the cotton plug too tightly into the neck of the vessel. The cotton should remain porous to allow the passage of air and other gases.
- A sufficient portion of the cotton plug should remain outside the vessel for easy removal and replacement. It should not be pushed too deep into the tube or flask.
- Check the fitting of the cotton plug before use. It should not fall out easily during normal handling.
- In the case of permanent cotton plugs, the muslin cloth or gauze should be clean and properly tied with thread. The cloth and thread should not interfere with the fitting of the plug.
- The cotton plug must remain dry. Avoid contact with the culture medium or any other liquid. Wet or damaged cotton plugs should be replaced.
- The prepared cotton plugs must be subjected to suitable sterilization before using them in aseptic microbiological work. Do not attempt to sterilize the cotton plug by direct flaming.
Significance of Cotton Plug
- Cotton plugs help prevent the entry of airborne microorganisms and dust particles into culture tubes and flasks.
- They allow the exchange of air and gases required during microbial growth.
- Cotton plugs are used to cover culture vessels during sterilization and incubation.
- The plug can be easily removed and replaced during aseptic inoculation and transfer of microbial cultures.
- It also helps prevent microorganisms from escaping into the laboratory environment.
References
- Cappuccino, J. G., & Welsh, C. T. (2022). Microbiology: A laboratory manual (12th ed.). Pearson. https://www.pearson.com/en-us/subject-catalog/p/microbiology-a-laboratorymanual/P200000006788/9780137546527
- Dubey, R. C., & Maheshwari, D. K. (2023). Practical microbiology (4th ed.). S. Chand Publishing. https://www.schandpublishing.com/books/higher-education/biology/practical-microbiology/9789355017451/
- Erkmen, O. (2021). Laboratory practices in microbiology. Academic Press. https://shop.elsevier.com/books/laboratory-practices-in-microbiology/erkmen/978-0-323-91017-0
- Muniaraj, M., Paramasivan, R., & Arunachalam, N. (2010). Glass capping of bacterial culture flasks. Journal of Bacteriology and Virology, 40(4), 213–217. https://doi.org/10.4167/jbv.2010.40.4.213
- Schultz, J. S. (1964). Cotton closure as an aeration barrier in shaken flask fermentations. Applied Microbiology, 12(4), 305–310. https://doi.org/10.1128/am.12.4.305-310.1964
- Sutter, R. P. (1969). Comparison of stainless-steel closures and cotton plugs in maintaining contamination-free medium in circulating air. Applied Microbiology, 18(3), 525. https://doi.org/10.1128/am.18.3.525-525.1969