Contents
What is Direct ELISA?
- Direct ELISA is a plate-based immunosorbent assay that is used for the detection and quantification of specific analytes within a complex biological sample. It is the simplest and quickest among the four different ELISA formats. In direct ELISA, only one antibody is involved in the reaction, making it useful for qualitative or quantitative antigen detection, antibody screening, and epitope mapping.
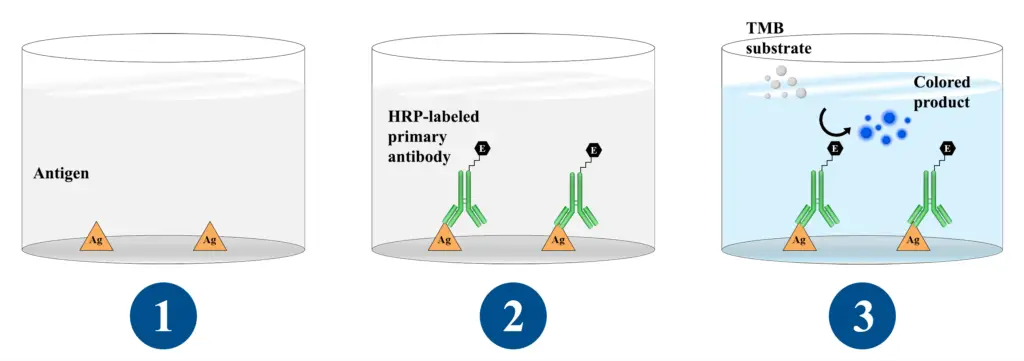
- The direct ELISA technique involves immobilizing the antigen directly onto the surface of a multi-well microtiter plate, such as a 96-well polystyrene plate. The antigen is then complexed with an enzyme-labeled primary antibody that is specific to the antigen. When the enzyme-labeled primary antibody binds to the antigen, it catalyzes a reaction with its respective substrate, resulting in a visible colorimetric output. This output can be measured using a spectrophotometer or absorbance microplate reader.
- One advantage of direct ELISA is its speed and simplicity, as it requires fewer steps and reagents compared to other ELISA techniques. It is also less prone to errors since there is no need for a potentially cross-reacting secondary antibody. However, there are some disadvantages to consider. The antigen immobilization in direct ELISA is not specific, leading to higher background noise compared to indirect ELISA. This is because all proteins in the sample, including the target protein, can bind to the plate. Additionally, direct ELISA requires a specific conjugated primary antibody for each target protein, making it less flexible. Unlike indirect ELISA, there is no signal amplification in direct ELISA, which reduces the assay sensitivity. Therefore, direct ELISA is typically used when analyzing the immune response to a specific antigen.
- The applications of direct ELISA are widespread. It is used for disease diagnosis, such as screening donated blood for evidence of viral contamination by HIV, Hepatitis C, Hepatitis B, and other infectious agents. It is also utilized in detecting sexually-transmitted agents like syphilis and Chlamydia, measuring allergens in food, identifying autoimmune diseases like lupus erythematosus, measuring hormone levels, and determining the time of ovulation. Direct ELISA has proven to be a valuable tool in biomedical research and clinical diagnostics due to its sensitivity and specificity in detecting and quantifying antigens.
Principle of Direct ELISA
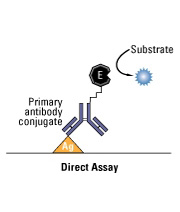
The principle of direct ELISA revolves around the specific binding interaction between an antigen and its corresponding antibody. In this type of ELISA, the antigen of interest is adsorbed or immobilized onto the surface of a plastic plate, typically a microtiter plate with multiple wells. To minimize non-specific binding, an excess of another protein, such as bovine serum albumin (BSA), is added to block any remaining unoccupied binding sites on the plate.
In a separate reaction, an enzyme is linked or conjugated to a specific antibody that recognizes and binds to the antigen. This enzyme-antibody conjugate is then added to the plate, allowing it to bind to the immobilized antigen. The plate is then washed to remove any excess or unbound enzyme-antibody conjugate, ensuring that only the bound conjugate remains attached to the antigen.
After the washing step, the presence of the enzyme-antibody bound to the antigen is detected by adding a substrate specific to the enzyme. The enzyme catalyzes a reaction with the substrate, resulting in a colorimetric or fluorescent signal that indicates the presence and amount of the antigen.
The direct ELISA technique offers several advantages. Firstly, it is a relatively fast method compared to other forms of ELISA since it involves fewer steps and the use of only one antibody. Additionally, direct ELISA helps eliminate potential cross-reactivity issues that may arise when using secondary antibodies in indirect ELISA. By directly measuring the specific antibody-to-antigen reaction, the direct ELISA provides a more accurate and specific detection of the target antigen.
However, there are some limitations to consider. The antigen adsorption step in direct ELISA is not always specific, which may lead to higher background noise and nonspecific binding. Furthermore, the direct ELISA format requires a specific enzyme-antibody conjugate for each target antigen, making it less flexible compared to indirect ELISA.
In summary, the principle of direct ELISA involves immobilizing the antigen on a plastic plate, blocking non-specific binding sites, adding an enzyme-linked antibody that binds to the antigen, washing away excess unbound conjugate, and detecting the enzyme activity using a substrate. This approach allows for the specific detection of antigen-antibody interactions and offers advantages in terms of simplicity, speed, and reduced cross-reactivity.
Direct ELISA Animated Video

Material Required for Direct ELISA
- Specific antibody–alkaline phosphatase conjugate: This is a conjugate of the specific antibody used for detection and an enzyme, such as alkaline phosphatase. It allows for the detection of the antigen-antibody complex.
- Deionized water: Water free from ions and impurities is needed for preparing various solutions and dilutions.
- Blocking buffer: A buffer solution, such as PBS (phosphate-buffered saline), containing a blocking agent like non-fat dry milk or bovine serum albumin (BSA). It is used to block non-specific binding sites on the microtiter plate.
- Capture antibody solution: This is a specific antibody that binds to the antigen and is immobilized onto the wells of the microtiter plate. It captures the antigen during the assay.
- Test antigen samples: These are the samples containing the antigen of interest that will be tested for its presence or concentration.
- P-nitro phenyl phosphate (NPP) substrate solution: This is a substrate solution for the enzyme, such as alkaline phosphatase. It undergoes a reaction with the enzyme to produce a detectable signal, usually colorimetric or fluorescent.
- Stop solution (0.5 M NaOH): This solution is used to stop the enzymatic reaction by adjusting the pH, thereby stabilizing the signal generated.
- 96-well microtiter plate: The microtiter plate consists of multiple wells in a 8 x 12 format, where the antigen, antibodies, and other solutions are added. It allows for simultaneous processing of multiple samples.
- Microtiter plate reader – spectrophotometer with a 405-nm filter: A plate reader equipped with a specific wavelength filter (405 nm for alkaline phosphatase) is used to measure the absorbance or fluorescence of the wells, which reflects the presence or concentration of the antigen.
- Pipette and disposable pipette tips: These are used for accurate and precise measurement and transfer of liquid samples and reagents.
- Plastic squirt bottles: Squirt bottles are used to dispense wash solution and other reagents during the washing steps.
- Vials (1.5 ml): Vials are used to store and prepare small volumes of reagents, such as conjugates, substrates, or stop solutions.
- Vial rack: A rack is used to hold the vials, keeping them organized and easily accessible during the assay.
- Plastic wrap: Plastic wrap is used to cover the microtiter plate during incubation steps to prevent evaporation and maintain a controlled environment.
- Plastic container: A container may be used to hold water or wash solution for rinsing the microtiter plate during the washing steps.
- Incubator: An incubator is used to maintain a specific temperature during incubation steps, such as overnight incubation at 4℃ or incubation at room temperature.
- Absorbent paper: Absorbent paper, such as paper towels, is used to remove excess liquid from the microtiter plate after washing steps.
Buffers and Reagents
The reagents used in the direct ELISA protocol include the following:
- Bicarbonate/carbonate coating buffer: This buffer is used to immobilize the antigen or antibody onto the wells of the microtiter plate. To prepare the coating buffer, Na2CO3 (3.03 g) and NaHCO3 (6.0 g) are dissolved in 1000 ml of distilled water to achieve a pH of 9.6.
- PBS (Phosphate Buffered Saline): PBS is a commonly used buffer solution in various biological assays. It is typically prepared by dissolving Na2HPO4 (1.16 g), KCl (0.1 g), K3PO4 (0.1 g), and NaCl (4.0 g) in 500 ml of distilled water to achieve a pH of 7.4. PBS is used for washing steps and diluting antibodies.
- Blocking solution: A blocking agent is used to prevent non-specific binding of antibodies or other proteins to the microtiter plate. Commonly used blocking agents include 1% BSA (Bovine Serum Albumin), serum, non-fat dry milk, casein, or gelatin in PBS. The blocking solution is added to the plate to occupy any unoccupied binding sites and reduce background noise.
- Wash solution: The wash solution is used to wash away unbound reagents and reduce background signal. Typically, PBS or Tris-buffered saline (pH 7.4) containing a detergent, such as 0.05% Tween20 (TBST), is used for efficient washing.
- Antibody dilution buffer: The primary and secondary antibodies used in the direct ELISA should be diluted in a buffer to reduce non-specific binding. A common dilution buffer is 1x blocking solution, which is prepared by diluting the blocking agent in PBS.
These reagents play crucial roles in the different steps of the direct ELISA protocol, including antigen/antibody immobilization, blocking non-specific binding, washing away unbound reagents, and diluting antibodies for optimal specificity and sensitivity of the assay.
Microplate
- A microplate, also known as a microtiter plate or a multiwell plate, is a flat plate with multiple wells used for various laboratory applications, including ELISA (Enzyme-Linked Immunosorbent Assay). It is designed to hold and facilitate the simultaneous processing of multiple samples or reactions.
- Microplates come in different sizes and formats, including 6, 12, 24, 96, 384, or even 1536 sample wells. The most commonly used format for ELISA is the 96-well plate, which consists of 8 rows and 12 columns, arranged in a 2:3 rectangular matrix. Each well serves as an individual reaction vessel.
- The microplate wells are typically made of different materials depending on the intended use. The most common material is polystyrene, which is optically clear and has a high binding capacity for antibodies and proteins. Polystyrene plates have a passive binding property, meaning they can immobilize antibodies and proteins without any additional treatment.
- In some cases, polypropylene microplates are used when the plates need to withstand wide temperature variations, such as storage at 80°C. Polypropylene is more resistant to temperature changes compared to polystyrene.
- Apart from polystyrene and polypropylene, other materials have also been used for microplates. These include particles of cellulose, polyacrylamide, cross-linked dextrans, and various types of plastics. These alternative materials offer specific advantages for certain applications, such as improved binding capacity, compatibility with certain assays, or specialized chemical properties.
- Microplates provide a convenient and efficient platform for conducting ELISA and other assays. They allow for high-throughput processing of samples, enabling simultaneous analysis of multiple analytes or reactions. The wells of the microplate can be easily accessed by pipettes or automated liquid-handling systems, facilitating accurate sample dispensing and reagent addition.
- Overall, microplates play a crucial role in laboratory research and diagnostics, providing a standardized and reliable platform for conducting various assays, including ELISA. Their design and material selection ensure optimal performance and reproducibility in sample analysis.
Steps of Direct ELISA
- Dilute the antigen: Dilute the antigen to a final concentration of 10 µg/ml in bicarbonate/carbonate coating buffer.
- Coating the plate: Pipette 100 µl of the antigen dilution into each well of a PVC Microtiter Plate. Dilute down the plate as necessary using serial dilutions of the antigen. Seal the plate with an adhesive plastic and incubate it at 4℃ overnight or at room temperature for 2 hours. This allows the antigen to adhere to the plate.
- Washing the plate: Wash the plate three times with a wash solution. This step helps remove any unbound or non-specifically bound components.
- Blocking: Add 200 µl of blocking buffer, such as 5% non-fat dry milk in PBS, to each well to block the remaining protein binding sites on the plate. Cover the plate with an adhesive plastic and incubate it for at least 2 hours at room temperature or overnight at 4℃. Blocking helps prevent non-specific binding of antibodies.
- Washing the plate: Wash the plate twice with the wash solution to remove any excess blocking buffer and unbound components.
- Incubation with the primary antibody: Add 100 µl of the primary antibody, diluted to the optimal concentration according to the manufacturer’s datasheet, to each well. Dilute the antibody with blocking buffer immediately before use. Cover the plate with an adhesive plastic and incubate it for 2 hours at room temperature. The primary antibody binds specifically to the antigen.
- Washing the plate: Wash the plate five times with the wash solution to remove any unbound primary antibody.
- Addition of substrate: Using a multichannel pipette, dispense 50-100 µl of the substrate solution per well. The substrate reacts with the enzyme linked to the primary antibody, leading to the development of a detectable signal.
- Color development: Allow sufficient time for color development to occur. The duration may vary depending on the specific substrate used and the desired level of signal intensity.
- Stop the reaction: After sufficient color development, add 50-100 µl of stop solution to each well. The stop solution terminates the enzyme-substrate reaction and stabilizes the signal.
These steps represent the essential process of performing a Direct ELISA. The resulting signal, which can be measured as absorbance or fluorescence, is proportional to the presence or concentration of the antigen in the test sample.
Protocol of Direct ELISA
1. Coating antigen to microplate
Coating the antigen to a microplate is a critical step in the direct ELISA protocol. The following steps are involved in coating the microplate with the antigen:
- Dilute the antigen: Prepare a dilution of the antigen in PBS or another suitable carbonate buffer. The final concentration of the antigen should be 20 µg/ml. This concentration can be adjusted based on the detection range of the specific antibody used in the assay.
- Coat the microplate: Take a PVC microtiter plate and pipette 50 µl of the antigen dilution into the top wells of the plate. Dilute down the plate as required. Ensure that the samples you are testing contain the antigen at a concentration within the detection range of the specific antibody.
- Incubate the plate: Cover the plate with an adhesive plastic film or lid to prevent evaporation. Incubate the plate for 2 hours at room temperature or overnight at 4°C. The incubation time may require optimization depending on the specific antigen and experimental conditions.
- Remove coating solution and wash the plate: After the incubation period, carefully remove the coating solution by pouring it out or by aspiration. Wash the plate twice by filling the wells with 200 µl of PBS. After each addition, discard the PBS by pipetting or flicking the plate over a sink. Remove any remaining drops by gently patting the plate on a paper towel.
- Repeat coating if necessary: If required, repeat the coating process with a fresh batch of coating antigen. Add 100 µl of the appropriate coating antigen solution to each well at a concentration of 1-10 µg/ml in the coating buffer. Incubate the plate again as described in step 3.
- Test sample addition: Pipette the test samples onto the coated microplate. The pure antigen samples should be added at a concentration of less than 2 µg/ml. It is not necessary for the samples to be pure, but ideally, more than 3% of the protein in the test sample should be the target antigen. Avoid using antigen concentrations above 20 µg/ml, as this may saturate most of the available binding sites on the microplate.
Coating the microplate with the antigen ensures that it becomes immobilized to the plate surface, allowing specific antibody-antigen interactions to occur during the subsequent steps of the direct ELISA protocol.
2. Blocking
Blocking is an important step in the direct ELISA protocol that helps prevent non-specific binding of antibodies and other proteins to the coated microplate. The following steps are involved in the blocking process:
- Prepare blocking buffer: Prepare a blocking solution by adding 5% non-fat dry milk in PBS. Other blocking agents such as BSA, serum, casein, or gelatin can also be used. The purpose of the blocking buffer is to occupy any remaining protein-binding sites on the coated wells.
- Add blocking buffer to the plate: After removing the coating solution and washing the plate as described in the previous steps, add 200 µl of the blocking buffer to each well of the microplate. Ensure that the entire well is covered with the blocking solution.
- Incubate the plate: Cover the plate with an adhesive plastic film or lid to prevent evaporation. Incubate the plate for at least 2 hours at room temperature. Alternatively, the plate can be incubated overnight at 4°C for convenience.
- Wash the plate: After the blocking step, wash the plate twice with 200 µl of PBS. The purpose of the washing step is to remove any unbound blocking buffer and further reduce non-specific binding.
By blocking the remaining protein-binding sites with a blocking buffer, non-specific interactions between antibodies and the coated surface of the microplate are minimized. This helps to reduce background noise and improve the specificity of the assay. The use of non-fat dry milk or other blocking agents in the buffer helps to occupy these sites and prevent unwanted binding.
Following the blocking step, the plate is washed to remove any excess blocking buffer and prepare the wells for the subsequent steps of the direct ELISA protocol.
3. Incubation with the Antibody
After the blocking step in the direct ELISA protocol, the next step is to incubate the microplate with the specific antibody. The following steps outline the process of incubation with the antibody:
- Prepare the antibody dilution: Dilute the specific antibody in the optimal concentration according to the manufacturer’s instructions. This concentration may vary depending on the specific antibody and the desired sensitivity of the assay. The antibody should be diluted in the blocking buffer immediately before use to maintain its stability and activity.
- Add the antibody to the wells: Add 100 µl of the diluted antibody solution to each well of the microplate. Ensure that the entire well is covered with the antibody solution.
- Incubate the plate: Cover the plate with an adhesive plastic film or lid to prevent evaporation. Incubate the plate for 2 hours at room temperature. This incubation time is generally sufficient to allow specific binding of the antibody to the target antigen. However, if a weak signal is obtained, an overnight incubation at 4°C can be performed to enhance the staining intensity. It is important to optimize the incubation time based on the specific antibody and antigen being used.
- Wash the plate: After the incubation with the antibody, wash the plate four times with 200 µl of PBS. The washing step helps to remove any unbound antibody and reduce background noise. Each well should be filled with the wash solution, and then the solution is discarded by gentle aspiration or by flicking the plate over a sink. Any remaining drops can be removed by patting the plate on a paper towel.
The incubation with the antibody allows for specific binding of the antibody to the immobilized antigen on the microplate. This step plays a crucial role in the detection and quantification of the target antigen. After the incubation, excess unbound antibody is washed away to ensure the specificity and accuracy of the assay.
4. Detection
The detection step in the direct ELISA protocol involves the addition of a substrate solution that reacts with the enzyme-labeled antibody bound to the antigen. The following steps outline the process of detection:
- Dispense the substrate solution: Add 100 µl of the substrate solution to each well of the microplate. The substrate solution contains a substrate molecule that reacts with the enzyme linked to the antibody. This reaction generates a colorimetric or fluorescent signal that can be measured.
- Color development: Allow sufficient time for color development. The duration may vary depending on the specific substrate used and the enzymatic activity associated with the antibody. Typically, the reaction is allowed to proceed for a few minutes to produce a detectable signal. If necessary, the incubation time can be optimized to achieve the desired level of color development.
- Addition of stop solution (if applicable): If a stop solution is required to halt the enzymatic reaction, add 100 µl of the stop solution to each well. The stop solution terminates the substrate-enzyme reaction, preventing further color development. The use of a stop solution depends on the specific substrate system being used and is not always necessary.
- Read the absorbance: Measure the absorbance or optical density (OD) of each well using a plate reader. The plate reader detects the intensity of the color developed in each well. The absorbance reading provides a quantitative measurement of the presence or concentration of the target antigen in the sample.
It is important to note that some enzyme substrates used in ELISA assays may be considered hazardous and potentially carcinogenic. Therefore, it is crucial to handle them with care and follow proper safety precautions. It is recommended to wear gloves and adhere to safety guidelines when working with enzyme substrates.
The detection step allows for the measurement and quantification of the antigen in the sample based on the enzymatic reaction and the resulting colorimetric or fluorescent signal. The absorbance reading obtained from the plate reader provides valuable data for the analysis and interpretation of the ELISA results.
5. Analysis of Data
The analysis of data in the context of ELISA involves several steps to determine the concentration of the antigen in the test samples. Here is an overview of the data analysis process:
- Prepare a standard curve: Begin by preparing a standard curve using the data obtained from the serial dilutions of the standard antigen solution. Plot the concentration of the antigen on the x-axis (usually in a logarithmic scale) and the absorbance on the y-axis (in a linear scale). The standard curve represents the relationship between the known concentrations of the antigen and their corresponding absorbance values.
- Interpolate sample concentration: Once the standard curve is established, measure the absorbance of the test samples. Using the standard curve as a reference, interpolate the concentration of the antigen in the test solutions based on their corresponding absorbance values. This interpolation allows you to determine the concentration of the antigen in the test samples.
- Dilutions of test antigen solutions: Prepare dilutions of the test antigen solutions in blocking buffer. It is recommended to assay one or two serial dilutions of the initial antigen test solution to ensure accurate measurements. The dilutions should cover a range of concentrations, typically from 1 to 100 ng/ml, to accurately determine the concentration of the antigen in the test samples.
- Prepare developing-reagent dilutions: Dilute the antibody-alkaline phosphatase conjugates (developing reagents) in blocking buffer. Create a series of dilutions with different concentrations, such as 500, 250, 125, 62.5, and 31.25 ng/ml, in order to optimize the detection of the antigen-antibody complex.
- Prepare coating-reagent dilutions: Dilute the specific antibody (coating reagent) in PBSN (Phosphate-Buffered Saline with Nonionic Surfactant). Create a series of dilutions with concentrations of 10, 5, 2.5, and 1.25 μg/ml to optimize the coating of the antigen on the microtiter plate.
- Mix and incubate conjugate and inhibitor: Add the conjugate solution (antibody-alkaline phosphatase conjugate) to each well of the microtiter plate, followed by the addition of the inhibitor (test antigen solution). Mix the solutions by pipetting up and down, and incubate for 30 minutes at room temperature. This step allows for the binding of the conjugate to the antigen in the presence or absence of inhibitors.
- Prepare uninhibited control samples: Mix equal volumes of the conjugate solution and blocking buffer to create uninhibited control samples. These samples serve as a reference to compare against the test samples.
- Construct the standard curve: Utilize the data generated from the serial dilutions of the standard antigen to construct a standard curve. Plot the logarithmic concentration of the antigen on the x-axis and the absorbance on the y-axis. The standard curve provides a reference to determine the concentration of the antigen in the test samples.
- Interpolate the antigen concentration: Interpolate the concentration of the antigen in the test solutions based on their absorbance values and the standard curve. By aligning the absorbance values of the test samples with the corresponding concentration values on the standard curve, you can determine the concentration of the antigen in the test samples.
By following these steps and utilizing the standard curve, it is possible to analyze the data obtained from the direct ELISA protocol and determine the concentration of the antigen in the test samples accurately.
Advantages of Direct ELISA
The direct ELISA technique offers several advantages compared to other forms of ELISA, making it a popular choice in many research and diagnostic applications. Some of the advantages include:
- Speed: Direct ELISA is a quicker method compared to other ELISA formats because it involves fewer steps and utilizes only one antibody. This results in a streamlined process with reduced incubation times, making it a time-efficient technique.
- Elimination of cross-reactivity: By using only one antibody, direct ELISA eliminates the need for a secondary antibody. This helps in reducing cross-reactivity issues that can occur when using secondary antibodies, leading to more specific and accurate results.
- Simplicity: Direct ELISA is relatively simple and straightforward to perform. It requires fewer reagents and steps, reducing the chances of procedural errors. The simplified protocol makes it accessible to researchers with varying levels of expertise.
- Reduced error potential: Due to its simplified nature, direct ELISA is less prone to errors compared to other ELISA methods. With fewer reagents and steps involved, there are fewer opportunities for mistakes in sample handling, reagent preparation, or washing steps, enhancing the overall reliability of the results.
- Specific antibody-to-antigen reactions: Direct ELISA allows for the specific detection of antibody-to-antigen interactions without interference from other antibodies. This specificity is crucial in research and diagnostic applications where accurately measuring the presence or concentration of a particular antigen is essential.
Disadvantages of Direct ELISA
While direct ELISA offers certain advantages, there are also some disadvantages associated with this technique:
- Non-specific antigen immobilization: Unlike indirect ELISA, where the primary antibody specifically binds to the antigen, direct ELISA relies on the antigen adsorbing to the microplate. This can result in higher background noise as other proteins present in the sample may also bind to the plate, leading to reduced specificity.
- Lack of flexibility: Direct ELISA requires a specific conjugated primary antibody for each target protein. This means that for different target proteins, separate conjugated primary antibodies need to be used. This lack of flexibility can be time-consuming and may limit the choice of primary antibodies in different experiments.
- Limited signal amplification: Direct ELISA does not involve signal amplification steps, which can reduce the overall assay sensitivity. Amplification techniques used in other ELISA formats, such as indirect or sandwich ELISA, allow for the amplification of the signal, resulting in increased sensitivity and lower detection limits.
- Potential adverse effects on primary antibody: Labeling the primary antibody with enzymes or tags for detection purposes can sometimes affect its immunoreactivity. The modification of the primary antibody may impact its binding affinity or specificity, potentially leading to reduced assay performance.
- Time-consuming and expensive antibody labeling: In direct ELISA, each specific ELISA system requires the primary antibody to be labeled with enzymes or tags. This process can be labor-intensive, time-consuming, and expensive, especially when multiple primary antibodies need to be labeled for different assays.
- Limited choice of primary antibody label: Unlike indirect or sandwich ELISA, where various labeling options for primary antibodies are available, direct ELISA has minimal flexibility in choosing different labels for primary antibodies. This restricts the range of detection strategies that can be employed in different experiments.
- Minimal signal amplification: Direct ELISA lacks signal amplification steps, which can limit the detection sensitivity compared to other ELISA formats. The absence of amplification techniques may result in higher detection limits and reduced ability to detect low concentrations of antigens.
FAQ
What is Direct ELISA?
Direct ELISA is an immunoassay technique used to detect and quantify an antigen directly using a labeled primary antibody that binds to the antigen of interest.
What materials are needed for Direct ELISA?
The materials typically required for Direct ELISA include a microplate, specific antibody-enzyme conjugate, blocking buffer, substrate solution, stop solution, wash solution, and a microplate reader.
How is the sensitivity of Direct ELISA determined?
The sensitivity of Direct ELISA is influenced by various factors, such as the affinity and specificity of the primary antibody, the labeling efficiency of the antibody-enzyme conjugate, and the concentration of the antigen in the sample.
What are the disadvantages of Direct ELISA?
Direct ELISA has some drawbacks, including higher background noise due to non-specific antigen immobilization, limited flexibility in primary antibody choice, and lack of signal amplification, which may reduce assay sensitivity.
What are the applications of Direct ELISA?
Direct ELISA is commonly used for antigen detection in research, clinical diagnostics, and quality control. It can be used to measure antigen concentration, detect the presence of specific antibodies, and screen samples for the presence of pathogens or allergens.
What are the advantages of Direct ELISA?
Direct ELISA is quicker, involves fewer steps, and reduces the potential for cross-reactivity of secondary antibodies. It is also less prone to errors due to the simplicity of the technique.
How does Direct ELISA differ from other ELISA formats?
In Direct ELISA, a single labeled primary antibody is used to detect the antigen directly, whereas in indirect and sandwich ELISA, multiple antibodies are involved, providing signal amplification or capture of the antigen, respectively.
Can Direct ELISA be used for quantitative analysis?
Yes, Direct ELISA can be used for quantitative analysis by constructing a standard curve using known concentrations of the antigen and measuring the signal intensity of the samples in comparison to the standard curve.
Can different types of primary antibodies be used in Direct ELISA?
Yes, different types of primary antibodies can be used in Direct ELISA, including monoclonal antibodies and polyclonal antibodies. The choice of primary antibody depends on the specificity and sensitivity required for the assay.
What are the critical steps to consider for a successful Direct ELISA?
Important steps in Direct ELISA include proper coating of the antigen on the microplate, optimization of antibody dilutions, adequate blocking to reduce non-specific binding, thorough washing steps to remove unbound components, and accurate measurement of the signal using a microplate reader.
References
- https://www.sinobiological.com/category/direct-elisa-principle
- https://vlab.amrita.edu/?sub=3&brch=69&sim=696&cnt=2
- https://www.bio-rad-antibodies.com/elisa-types-direct-indirect-sandwich-competition-elisa-formats.html
- https://www.creative-diagnostics.com/direct-elisa-protocol.htm
- https://www.aatbio.com/resources/faq-frequently-asked-questions/What-is-a-Direct-ELISA
- https://www.epigentek.com/catalog/direct-elisa-protocol-n-25.html
- https://www.peprotech.com/en/protocols-elisa-direct
- https://www.sinobiological.com/category/direct-elisa-protocol
Related Posts
- Radial Immunodiffusion – Principle, Procedure, Result, Uses
- Latex agglutination test – Definition, Procedure, Principle, Advantages, Limitation, Uses
- Rapid Plasma Reagin (RPR) Test – Principle, Procedure, Result, Applications
- Mantoux Test – Procedure, Normal Range and Result Interpretation
- Types of Immunoelectrophoresis


