Hey there, future scientists! Ever wondered about the secret world that hides under your fingertips, in a drop of pond water, or on a petal of a flower? Well, with a trusty microscope, that world can become as familiar to you as your own backyard. But, to unlock those secrets, you need to master the art of preparing microscope slides. So, are you ready to embark on this incredible microscopic adventure? Let’s gear up!
“The secret of getting ahead is getting started.” – Mark Twain.
And getting started with microscope slides preparation is the first step towards your exciting journey of exploration. So, buckle up and let’s dive in!
Contents
Introduction: The importance of microscope slide preparation for students
Microscope slide preparation is a fundamental aspect of any biology or life science curriculum for students. It involves creating slides with specimens that can be observed and analyzed under a microscope. This process is of paramount importance for several reasons:
- Visualization of Microscopic Structures: Microscope slide preparation allows students to view and understand the intricate world of microscopic structures. It enables them to observe cells, tissues, microorganisms, and other minute biological entities that would otherwise remain invisible to the naked eye. This hands-on experience fosters a deeper appreciation for the complexity and beauty of life at the cellular and molecular levels.
- Enhanced Learning Experience: Utilizing prepared microscope slides provides a standardized and consistent learning experience for students. Teachers can present well-prepared slides that highlight specific structures or concepts, ensuring that students can readily identify and comprehend the subject matter.
- Development of Observation Skills: Preparing slides requires attention to detail, patience, and precision. Students learn how to handle delicate specimens, apply stains, and carefully mount them on slides. These skills contribute to the development of their fine motor skills and increase their ability to observe and analyze scientific samples accurately.
- Engaging Practical Application: Microscope slide preparation offers a practical application of theoretical concepts taught in the classroom. It reinforces theoretical knowledge by allowing students to witness real examples of biological structures and phenomena. This connection between theory and practice strengthens understanding and retention of the subject matter.
- Scientific Methodology and Critical Thinking: Students engaged in slide preparation must follow specific protocols and techniques. They learn about the scientific method, including hypothesis formation, experimental design, data collection, and analysis. It encourages critical thinking as students interpret the results of their observations and draw conclusions from their experiments.
- Preparation for Advanced Studies and Research: Microscope slide preparation is a foundational skill for students considering advanced studies in biology, medicine, or other life sciences. It provides a basis for more complex microscopic techniques used in research and diagnostic laboratories.
- Stimulating Curiosity and Inquiry: As students explore microscopic worlds, they may stumble upon unexpected findings, sparking curiosity and inquiry-driven learning. These discoveries can lead to further investigations and research, fostering a lifelong interest in science.
- Connection with Nature and Conservation: By observing the beauty and complexity of living organisms through a microscope, students can develop a deeper sense of connection with nature and an appreciation for biodiversity. This, in turn, can promote a sense of responsibility towards conservation and environmental stewardship.
What are microscope slides used for?
Microscope slides are thin, flat, rectangular pieces of glass or plastic used to hold and support specimens for observation under a microscope. They serve as a critical tool in various scientific fields and applications. Some of the primary uses of microscope slides are as follows:
- Microscopic Examination: The primary purpose of microscope slides is to facilitate the observation of specimens under a microscope. They allow scientists, students, and researchers to examine the intricate details of cells, tissues, microorganisms, and other small biological structures.
- Education and Research: Microscope slides are indispensable in educational settings, enabling students to learn about the microscopic world and understand biological processes. In research, microscope slides aid in the study of organisms and their functions, contributing to advancements in various scientific disciplines.
- Medical Diagnostics: In medicine, microscope slides are crucial for diagnosing diseases and disorders. Clinical laboratories use prepared slides to analyze blood smears, tissue samples, and other bodily fluids to detect abnormalities and help with disease identification.
- Histology: Histology is the study of tissues and their structures. Microscope slides are commonly used in histology to create thin sections of tissues, which are stained to highlight specific features. These prepared slides help pathologists and researchers study tissue architecture and identify abnormalities or diseases.
- Cytology: Cytology involves the study of individual cells and their functions. Microscope slides are used to examine cellular samples from body fluids or tissues, aiding in the diagnosis of cancer and other cellular disorders.
- Microbial Analysis: Microscope slides are instrumental in identifying and studying microorganisms such as bacteria, fungi, and protozoa. They help microbiologists understand microbial morphology, behavior, and interactions.
- Botany and Zoology: Microscope slides are used in the study of plant and animal tissues, helping botanists and zoologists analyze cellular structures, identify different species, and explore various biological processes.
- Environmental Sciences: Microscope slides are utilized to examine environmental samples, such as water or soil, for the presence of microorganisms and other microscopic life forms. This aids in monitoring ecosystem health and understanding the impact of pollution.
- Quality Control and Industrial Applications: In various industries, microscope slides are used for quality control purposes. For instance, in the manufacturing of products such as pharmaceuticals, food, and textiles, slides are employed to assess product integrity and purity.
- Forensic Analysis: Forensic scientists use microscope slides to analyze trace evidence found at crime scenes, such as hair, fibers, and biological materials, to aid in criminal investigations.
What are the different types of microscope slides?
The types of microscope slides described in the provided content and the additional information are as follows:
- Flat Slides: Basic rectangular pieces of clear glass or plastic, usually 1 by 3 inches and 1 millimeter thick. They are covered with a cover slip when in use and may have frosted sides for orientation and labeling.
- Cover Slips: Small square pieces of clear borosilicate or silicate glass used to protect the specimen on flat slides. Number 2 cover slips are for general use, while Number 1 slips are thinner and used for higher magnification.
- Concave Slides: Rectangular slides with circular depressions to hold liquid solutions and larger specimens. They can be used with or without a cover slip and may feature dual concavities for comparing two different samples.
- Electrostatic Charged Slides: Special slides used for specimens that don’t adhere well to regular glass slides, such as certain cells, tissues, organs, and disease-causing elements like cancer cells.
- Etched Grid/Graticule Slides: Flat slides with grid-like etching to aid in specimen observation, measurement, and sketching.
- Transparent Mica Slides: A variation of regular glass slides used for small, dry, and rough particulates analyzed under high magnification. These slides are glare, scratch, and dust resistant.
- Plain Glass Slides: Plain glass slides are the most basic and widely used type of microscope slides. They consist of a flat, rectangular piece of clear glass with smooth, polished edges. These slides are suitable for general observations and can be easily cleaned and reused.
- Frosted Glass Slides: Frosted glass slides have one end frosted, which creates a frosted or matte area on the slide surface. This frosted area allows users to label or write notes using a pencil or special marking pen. They are commonly used in clinical and research settings where labeling and identification of specimens are crucial.
- Concavity Slides: Concavity slides have a depression or well in the center, creating a concave area on the slide. These slides are ideal for holding liquid or bulky specimens that may require more space. They are commonly used in microbiology and cytology for examining liquids or larger specimens.
- Chamber Slides: Chamber slides have removable or fixed chambers or wells, allowing researchers to separate different samples or conduct multiple observations on the same slide. They are often used for cell culture and live-cell imaging studies.
- Single Depression Slides: Single depression slides have a single shallow well or depression on the slide surface. They are used for holding small liquid samples or for preparing semi-permanent mounts.
- Double Depression Slides: Double depression slides have two shallow wells or depressions on the slide surface. These slides are useful for comparing two specimens side by side or for conducting paired experiments.
- Microscope Slide Kits: Slide kits are pre-packaged sets of microscope slides with prepared specimens, commonly used in educational settings. These kits offer a convenient way to study various biological samples without the need for individual slide preparation.
- Prepared Slides: Prepared slides come ready-to-use with mounted specimens. They are professionally prepared by experts and are commonly used in educational and research institutions to study specific biological structures or organisms.
- Specialty Slides: Specialty slides include various types designed for specific purposes, such as counting chambers for cell counting, hemocytometers for blood cell analysis, and hemacytometer slides for sperm counting.
- Plastic Slides: Plastic slides are made from materials like polystyrene and are often used for disposable applications or when glass slides are not suitable due to breakage concerns.
Each type of microscope slide is designed to cater to specific needs and techniques in microscopy, enhancing the efficiency and accuracy of specimen analysis and research. Choosing the appropriate slide type depends on the characteristics of the sample being observed and the intended method of examination.
How do I prepare a microscope slide?
Wet Mount (or Temporary Mount) slide Preparation
A wet-mount slide is a type of slide preparation used in microscopy, specifically for observing living samples, transparent liquids, and aquatic specimens. It involves placing the sample on a slide, adding a drop of water, and covering it with a coverslip to hold the sample in place through surface tension.
Advantages:
- Preservation of Living Specimens: Wet mounts are ideal for viewing microscopic living organisms without the risk of them drying out. The water drop provides a moist environment, allowing the organisms to remain alive and active during observation.
- Real-Time Observation: Since wet mounts keep the specimens alive, researchers and students can observe dynamic processes, movements, and behaviors of living organisms under the microscope.
Disadvantages:
- Time-Consuming: Preparing wet-mount slides takes more time compared to other slide preparation methods, as it involves placing the sample carefully and ensuring that air bubbles are minimized.
Wet mounts are particularly useful when observing living samples, such as:
- Saliva: For studying live microorganisms present in oral samples.
- Blood: To observe live blood cells and study their morphology and behavior.
- Aquatic Samples: For observing live microorganisms, algae, and other aquatic life.
Materials Required
To prepare and perform wet-mount slides for microscopy, the following materials are required:
- Slides: Tiny rectangular pieces of clear glass or plastic used as the base for mounting the specimen.
- Coverslips: Small square pieces of clear glass or plastic that are placed over the specimen on the slide to protect it and maintain a moist environment.
- Toothpicks: Used for transferring small specimens onto the slides and adjusting the positioning of coverslips.
- Water: A drop of water is used to suspend the specimen between the slide and coverslip, providing a moist environment for living samples.
- Clear Nail Polish: Used to seal the edges of the coverslip to prevent evaporation and secure the coverslip in place.
- Scissors: For cutting and preparing larger specimens or materials to fit on the slide.
- Forceps (optional): Fine-tipped tweezers that can be used to handle delicate specimens.
- Razor Blade: For obtaining thin sections of materials like plant tissues or other samples requiring fine slicing.
- Microscope: The main instrument for observing the specimens on the slides.
Materials for wet mount viewing can include various specimens such as:
- Cheek Cells (scrape): Obtained by gently scraping the inside of the cheek with a cotton swab or spatula.
- Tooth Plaque (scrape): Collected by gently scraping the surface of the teeth to obtain dental plaque.
- Fruit or Bread Mold (scrape): Collecting mold spores from fruits or bread.
- Dust: Collected from various surfaces for observation.
- Soil: Sampled from different areas for analysis.
- Dry Food: Coffee grounds, spices, salt, and sugar crystals can be used to observe their microstructures.
- Fabric or Threads: For studying the fibers and structure of textiles.
- Plant Material: Thin sections of plant tissues can be prepared for observation.
- Cork or Foam (thin slices—no coverslip needed): Certain materials like cork or foam can be thinly sliced and observed without a coverslip.
Additionally, other appropriate items that can be transferred using toothpicks or forceps can be used as well. These materials provide a diverse range of specimens to study, allowing for various observations and investigations under the microscope.
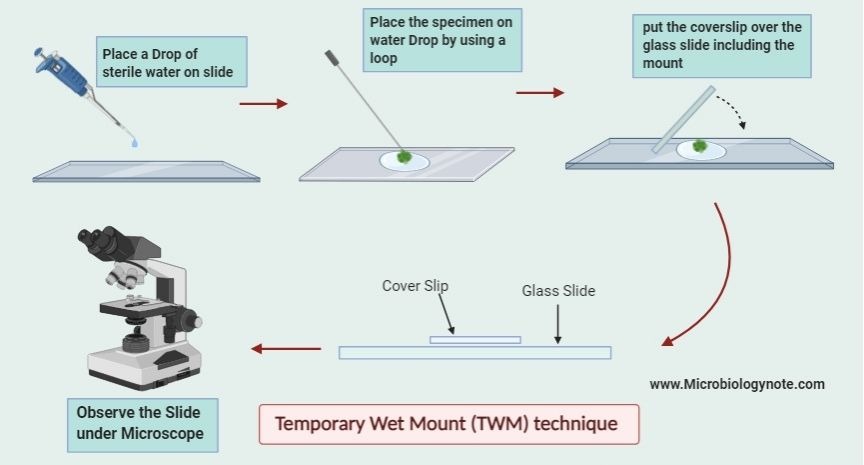
Wet Mount (or Temporary Mount) slide Preparation Procedure
The wet mount slide preparation procedure involves the following steps:
- Prepare the Slide: Place a small drop of water or clear nail polish on a clean microscope slide. The mountant, either water or nail polish, will secure the specimen and prevent it from moving or changing during observation.
- Gather the Subject Material: Use a toothpick or forceps to gather the non-liquid subject material you want to observe. Carefully transfer the material to the drop of water or nail polish on the slide.
- Transfer the Material: Touch the toothpick or forceps to the mountant drop, allowing the subject material to be transferred onto the slide. If needed, gently move the toothpick or forceps to dislodge the materials and ensure they are evenly spread.
- Add Coverslip: Carefully lower a coverslip onto the slide, ensuring it gently rests on top of the specimen and the mountant. The coverslip helps protect the specimen and create a flat surface for observation.
- Examine Under the Microscope: Place the prepared wet mount slide on the microscope stage and examine it under low and high magnification. Observe and explore the specimen’s details and structures.
- Record Observations: While viewing the specimen, make detailed observations. You can write a journal entry, sketch the specimen, or take photographs to document your findings.
- Cleaning and Reuse: A slide made with clear nail polish is semi-permanent, but if you want a temporary slide, carefully separate the slide and coverslip. Wash and dry them thoroughly, and they will be ready for reuse.
It’s important to note that the choice of mountant (water or nail polish) depends on the nature of the specimen. Water is typically used for observing living materials or creating temporary slides, while clear nail polish is used for more permanent slide preparations.
Carolina offers useful kits, such as the Oral Bacteria Kit and the Carolina™ Microscopic Discovery Kit, that provide all the necessary materials and detailed instructions for preparing various types of slides. These kits are especially helpful for educational purposes and can include a variety of sample materials to study, enhancing the learning experience in microscopy.
Dry mount Slide Preparation
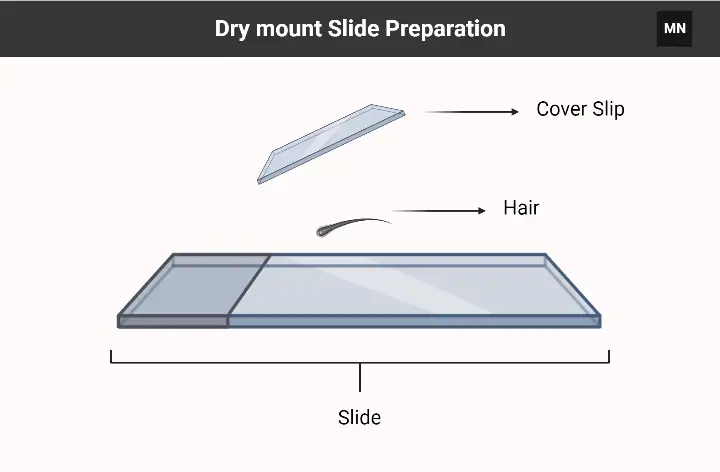
A dry-mount slide is a simple type of slide preparation where the sample is placed directly on a slide without any additional mounting medium. The sample can be left as it is or covered with a coverslip to hold it in place or flatten it, if necessary.
Advantages:
- Quick and Easy: Dry-mount slide preparation is quick and straightforward, requiring minimal steps and materials.
- Simple Procedure: The simplicity of this technique makes it accessible to beginners and students learning microscopy.
Disadvantages:
- Limited for Living Samples: Dry mounts are not suitable for observing living samples since they quickly dry out, causing the specimens to die and lose their natural characteristics.
Dry mount slides are typically used when observing samples such as pollen, feathers, and hair, as well as other non-living or inorganic materials.
Dry mounts are well-suited for low power microscopes, like dissection scopes, where the surface of the object is examined. For compound microscopes, it’s crucial to ensure the sample is very thin and flat to obtain clear and detailed observations. You may need to use a knife or razor blade to shave a section of the sample to achieve the desired thickness.
Dry mount slides are particularly useful for observing non-living and inorganic specimens such as hair, feathers, pollen, dust particles, and various dead matter, like insect legs or antennae. Opaque specimens may require very fine slices to ensure adequate illumination.
Since dry mounts are used primarily for inorganic and dead matter, they can theoretically last indefinitely, making them suitable for creating permanent slide preparations for long-term storage and observation.
Materials Required
To prepare and perform dry mount slides for microscopy, the following materials are required:
- Slides: Tiny rectangular pieces of clear glass or plastic used as the base for mounting the specimen.
- Coverslips: Small square pieces of clear glass or plastic that can be used to cover the specimen on the slide, if desired.
- Toothpicks: Used for transferring small specimens onto the slides and adjusting the positioning of samples.
- Forceps (optional): Fine-tipped tweezers that can be used to handle delicate specimens.
- Clear Nail Polish (optional): Used for creating a semi-permanent mount by sealing the edges of the coverslip to prevent evaporation and secure the coverslip in place.
- Scissors: For cutting and preparing larger specimens or materials to fit on the slide.
- Razor Blade: For obtaining thin sections of materials like plant tissues or other samples requiring fine slicing.
- Microscope: The main instrument for observing the specimens on the slides.
Materials for dry mount viewing can include various specimens such as:
- Feather: For observing the intricate structure of feathers and their microscopic features.
- Hair: To study the morphology and characteristics of hair under the microscope.
- Small Insect or Insect Body Part: For examining insect anatomy and structures.
- Newspaper or Magazine (cut to size): To observe the fibers and composition of paper materials.
- Cloth (cut to size): For studying the fibers and weave patterns of different fabrics.
- Plant Matter (such as leaf, seed, bark): Thin sections of plant tissues can be prepared for observation.
- Other Appropriate Items Transferrable by Toothpick or Forceps: This category includes various materials suitable for observation, which can be transferred using toothpicks or forceps.
When preparing dry mount slides, it is essential to ensure that the sample is relatively thin and flat to achieve clear and detailed observations. Some samples may require slicing or cutting with a razor blade or scissors to achieve the desired thickness. Dry mount slides are particularly useful for observing non-living specimens and inorganic materials, making them suitable for creating permanent slide preparations for long-term storage and observation.
Dry mount slide Preparation Procedure
The dry-mount slide preparation procedure is a straightforward process that involves the following steps:
- Gather the Dry Subject Material: Use a toothpick or forceps to gather the dry specimen or subject material you want to observe under the microscope. Ensure the material is relatively thin and flat for clear and detailed observations.
- Place the Material on the Slide: Position the dry subject material carefully on the center of a clean microscope slide.
- Optional: Use a Concavity Slide or Nail Polish: If needed, you can use a concavity slide to hold the specimen. Alternatively, for semi-permanent slides, you can add a drop of clear fingernail polish to the dry material on the slide before placing the coverslip. The nail polish acts as a mounting medium, securing the specimen and preventing it from moving or changing during observation.
- Add the Coverslip: Carefully lower a coverslip onto the slide, ensuring it gently rests on top of the specimen and the mounting medium (if used).
- Examine Under the Microscope: Place the prepared dry mount slide on the microscope stage and examine it under low and high magnification. Observe and explore the specimen’s details and structures.
- Record Observations: While viewing the specimen, make detailed observations. You can write a journal entry, sketch the specimen, or take photographs to document your findings.
- Cleaning and Reuse: If you created a temporary slide, you can separate the slide and coverslip. Wash and dry them thoroughly, and they will be ready for reuse for future observations.
Dry mount slides are well-suited for observing non-living specimens and inorganic materials, making them suitable for creating permanent or temporary slide preparations. For permanent slides, the use of clear fingernail polish as a mounting medium helps preserve the specimen and maintain its characteristics over time.
The simplicity and versatility of the dry mount slide preparation make it accessible to beginners and students learning microscopy. It allows for quick and easy observation of various dry samples, such as feathers, hairs, papers, fabrics, and other inorganic materials, providing valuable insights into their microstructures and features.
Smear Mount Preparation
A smear mount is a common technique used to prepare samples for microscopic examination, particularly in the case of blood samples.
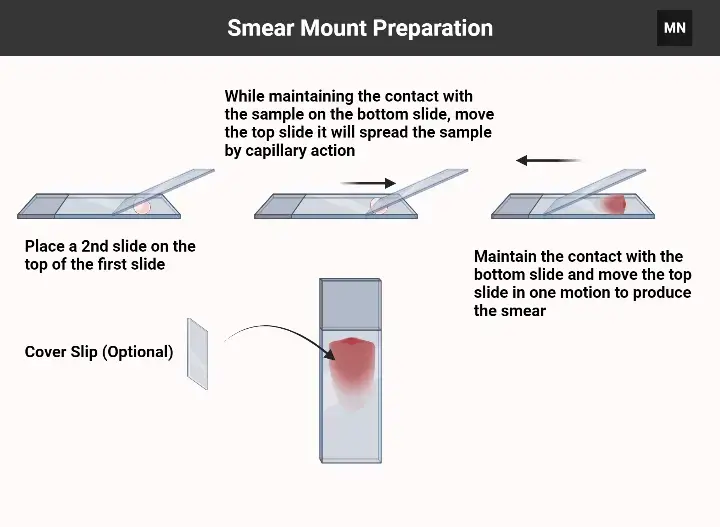
To prepare a smear mount, follow these steps:
- Prepare a Small Sample: Obtain a small sample of the specimen you want to examine under the microscope.
- Transfer the Sample onto a Slide: Place the sample on a clean microscope slide.
- From a Broth Culture: If the specimen is from a broth culture, use a sterile pipette to transfer 1-2 drops of the culture onto the slide. Spread the drop into an even smear, spreading it thinly along the length of the slide.
- From a Solid Media Culture: If the specimen is from a solid media culture, use a sterile pipette to transfer a drop of sterile water or saline solution to the middle of the slide. With a sterile inoculation loop, take a small sample of the culture and mix it evenly into the drop of sterile water or saline solution. Spread the mixture into an even smear, thinly across the length of the slide.
- Allow the Smear to Dry: Let the smear dry completely before proceeding to fixation. This step ensures that the specimen adheres to the slide’s surface.
- Fixation: Depending on the sample and the staining technique you intend to use, you may need to perform fixation. Heat fixation or methanol fixation can be used to adhere the smear to the slide.
- Optional Cover Slip: Using a cover slip is optional. If you choose to use one, carefully place it over the smear to protect the specimen during observation.
Smear mounts are commonly used to examine blood samples, but they can also be used for other specimens, such as microbial cultures and certain types of tissues.
After preparing the smear mount, you might consider whether staining the samples is necessary. Staining enhances the visibility of specific structures and components in the specimen, providing more detailed information during microscopic observation.
In summary, smear mounts are a vital technique in microscopy, especially for examining blood and microbial cultures. By following the proper preparation steps, you can create well-prepared slides for accurate and informative microscopic analysis.

Staining a Sample in Microscopic Slide
Microscope Slide Preparation Steps
Staining a sample is an essential technique in microscopy as it helps improve the contrast of the specimen, making its features more distinguishable under the microscope. By using different stains, you can highlight specific structures and characteristics, enabling better classification and identification of the specimen.
Benefits of Staining:
- Improved Contrast: Staining enhances the visibility of structures within the specimen, making it easier to distinguish various components.
- Shape and Features: Staining allows for the visualization of a specimen’s shape and distinct features, such as the presence of a nucleus in eukaryotic cells.
- Cell Viability: Staining can help differentiate between living and dead cells, providing insights into the health and condition of the specimen.
- Metabolic Processes: Some stains allow researchers to visualize metabolic processes within the specimen, aiding in the study of cellular activities.
Commonly Used Stains:
- Iodine: Used to stain carbohydrates in animal and plant specimens. It produces a dark-blue color when starch is present.
- Methylene Blue: Used for staining nuclei and other acidic cell parts in animal specimens (e.g., blood cells) and bacteria.
- Crystal Violet: Employed in Gram stains to classify bacteria. It stains them purple.
- Eosin Y: Used on plant and animal specimens (e.g., red blood cells) to stain cell membranes, cytoplasm, and extracellular structures in red or pink.
- Toluidene Blue: Used to demonstrate mitosis in plant cells by staining acidic cell structures (e.g., nuclei) dark blue.
Choosing the Right Stain:
The choice of stain depends on the specific specimen and the structures you want to highlight. Different stains have varying affinities for specific cellular components, enabling researchers to target specific features of interest. Therefore, understanding the specimen and the information you seek to uncover will help you select the most appropriate stain for your study.
Staining Techniques:
The method of staining varies based on the specimen and the staining media being used. There are different staining techniques such as simple staining, differential staining (e.g., Gram staining), and specific staining methods for highlighting particular cellular components. It is crucial to follow established protocols and procedures to ensure accurate and consistent staining results.
In summary, staining is a powerful tool in microscopy, enabling researchers to visualize and identify cellular structures and characteristics. By choosing the right stain and applying appropriate staining techniques, you can enhance the quality and depth of information obtained from microscopic observations.
Methylene Blue Staining of Bacterial Slide
Staining bacterial samples with methylene blue is a common technique used in microbiology to visualize the morphology and structures of bacterial cells under the microscope. Here is a step-by-step guide on how to perform methylene blue staining of a bacterial slide:
- Prepare a Bacterial Smear: Take a small sample of the bacterial culture you want to examine and prepare a bacterial smear on a clean microscope slide. The smear should be thin and evenly spread across the slide.
- Flood the Slide with Methylene Blue Solution: Using a sterile pipette, gently flood the slide with a methylene blue staining solution. Ensure that the entire smear is covered by the solution.
- Incubate for 1 to 3 Minutes: Allow the methylene blue solution to remain on the slide for approximately 1 to 3 minutes. The time can vary depending on the staining intensity desired and the bacterial species being observed.
- Rinse with Distilled Water: After the incubation period, rinse the slide with gentle streams of distilled water to remove excess stain from the slide. Make sure to thoroughly rinse the slide to prevent over-staining.
- Drain Excess Water: Gently tilt the slide to drain any excess water from the surface.
- Blot the Slide: Place the stained slide between two sheets of blotting paper to remove excess water from the slide’s surface.
- Air Dry the Slide: Allow the slide to air dry completely. Avoid using excessive heat or forced drying, as it may distort the bacterial structures.
Once the methylene blue staining process is completed, the bacterial cells should appear blue under the microscope. The methylene blue stain will bind to certain cellular components, such as nucleic acids, giving the cells a blue coloration. This staining enables you to visualize the morphology and internal structures of the bacterial cells, aiding in their identification and classification.
Methylene blue staining is a widely used technique in microbiology, providing valuable insights into the cellular characteristics of bacteria, and helping researchers and microbiologists to study and understand various bacterial species and their properties.
How to study glass microscope slides?
Studying glass microscope slides and observing microorganisms under a microscope can be a fascinating and educational experience. To ensure a successful and safe observation, follow these detailed steps:
- Prepare the Microscope: Place your microscope on a flat surface. If your microscope has an electric illuminator, ensure you have access to a nearby power outlet.
- Handle the Microscope with Care: When moving the microscope from one place to another, hold the tube holder with one hand and support the base of the tripod with the other hand. This will help prevent accidental drops and breakage of the instrument.
- Power On the Microscope: If your microscope has an illuminator, connect it to the power source and turn it on. Remove the eyepiece cover to prepare the microscope for observation.
- Place the Microscope Slide: Hold the microscope slide by its edges and place it on the microscope stage with the cover slip facing up. Slowly move the slide until the specimen is in the center, directly under the microscope objective lens.
- Start with the Low-Power Objective: Rotate the revolving nosepiece to position the objective lens with the lowest magnification (usually the smallest in size) over the specimen. Using the coarse adjustment knobs, lower the objective lens close to the slide without making contact. Observe the process directly on the microscope stage, not through the eyepiece, especially when using high-powered objectives.
- Focus the Image: Look through the eyepiece and slowly lift the objective lens away from the specimen using the coarse adjustment knobs until the image comes into focus. Once the image is focused, use the fine adjustment mechanism to achieve maximum sharpness.
- Changing Magnification: To increase the magnification, turn the revolving nosepiece to select a higher-powered objective lens. Again, carefully control the distance between the objective lens and the stage to avoid damaging the objective or specimen. Repeat step 5 to focus the image with the new magnification.
Remember to always handle the microscope and microscope slides with care to prevent damage. Following these steps will allow you to observe microorganisms and specimens under the microscope effectively, enhancing the educational experience and minimizing the risk of breakage.
What are Prepared Slides?
Prepared slides are microscope slides that come ready-to-use with mounted specimens for observation under a microscope. These slides are especially useful for educational purposes and for individuals who prefer not to undertake the laborious process of slide preparation themselves. Prepared slides cover a wide range of scientific areas and provide access to various specimens that may not be readily available to students or hobbyists.
Some common types of prepared slides include:
- Biology: Prepared slides in biology cover a diverse range of specimens, including plant tissues, animal tissues, and single-cell organisms. These slides allow students and researchers to study the morphology and cellular structures of different biological samples.
- Human Anatomy: This category includes prepared slides of human organ samples, tissues, blood smears, and epithelial cells. These slides are essential for studying human anatomy and physiology.
- Botany: Prepared slides in botany offer samples of monocot and dicot tissues, allowing researchers to study the anatomy of various plant species.
- Zoology: This category includes prepared slides from various animal species, providing insights into the anatomy and structures of different animals.
- Marine Biology: Prepared slides in marine biology showcase specimens of bacteria, algae, coral, fish, and crustaceans, enabling the study of marine life under the microscope.
- Pathology: Prepared slides in pathology are essential for studying bacteria, viruses, and diseased tissues, aiding in the understanding of diseases and pathological conditions.
Prepared microscope slides offer several advantages:
- Convenience: Prepared slides save time and effort as they come ready for observation without the need for slide preparation.
- Wide Range of Specimens: They provide access to a diverse array of specimens, allowing students and researchers to explore different areas of science.
- Control Samples: Prepared slides can serve as control samples for comparing and validating observations from collected samples.
- Indefinite Reuse: Most prepared slides are permanent, allowing for indefinite reuse, making them a cost-effective option for educational institutions and researchers.
Whether used for educational purposes, research, or personal interest, prepared microscope slides are valuable tools that facilitate the study of various biological and scientific subjects. They offer a convenient and comprehensive way to explore the microscopic world and enhance the learning experience in microscopy and the life sciences.
How to Make a Blood Smear Slide
Making a blood smear slide is a common technique used in microscopy to observe blood samples and distinguish individual blood cells. Here’s a step-by-step guide on how to make a blood smear slide:
- Prepare the Liquid Sample: Place a small drop of the liquid sample, in this case, blood, onto a clean microscope slide. The drop should be placed near one end of the slide.
- Create the Smear: Take a second clean slide and hold it at an angle to the first slide. Touch the edge of the second slide to the drop of blood on the first slide. Capillary action will draw the blood along the edge of the second slide. Slowly and evenly draw the second slide across the surface of the first slide, spreading the blood drop along the slide. This process creates a smear of the blood sample.
- Even and Gentle Motion: While creating the smear, try to maintain an even and gentle motion. Avoid applying excessive pressure, as this may distort the blood cells and affect the quality of the smear.
- Allow the Smear to Dry: Once the smear is created, you have two options. You can allow the slide to dry completely before staining it for further observation. Alternatively, you can place a coverslip on top of the smear immediately to protect it and facilitate direct observation without staining.
- Staining (Optional): If you choose to stain the blood smear for better visualization of the blood cells, you can follow appropriate staining techniques. Staining enhances the contrast and allows for more detailed observation of different blood cell types.
Blood smear slides are essential tools in clinical laboratories and medical settings for analyzing blood samples, identifying abnormal blood cells, and diagnosing various blood-related disorders. Properly prepared and stained blood smears provide valuable information about the composition and health of a patient’s blood cells, aiding in the diagnosis and treatment of various medical conditions.
What are the materials needed for preparing a microscope slide?
To prepare a microscope slide, you will need the following materials:
- Microscope Slide: A flat, rectangular piece of glass or plastic on which the specimen will be mounted.
- Cover Slip/Coverslip: A small, thin, square or circular piece of glass or plastic that is placed on top of the specimen to protect it and to flatten the sample for better observation.
- Specimen: The object or material you want to observe under the microscope. This could be anything from a small piece of plant tissue to a drop of liquid or a thin section of a biological sample.
- Mounting Medium/Mountant: A liquid or gel substance used to hold the specimen in place on the slide and prevent it from moving during observation. The mounting medium can also be used to enhance transparency and visibility of the specimen.
- Pipette or Dropper: Used to place a small drop of the mounting medium or liquid specimen onto the slide.
- Forceps: Tweezers-like tools used to handle delicate specimens and coverslips without touching them directly.
- Blotting Paper or Tissue: Used to remove excess liquid from the slide and coverslip during the mounting process.
- Microscope: The microscope is the main tool used to observe the prepared slide. Make sure your microscope is in proper working condition and properly calibrated for accurate observations.
- Staining Agents (Optional): If you want to enhance the contrast or visibility of certain structures within the specimen, you may need staining agents such as methylene blue, iodine, eosin, or other specific dyes.
Keep in mind that the specific materials needed may vary depending on the type of specimen you are preparing, the purpose of the observation, and the staining techniques (if any) you plan to use. For basic slide preparation, a microscope slide, cover slip, specimen, and mounting medium are typically the primary materials required.
What are the Common Objects to Examine With a Microscope?
Examining common objects under a microscope can be a captivating and educational experience. Various foods and everyday items can be prepared as microscope slides, allowing you to explore the microscopic world and discover the intricate details of these objects. Depending on the nature of the sample, you can use wet mount slides for liquids and wet samples, while dry mount slides are suitable for dry and solid objects. Here are some common objects that make fascinating subjects for microscope observation:
- Table Salt: Observe the crystalline structure of table salt under the microscope. The arrangement of salt crystals can be intriguing to explore.
- Epsom Salt: Similar to table salt, Epsom salt crystals can be studied to compare their unique crystal shapes.
- Alum: Examine alum crystals and observe their distinct patterns and formations.
- Dishwashing Detergent Powder: Observe the detergent particles and their interactions, especially if the powder contains additives or colorants.
- Sugar: Examine sugar crystals to see their different shapes and sizes.
- Mold from Bread or Fruit: Study mold samples from bread or fruit to understand the structures and growth patterns of fungi.
- Thin Slices of Fruits or Vegetables: Prepare thin sections of fruits or vegetables to observe their cellular structures and arrangements.
- Human or Pet Hair: Examine hair samples to explore their textures, colors, and scales.
- Pond Water: Collect a sample of pond water and prepare a wet mount slide to observe the diverse microorganisms, such as algae, protozoa, and other tiny creatures present in the water.
- Garden Soil: Create a wet mount slide of garden soil to observe the various soil particles, organic matter, and microorganisms that contribute to soil health.
- Yogurt: Study yogurt samples to see the live bacteria present and observe their movements.
- Dust: Collect dust particles from different surfaces and examine them to understand the composition and sources of dust in your environment.
What is the purpose of using a cover slip?
The purpose of using a cover slip (also known as a coverslip) in microscopy is to protect the specimen and hold it in place on the microscope slide. Cover slips are thin, transparent pieces of glass or plastic that are placed on top of the specimen, sandwiching it between the cover slip and the microscope slide. They are typically square or circular in shape and come in various sizes to match the dimensions of the microscope slide.
Here are the main reasons for using a cover slip:
- Protection: The cover slip provides a protective layer over the specimen, preventing it from being directly exposed to the objective lens of the microscope. This helps to avoid damage to both the specimen and the microscope lens.
- Flattening the Specimen: When working with wet mount slides or liquid samples, the cover slip helps to flatten the specimen, making it easier to observe and focus on specific areas under the microscope.
- Minimizing Evaporation: For wet mount slides, the cover slip helps to minimize evaporation of the liquid medium, keeping the specimen in a stable environment for extended observation.
- Reducing Contamination: The cover slip acts as a barrier, preventing contamination of the microscope lens by the specimen. It also helps to protect the specimen from external contaminants during observation.
- Enhancing Clarity: By placing the cover slip directly on top of the specimen, it reduces the distance between the objective lens and the specimen, which improves image clarity and sharpness.
- Facilitating Focus: The cover slip allows the microscope’s fine adjustment mechanism to work more effectively, making it easier to achieve precise focus on the specimen.
- Preserving Specimens: When using mounting media or permanent stains, the cover slip helps to seal and preserve the specimen for long-term storage and future reference.
How do I clean microscope slides?
Cleaning microscope slides is essential to ensure accurate and clear observations during microscopy. Here are the steps to properly clean microscope slides:
Materials Needed:
- Microscope slides
- Distilled or deionized water
- Dishwashing detergent or mild soap
- Soft lint-free cloth or lens paper
- Tweezers or forceps (optional)
Steps:
- Preparation: Gather all the used microscope slides that need to be cleaned.
- Remove Excess Debris: Use tweezers or forceps to carefully remove any large debris, dirt, or specimens from the slides. Be gentle to avoid scratching the slide surface.
- Rinse with Water: Rinse the slides under running tap water or immerse them in a container of distilled or deionized water. Swirl the slides in the water to remove any remaining debris.
- Cleaning Solution: Prepare a mild cleaning solution by mixing a small amount of dishwashing detergent or mild soap with water in a clean container. The solution should be gentle enough not to damage the glass surface of the slides.
- Cleaning Process: Dip the slides in the cleaning solution or apply a few drops of the solution directly onto the slide’s surface. Gently scrub the slide with a soft lint-free cloth or lens paper. Avoid using abrasive materials or rough cloths that could scratch the glass.
- Rinse Again: Rinse the slides thoroughly under running tap water or immerse them in a container of clean water to remove any soap residue.
- Dry the Slides: Use a clean, dry, lint-free cloth or lens paper to gently pat dry the slides. Avoid rubbing the slides vigorously to prevent scratches.
- Air Drying: Place the clean slides on a clean, dry surface or a wire rack to air dry completely. Ensure that the slides are in a dust-free environment during drying.
- Inspect for Residue: Before using the cleaned slides for microscopy, inspect them carefully for any residues or spots. If needed, repeat the cleaning process for stubborn stains or residues.
- Storage: Store the cleaned and dried microscope slides in a clean slide box or container to protect them from dust and dirt until they are ready to be used.
Note: Always handle microscope slides with care to avoid fingerprints and smudges. If you notice any stubborn stains or residue that cannot be removed with the above method, you can use specialized cleaning solutions designed for laboratory glassware or consult with your lab supervisor for guidance on proper cleaning procedures.
What are the common mistakes to avoid while preparing microscope slides?
Preparing microscope slides requires attention to detail and careful handling to ensure accurate and clear observations. Avoiding common mistakes can significantly improve the quality of the prepared slides and enhance your microscopy experience. Here are some common mistakes to avoid while preparing microscope slides:
- Contamination: Make sure to work in a clean and sterile environment. Contamination from dust, dirt, or other particles can obscure the specimen or lead to inaccurate observations.
- Air Bubbles: Air bubbles trapped between the slide and the cover slip can disrupt the observation and affect the clarity of the image. Ensure that the cover slip is carefully lowered onto the specimen to minimize air bubble formation.
- Using Dirty or Scratched Slides: Always use clean and scratch-free microscope slides. Dirty or scratched slides can interfere with the observation and affect the quality of the image.
- Uneven Smears: When making a smear slide, ensure that the sample is evenly spread across the slide. Uneven smears can result in inconsistent observations and make it challenging to focus on specific areas.
- Over-Staining or Under-Staining: When using staining techniques, be cautious with the amount of stain applied. Over-staining can lead to excessive coloration, obscuring cellular details, while under-staining may result in faint or indistinct structures.
- Using Too Much Mounting Medium: Applying an excessive amount of mounting medium can cause the cover slip to float or tilt, leading to uneven observations.
- Forgetting to Label Slides: Always label your prepared slides with the appropriate specimen information. Forgetting to label slides can lead to confusion and make it difficult to identify and reference the specimens later.
- Using Non-Compatible Staining Techniques: Some specimens may not be suitable for certain staining techniques. Ensure you are using the appropriate staining method for the specific specimen to achieve the desired results.
- Inadequate Drying: When preparing wet mount slides, ensure the excess liquid is removed carefully to prevent smudging or disturbing the specimen during drying.
- Skipping Cover Slips: Always use cover slips to protect the specimen and prevent damage to the objective lens. Skipping cover slips can lead to contamination and distortion of the specimen.
- Applying Too Much Pressure: When lowering the cover slip onto the specimen, avoid applying excessive pressure as it may damage delicate structures.
- Improper Storage: Store prepared slides in a proper slide box or container to protect them from dust and damage. Avoid stacking slides on top of each other without proper protection.
By being mindful of these common mistakes and taking the necessary precautions, you can ensure the quality and accuracy of your prepared microscope slides and enjoy a more rewarding microscopy experience.
How do I store prepared microscope slides?
Proper storage of prepared microscope slides is crucial to maintain the quality of the specimens and prevent damage or contamination. Here are some guidelines for storing microscope slides:
- Slide Box or Slide Cabinet: Invest in a slide box or slide cabinet specifically designed to store microscope slides. These storage options have slots or compartments to hold individual slides securely.
- Labeling: Ensure that each slide is properly labeled with relevant information, including the specimen type, date of preparation, and any staining or mounting details. Clear labeling will help you easily identify and reference the slides later.
- Orientation: Store the slides in the slide box or cabinet with the cover slip facing upward. This orientation helps protect the specimen and prevent dust from settling on the slide’s surface.
- Dry Slides: Make sure that the prepared slides are completely dry before placing them in the storage container. Excess moisture can lead to mold growth or deterioration of the specimen.
- Avoid Direct Sunlight: Store the slide box or cabinet in a cool, dry place away from direct sunlight or extreme temperature fluctuations. Exposure to sunlight or heat can damage the specimens.
- Avoid Humidity: High humidity can cause mold or fungal growth on the slides. Store the slides in a humidity-controlled environment or use desiccant packs to absorb excess moisture.
- Prevent Contamination: Keep the slide box or cabinet clean and free from dust and debris. Regularly clean the storage container to avoid contamination of the slides.
- Organize: Organize the slides systematically within the slide box or cabinet. You can sort them by specimen type, date, or any other classification that makes retrieval and reference easier.
- Avoid Stacking: Avoid stacking slides directly on top of each other, as this can lead to damage or scratching. If multiple layers are necessary, use separators or foam inserts between slides to protect them.
- Regular Inspection: Periodically inspect the stored slides for signs of deterioration, mold, or contamination. Replace damaged or compromised slides to maintain the integrity of your slide collection.
- Keep Records: Maintain a record or catalog of the slides in your collection, noting the contents, date of preparation, and any relevant details. This catalog will help you quickly find specific slides when needed.
By following these guidelines, you can ensure that your prepared microscope slides are well-preserved, easily accessible, and remain in excellent condition for future use and reference. Proper storage will also help you maintain the integrity of the specimens and ensure accurate and clear observations during microscopy.
What are the safety precautions to take while preparing microscope slides?
Preparing microscope slides involves handling various materials and chemicals, so it’s essential to follow safety precautions to protect yourself and others in the laboratory. Here are some safety measures to take while preparing microscope slides:
- Personal Protective Equipment (PPE): Always wear appropriate PPE, including lab coats, safety goggles, and disposable gloves, while working with specimens, chemicals, or staining reagents. PPE helps protect your skin, eyes, and clothing from potential hazards.
- Adequate Ventilation: Work in a well-ventilated area or use a fume hood when dealing with potentially hazardous chemicals or volatile substances. Proper ventilation helps to minimize inhalation exposure to fumes and vapors.
- Chemical Handling: Read and understand the safety data sheets (SDS) for all chemicals used in slide preparation. Follow the manufacturer’s instructions and recommended safety practices when handling, storing, and disposing of chemicals.
- Avoid Skin Contact: Avoid direct skin contact with chemicals and specimens. If accidental spills occur on the skin, promptly rinse with water and seek medical attention if necessary.
- Labeling: Label all containers with the contents and hazard information. Clearly mark containers that contain hazardous chemicals or staining reagents.
- Prevent Cross-Contamination: Use separate tools and equipment for different specimens to prevent cross-contamination. Clean and sanitize tools between different samples.
- Sharp Objects: Be cautious when using sharp tools such as scalpels or razor blades to prepare specimens. Handle these objects carefully to avoid cuts or injuries.
- Safe Disposal: Follow proper waste disposal procedures for used microscope slides, staining reagents, and other chemical waste. Dispose of hazardous materials according to local regulations.
- No Eating or Drinking: Avoid eating, drinking, or applying cosmetics in the laboratory area to prevent accidental ingestion of harmful substances.
- Emergency Equipment: Familiarize yourself with the location and operation of emergency equipment, such as eyewash stations and safety showers.
- Training: Ensure that you have received proper training in slide preparation techniques and safety protocols before working independently in the laboratory.
- Supervision: If you are new to slide preparation or working with hazardous materials, seek guidance and supervision from experienced lab personnel.
- Keep Work Area Clean: Maintain a clean and organized workspace to minimize the risk of accidents and spills.
- First Aid: Know the location of first aid supplies and procedures in case of accidents or injuries.
By following these safety precautions, you can reduce the risk of accidents and ensure a safe working environment while preparing microscope slides. Safety should always be a top priority in the laboratory to protect yourself and others and to ensure the accuracy and quality of your work.
How do I dispose of used microscope slides safely?
Disposing of used microscope slides safely is essential to prevent injuries and to adhere to proper waste management protocols. Since microscope slides may contain potentially hazardous materials, follow these guidelines for safe disposal:
- Decontamination: Before disposal, ensure that the used microscope slides are free from any hazardous or infectious material. If the slides contain hazardous chemicals or biological specimens, decontaminate them following appropriate laboratory protocols.
- Autoclave or Chemical Treatment: If the microscope slides have been used with biological specimens or infectious materials, autoclave them to sterilize and deactivate any potential pathogens. Alternatively, you can use appropriate chemical disinfectants as per your laboratory’s guidelines.
- Sharps Disposal: If the microscope slides have broken or sharp edges, handle them with extreme caution. Dispose of broken slides as sharps waste in puncture-resistant containers.
- Recycling: If your microscope slides are made of plastic and have not been contaminated with hazardous materials, you may be able to recycle them. Check your local recycling guidelines to ensure they are accepted.
- Non-Hazardous Waste Disposal: If the microscope slides are free from hazardous materials or infectious agents, they can be disposed of as regular non-hazardous waste. Place them in an appropriate waste container designated for glass or solid waste.
- Sealed Containers: To prevent injuries or potential contamination during disposal, place the used microscope slides in a sturdy, leak-proof container. Seal the container tightly before disposal.
- Proper Labeling: If required by your laboratory’s guidelines or local regulations, label the waste container appropriately with “Used Microscope Slides” to inform waste handlers of its contents.
- Follow Local Regulations: Always follow your institution’s or municipality’s regulations for waste disposal. Different regions may have specific guidelines for the disposal of laboratory waste.
- Hazardous Waste Disposal: If the microscope slides are contaminated with hazardous materials, chemicals, or biohazards, they must be disposed of according to your laboratory’s hazardous waste management plan or local regulations. Contact your lab manager or waste disposal services for guidance.
- Consult with Experts: If you are unsure about the proper disposal procedures for used microscope slides, consult with your laboratory manager, waste disposal experts, or environmental health and safety personnel for guidance.
Remember that proper disposal of used microscope slides is crucial to maintain a safe and environmentally responsible laboratory practice. Always prioritize safety and adhere to waste management guidelines to prevent accidents and protect the environment.
Conclusion
In conclusion, proper slide preparation is of utmost importance for success in the laboratory. Microscope slides are fundamental tools used to observe and study various specimens, from cells and microorganisms to tissues and complex structures. The quality of slide preparation directly influences the accuracy, clarity, and reliability of observations, making it a critical step in any scientific study.
A well-prepared microscope slide ensures that specimens are properly mounted, appropriately stained if necessary, and free from contamination or artifacts. This attention to detail allows researchers, students, and scientists to study specimens effectively, make accurate observations, and draw meaningful conclusions from their research.
Proper slide preparation also contributes to the longevity of specimens, enabling researchers to preserve and reference samples for future studies. Whether using wet mount slides for living specimens or dry mount slides for dry substances, precise techniques and careful handling prevent damage and ensure the integrity of the specimens.
Additionally, proper slide preparation enhances the safety of laboratory work. Following safety protocols while handling specimens, chemicals, and staining reagents safeguards researchers from potential hazards and minimizes risks associated with exposure to harmful materials.
To excel in the lab, one must pay close attention to the specific requirements of slide preparation, including cleanliness, accurate labeling, and appropriate storage. The ability to prepare high-quality slides is a valuable skill that empowers scientists and students alike to delve deeper into the microscopic world, unlocking new discoveries and advancing our understanding of the natural world.
In summary, mastering proper slide preparation is not only crucial for successful laboratory work but also paves the way for scientific progress and innovation. It is a foundational skill that empowers individuals to explore the fascinating intricacies of the microscopic realm and contributes significantly to the advancement of various scientific disciplines.
References
- https://www.carolina.com/teacher-resources/Interactive/make-microscope-slides-for-science-fair-projects/tr10768.tr
- https://www.microscopemaster.com/microscope-slides.html
- https://www.thoughtco.com/how-to-prepare-microscope-slides-4151127
- https://microscope-microscope.org/microscope-info/preparing-microscope-slides/
- https://www.microscope.com/education-center/how-to-guides/mount-slides/
- https://levenhuk.com/blog/knowledge-base-microscopes/step-by-step-guide-on-microscope-slides-preparation-and-further-use/
- https://www.opticscentral.com.au/blog/microscope-slide-preparation-guide/
- https://elementalscience.com/blogs/science-activities/how-to-make-a-microscope-slide
Related Posts
- Trinocular Microscope – Definition, Principle, Parts, Protocol, Uses
- Coarse Adjustment and Fine Adjustment Knob of Microscope
- Working Distance – Definition, Measurement, Types, Importance
- Pocket Microscope – Definition, Parts, Principle, Uses, Types
- Polarizing Microscopes – Principle, Definition, Parts, Applications

