

To understand how to use a microscope properly, it is necessary to follow the correct procedure for preparing, focusing, and observing the specimen.
A compound light microscope is used to observe small specimens with the help of light and magnifying lenses. The microscope is first placed on a stable surface and the light source is switched on. A prepared slide is placed on the stage, and the revolving nosepiece is adjusted to bring the lowest-power objective lens into position. The specimen is then observed through the eyepiece (ocular).
The observation always begins with the lowest magnification. It provides a wider field of view and helps to locate the specimen easily. The coarse adjustment knob is used for initial focusing under low power, while the fine adjustment knob is used to obtain a sharp and clear image.
Light passing through the specimen is controlled with the help of the condenser and iris diaphragm. Once the specimen is properly focused and centered, the magnification can be increased by changing the objective lens. Care must be taken while focusing, particularly under high magnification, as improper adjustment may damage the glass slide or objective lens.
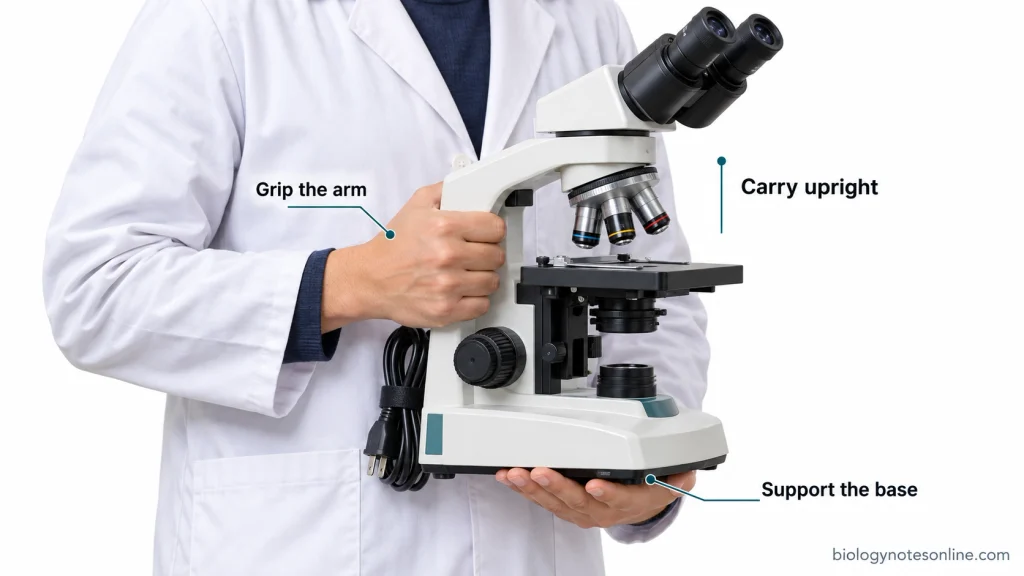
The microscope should be carried with both hands, one holding the arm and the other supporting the base. Some microscopes have different arrangements of stage movement and focusing controls, so the operating procedure may vary slightly depending on the microscope design. After completing the observation, the microscope is returned to its lowest-power objective, the slide is removed, and the light source is switched off.
Before Using a Microscope
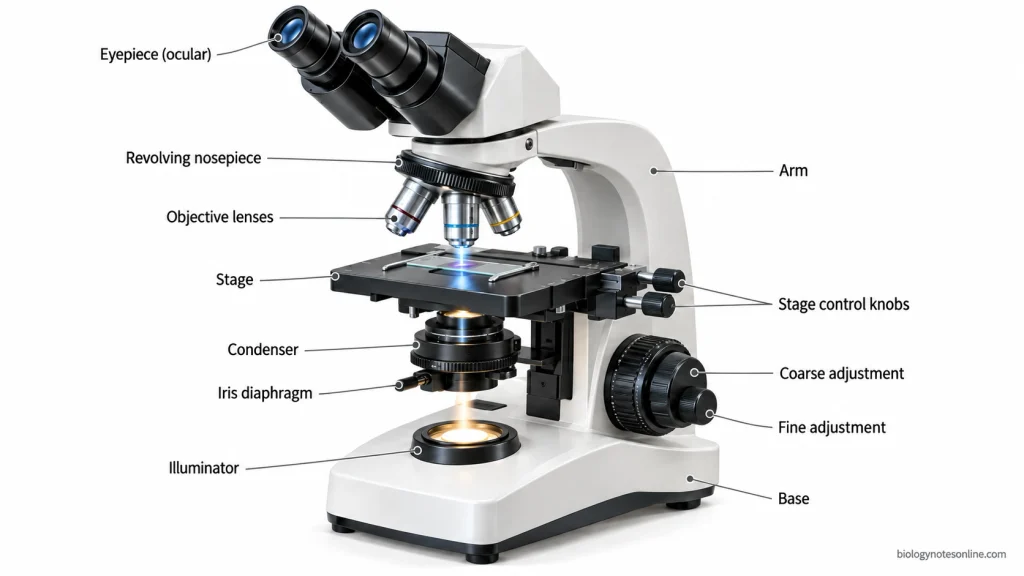
Before using a compound light microscope, the microscope should be properly set up for observation. The microscope has different optical and mechanical parts which are used for magnification, focusing, movement of the specimen and controlling the light. These parts and their controls must be identified before operating the microscope.
Essential Microscope Parts and Their Functions
The important parts of a compound light microscope which are required during observation and their functions are given below.
| Microscope Parts | Functions |
|---|---|
| Eyepiece (Ocular Lens) | This is the lens through which the specimen is viewed. It further magnifies the image formed by the objective lens. In most compound microscopes, it has a magnification of 10×. |
| Objective Lenses | These are the lenses located close to the specimen. They are used to produce images at different magnifications, commonly 4×, 10×, 40× and 100×. |
| Revolving Nosepiece | It is a rotating part which holds the objective lenses. The nosepiece is turned to change the objective lens for different magnification. |
| Stage | The flat platform used for placing the glass slide. It has stage clips or a mechanical slide holder which keeps the slide in its position. |
| Stage Control Knobs | These knobs move the slide towards the left or right and forward or backward. The slide can be moved without touching it by hand. |
| Coarse Adjustment Knob | It is used for initial focusing under low magnification. The stage or objective assembly moves through a relatively large distance during adjustment. |
| Fine Adjustment Knob | It produces very small focusing movements and is used to obtain a sharp image, especially when viewing under high magnification. |
| Light Source (Illuminator) | It provides the light required for illuminating the specimen. The brightness of the light is regulated by the light intensity control. |
| Condenser | The condenser is present below the stage. It collects the light coming from the illuminator and focuses it onto the specimen. |
| Iris Diaphragm | This part regulates the aperture of the light beam passing through the specimen, which helps in adjusting the contrast of the image. |
| Arm | It supports the upper parts of the microscope. The arm is also used for holding the microscope while carrying it. |
| Base | It is the bottom part which supports the entire microscope. In most compound microscopes, the light source is fitted in the base. |
Preparing the Microscope for Observation
The following preparations are required before starting the observation with a compound light microscope.
- The microscope should be carried with both hands. Hold the arm with one hand and support the base from below with the other hand. It should be kept in an upright position while carrying it to the laboratory bench.
- Place the microscope on a flat and stable laboratory bench, away from the edge. The working surface should be clean and dry. Avoid sliding the microscope across the bench after placing it, as it may disturb the optical components.
- Remove the dust cover from the microscope. The microscope is examined for any visible damage or loose parts. Check whether the stage and adjustment knobs are working properly. The electrical cord and its connection to the microscope should also be checked. Before connecting the microscope to the electrical outlet, make sure that the power switch is turned off. Keep the cord away from water and from a position where it can be accidentally pulled. The lamp can be switched on to check the light source.
- The eyepiece, objective lenses and condenser are examined for the presence of dust, fingerprints or oil. If the lenses are dirty, they are cleaned using lens paper and a suitable lens-cleaning solution recommended for the microscope. Ordinary tissue paper or rough cloth should not be used for cleaning the lenses. They may scratch the glass surface.
- The revolving nosepiece is rotated to bring the lowest-power objective lens (usually 4×) into position. It should fit properly into its position above the stage. Before placing the glass slide, sufficient space should be maintained between the stage and the objective lens to prevent accidental contact between the lens and slide.
- A suitable microscope slide is selected depending on the specimen to be examined. The two commonly used slide preparations are prepared slides and wet mounts. Prepared slides generally contain fixed and mounted specimens, which may also be stained for better visibility. In a wet mount, the specimen is placed in a drop of liquid and covered with a coverslip. It is commonly used for observing living cells and microorganisms. The slide and coverslip should be clean and free from cracks.
- In the case of a wet mount, the specimen should remain beneath the coverslip without liquid spilling over its edges. Check the outer surface of the slide for any excess liquid or specimen material. The slide is then kept ready for placing on the microscope stage.
How to Use a Microscope Properly: Step-by-Step
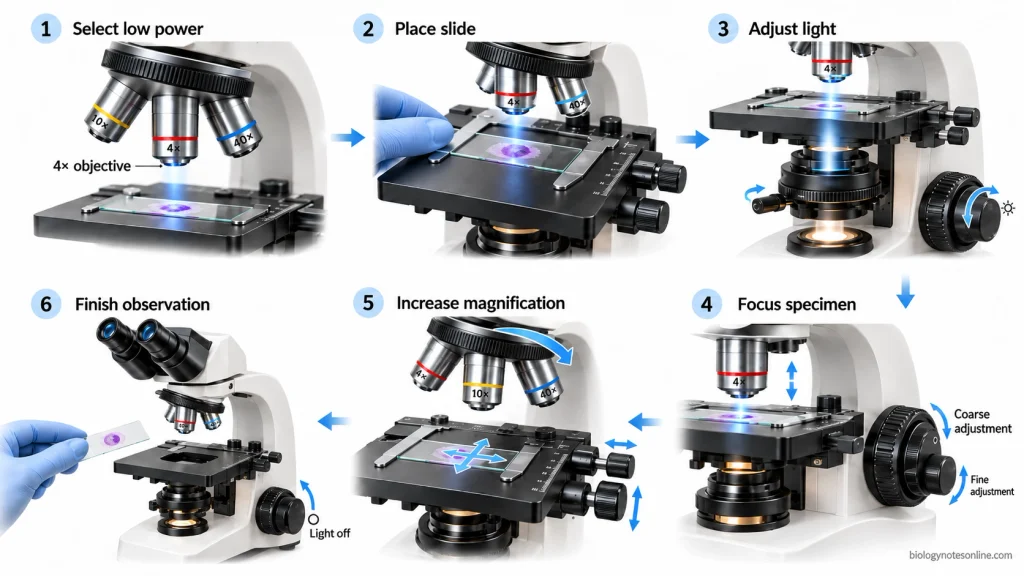
The following steps are used for operating a compound light microscope.
- Rotate the revolving nosepiece to bring the lowest-power objective lens (usually 4×) into position. Make sure that the objective lens clicks properly into its place.
- Place the prepared glass slide on the microscope stage, with the coverslip facing upwards. The slide is held in position using the stage clips or mechanical slide holder. It should not move freely during observation.
- Using the stage control knobs, move the slide until the specimen is positioned directly over the opening in the stage. Look at the slide from above to check its position. The specimen should lie in the path of the light coming from the illuminator.
- Switch on the microscope light source. Adjust the brightness with the light intensity control until a comfortable illuminated field is obtained through the eyepiece.
- Look through the eyepiece (ocular) and try to locate the specimen under the lowest magnification. At this magnification, a larger area of the slide is visible.
- The coarse adjustment knob is used to bring the specimen into initial focus. While looking at the microscope from the side, carefully bring the objective lens close to the slide without touching it. Now look through the eyepiece and slowly turn the coarse adjustment knob in the direction which moves the slide away from the objective until the specimen becomes visible. The direction of stage movement may be different in different microscope models. Avoid allowing the objective lens to come in contact with the glass slide.
- Once the specimen is visible, use the fine adjustment knob to obtain a sharp image. Turn the knob slowly until the details of the specimen become clear.
- The specimen or the particular region to be examined is then brought to the center of the field of view using the stage control knobs. This is done before changing to a higher magnification, as the visible area becomes smaller under high power.
- Adjust the light intensity according to the specimen. The iris diaphragm is used to regulate the aperture of the light beam and obtain suitable contrast. The condenser may also be adjusted when required. Excessive brightness or an improperly adjusted diaphragm can make the specimen details difficult to distinguish.
- For observing smaller details, rotate the revolving nosepiece to the next higher-power objective (e.g. 10× or 40×). Check the space between the objective lens and slide while changing the objective. At higher magnification, only the fine adjustment knob should be used for focusing. Do not use the coarse adjustment knob. If the specimen is lost or cannot be focused, return to a lower-power objective and locate it again before increasing the magnification.
- Observe the specimen carefully and record the required details, such as its shape, arrangement and visible structures. A labeled drawing may also be prepared. The total magnification should be recorded when required. It is calculated by multiplying the magnification of the eyepiece with that of the objective lens. For example, a 10× eyepiece with a 40× objective gives a total magnification of 400×.
- After completing the observation, rotate the nosepiece back to the lowest-power objective. Lower the stage to a safe position and remove the glass slide. Switch off the microscope and disconnect the power supply when required. Any dirt or oil present on the lenses should be cleaned using suitable lens paper and recommended cleaning solution. The microscope is then covered and kept in its proper storage place.
How to Focus a Microscope Correctly?
To focus a microscope properly, the distance between the objective lens and specimen is adjusted to obtain a sharp image. A compound light microscope has two focusing knobs, i.e. coarse adjustment and fine adjustment. Initial focusing is done under low magnification.
Coarse Adjustment vs. Fine Adjustment
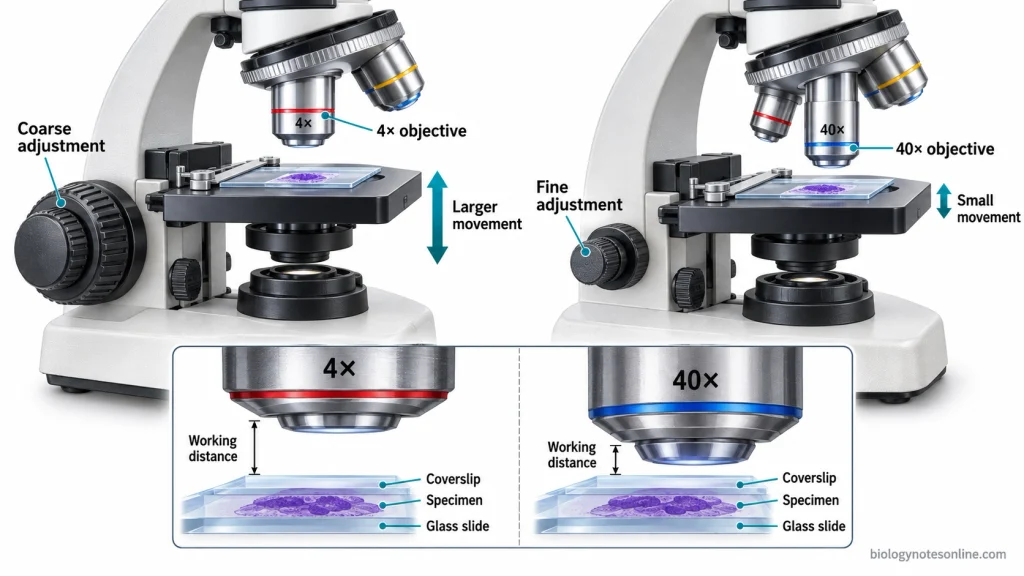
- Coarse Adjustment Knob- It is the larger knob used for initial focusing under low power (usually 4×). It moves the stage or objective assembly through a large distance. First, bring the objective close to the slide while looking from the side, without touching it. Then look through the eyepiece and slowly move the stage away until the specimen becomes visible.
- Fine Adjustment Knob- This knob produces very small movements of the stage or objective assembly. It is used to sharpen the image and bring the finer details of the specimen into focus, especially under high magnification.
- The coarse adjustment knob should be avoided under high magnification in standard teaching microscopes. At high power, the space between the objective and slide is very small. A large movement may damage the lens, slide or specimen.
Focusing at Higher Magnification
- The specimen is first focused and brought to the center of the field of view using the stage control knobs. Under higher magnification, a smaller area of the specimen becomes visible.
- Rotate the revolving nosepiece to change from a lower to higher objective (e.g. 10× to 40×), without moving the slide. Most modern compound microscopes have parfocal lenses. These lenses keep the specimen approximately in focus when the objective is changed.
- The distance between the objective lens and slide at focus is called working distance. It generally decreases as magnification increases. Check the clearance and do not force the nosepiece while changing objectives. At high power, only fine adjustment is used for focusing.
- If the specimen disappears, return to the lower-power objective and locate it again. Bring the specimen to the center and change back to higher power. The image is then adjusted with the fine adjustment knob. Non-parfocal microscopes may require larger focusing corrections according to the manufacturer’s procedure.
Adjusting Illumination for a Clear Image
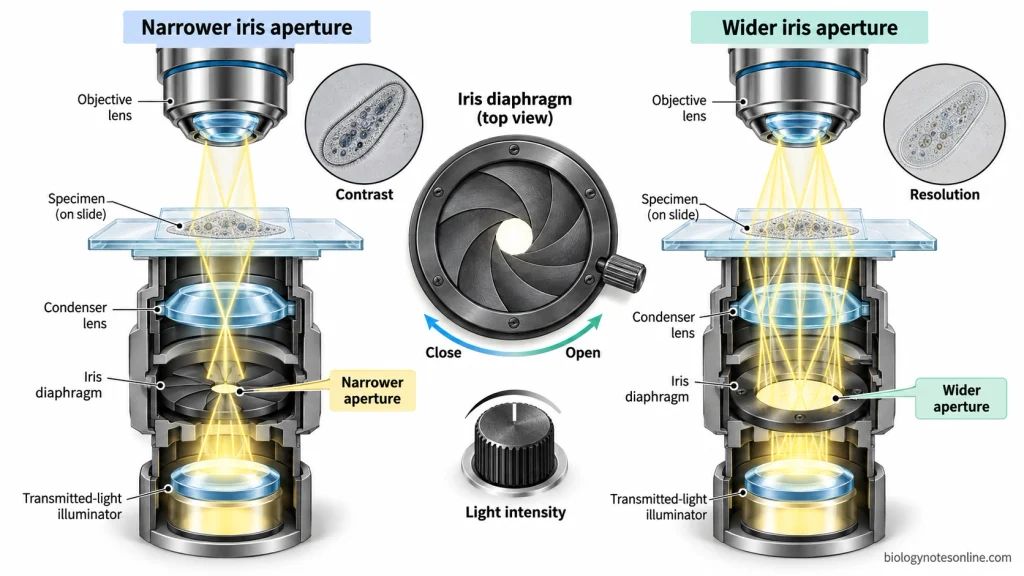
- The illuminator provides light for viewing the specimen. Its brightness is regulated by the brightness adjustment knob (rheostat). Excessive light may make the specimen appear washed out, particularly in unstained specimens. Very little light makes the details difficult to see.
- The condenser is present below the stage and focuses light onto the specimen. In microscopes with an adjustable condenser, its height and alignment can be changed to obtain uniform illumination and the available optical resolution.
- The iris diaphragm regulates the aperture of the light beam passing through the condenser. Partially closing it can increase contrast in transparent specimens. If it is closed too much, diffraction reduces the resolution and less light passes through. A widely opened diaphragm may produce a bright image with poor contrast.
- Brightness refers to the light intensity seen through the eyepiece. Contrast is the difference between the specimen and its background, while resolution is the ability to distinguish two closely placed points as separate objects. The light intensity and diaphragm opening are adjusted according to the specimen and magnification.
Microscope Magnification
Microscope magnification is changed mainly by rotating different objective lenses into the light path. The objective selected depends on the size of specimen and the amount of detail that has to be observed.
Changing Objective Lenses
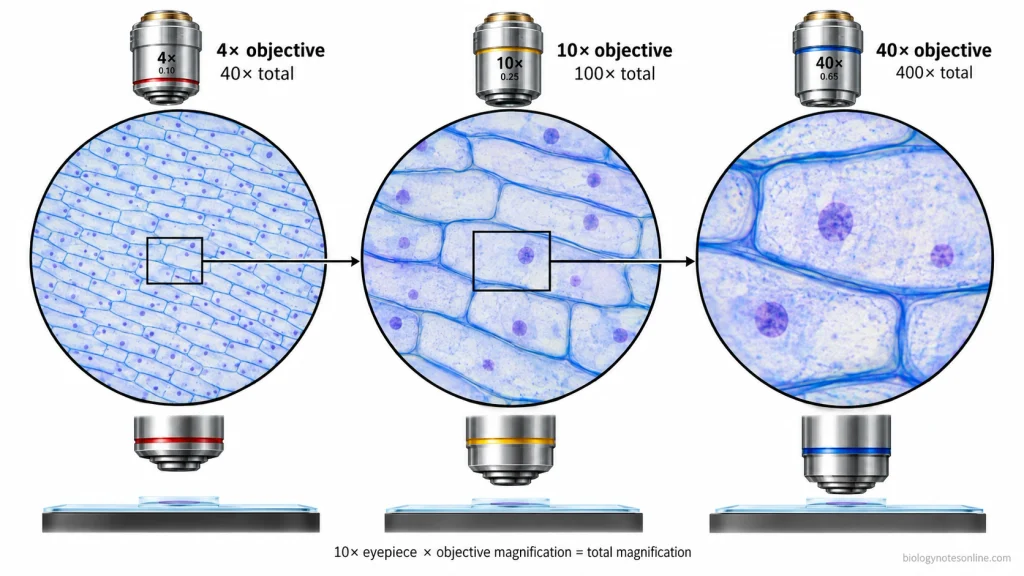
- A compound light microscope commonly contains 4×, 10×, 40×, and 100× objectives. The 4× lens is the scanning objective, 10× is low power, 40× is high dry, and a designated 100× objective is commonly used with immersion oil.
- Observation usually begins with the 4× scanning objective. It provides a large field of view, so a greater portion of the specimen can be seen at one time. After locating the required area, 10× or 40× objective can be selected when more magnification is required.
- The field of view becomes smaller as objective magnification increases. A specimen occupying only a small part of the field at 4× may fill much of the visible field at 40×.
- Working distance also becomes shorter with most higher-power objectives. Working distance is the space between the front of the objective and the specimen or coverslip when the specimen is in focus. A low-power objective normally provides more clearance, while high numerical aperture objectives work much closer to the slide.
- Higher objective power enlarges the specimen image, but magnification and resolution are not the same. Resolution is the ability to distinguish two close points as separate. It mainly depends on the numerical aperture (NA) of the optical system and wavelength of light. Higher-power objectives often have a higher NA and can resolve finer details, but simply enlarging an image without sufficient resolution produces no additional specimen detail.
Calculating Total Magnification
- The total magnification of a compound microscope is obtained by multiplying the magnification of objective lens by the magnification of eyepiece (ocular lens).Total magnification = Objective magnification × Eyepiece magnification
- With a typical 10× eyepiece, the total magnifications are as follows-
| Objective | Eyepiece | Total magnification |
|---|---|---|
| 4× | 10× | 40× |
| 10× | 10× | 100× |
| 40× | 10× | 400× |
| 100× | 10× | 1000× |
- The eyepiece enlarges the image already produced by the objective. A higher eyepiece magnification alone does not increase the actual resolving ability of the objective.
Using the Oil-Immersion Objective
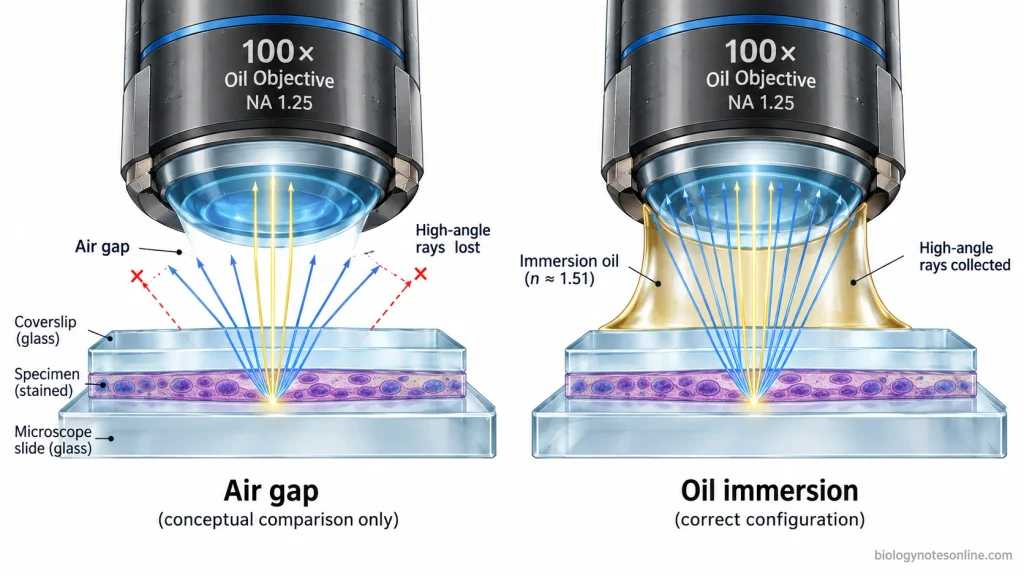
- The 100× oil-immersion objective is used when very small specimen details have to be examined at high magnification. It is commonly used for stained bacterial preparations where the objective is specifically designed for oil immersion. With a 10× eyepiece, a 100× objective gives 1000× total magnification.
- Immersion oil has a refractive index close to that of glass. The oil fills the air space between the slide and objective, reducing refraction and loss of light rays before they enter the objective. More light can be collected by a high numerical aperture oil objective, which improves resolution.
- Oil should be used only with an objective marked or specified for oil immersion. It must not contact 4×, 10×, or 40× dry objectives unless that particular objective is designed by the manufacturer for immersion use.
- When changing to oil immersion, the dry objective is moved away without passing it through the oil. A small drop of immersion oil is placed over the required area and the designated 100× objective is rotated into the oil. The manufacturer’s instructions should be followed because objective design and permitted immersion media can differ between microscopes.
- After observation, oil is removed from the 100× objective with lens paper and the cleaning material recommended for that microscope. Oil left on the lens can collect dirt or affect later observations. The dry objectives should remain free from immersion oil.
Microscope Safety and Handling Rules
The following precautions should be followed while handling and using a microscope-
- The microscope should always be carried upright with both hands. One hand holds the arm and the other supports the base. Carrying it with one hand or swinging the microscope can damage the optical alignment or cause the instrument to fall.
- Place the microscope on a stable and level laboratory bench, away from the edge. It should not be kept where it can be easily knocked over or pulled down by its power cord.
- The power cord should be kept away from walkways, water, chemicals, and moving parts of the microscope. A damaged or frayed cord should not be used. When disconnecting the microscope, pull the plug and not the cord.
- Never touch the eyepiece or objective lenses with fingers. Fingerprints and oil form smears on optical surfaces and reduce image quality. The lenses are cleaned only with suitable lens paper and the cleaning material recommended for the microscope.
- The slide must be properly placed and secured with the stage clips or mechanical stage holder before moving the stage. A loose slide may shift suddenly, fall from the stage, or get broken.
- An objective lens should never be allowed to strike the slide or coverslip. This can break the glass and may scratch or damage the front lens of the objective. Extra care is required when a high-power objective is close to the specimen.
- Coarse adjustment should not be used at high magnification. The coarse control moves the stage or objective through a comparatively large distance and can force the objective into the slide. Fine adjustment is used for the small focusing changes required at high power.
- Adjustment knobs and other movable parts should be turned gently. Never force a focus knob, revolving nosepiece, stage control, or any other part when it does not move freely.
- Slides containing potentially hazardous biological specimens should be handled according to the laboratory biosafety procedure. Required personal protective equipment (PPE), specimen containment, disinfection, and waste-disposal rules depend on the material being examined. Fixed or stained preparations should not automatically be considered free from biological hazards.
- The microscope stage and surrounding work area should be kept clean and dry. Spilled specimen material, immersion oil, water, or chemicals should be cleaned by the approved laboratory procedure. Liquids should not be allowed to enter electrical parts of the microscope.
- A damaged microscope, loose component, defective electrical part, or control that does not work normally should be reported to the instructor or laboratory staff. The microscope should not be dismantled or repaired by an unauthorized user.
Cleaning and Storing a Microscope
A microscope should be cleaned and returned to its proper storage condition after observation. The slide, immersion oil, dust, and other material should not be left on the microscope.
Cleaning the Microscope After Use
- First, remove the specimen slide from the stage. Slides should never be left on the microscope after use.
- Turn the microscope light off. Disconnect the microscope from the power supply after use, following the laboratory or manufacturer’s instructions. If the illuminator becomes hot during operation, allow it to cool before the microscope is covered.
- If the oil-immersion objective was used, remove the immersion oil after observation. Wipe the front lens gently with clean lens paper. Fresh areas of lens paper are used as oil is removed because dried oil and collected dirt can affect the objective lens.
- The eyepiece and objective lenses are cleaned only when required using lens paper and an approved lens cleaner. Ordinary tissue, paper towel, or fingers should not be used on optical surfaces. Cleaning fluids should also not be applied directly onto the lens unless specified by the microscope manufacturer.
- Clean the microscope stage and remove any oil, water, specimen material, or other residue present on it. The stage is kept clean and dry before storage.
- The outer surface of the microscope can be wiped carefully when required. Optical parts and internal components should not be taken apart for routine cleaning.
Proper Microscope Storage
- Rotate the nosepiece until the lowest-power objective is in the storage position. On many compound microscopes this is the 4× scanning objective.
- Lower the stage to its storage position so that sufficient distance is present between the objective and stage. The mechanical stage should also be positioned so that its movable parts do not project beyond the microscope.
- The electrical cord is arranged properly without tight bending, twisting, or leaving it loose where it can be damaged. Follow the cord holder or storage arrangement provided with the particular microscope.
- Place the dust cover over the microscope after the instrument is clean, dry, and the lamp has cooled.
- The microscope is returned upright to its designated cabinet, shelf, or storage area. It should be stored in a dry and protected place where the instrument is not exposed to dust, accidental impact, moisture, or chemical spills.
Common Microscope Problems and Solutions
Some microscope problems occur due to the position of specimen, incorrect focus, poor illumination, or dirty optical parts. The common problems and their possible solutions are given below-
| Problem | Possible cause | Solution |
|---|---|---|
| Specimen cannot be seen | The specimen may not be centered over the stage opening, or the objective is not completely clicked into position. The slide may also be placed incorrectly. | Check the position of slide and bring the specimen over the light opening. Make sure the low-power objective is properly locked into place. If required, check that the slide is placed with the specimen surface in the correct orientation. |
| Specimen is visible at low power but disappears at high power | The required area was not centered before changing the objective. Since the field of view becomes smaller at higher magnification, an off-center specimen can move outside the visible field. | Return to the lower-power objective and locate the specimen again. Center the required part before changing to higher power. |
| Image cannot be brought into focus | The microscope may be focused on the wrong plane, the slide can be upside down, or the objective may not be properly positioned. | Go back to low power and check the slide position and objective. A correctly adjusted parfocal microscope usually requires only a small change in focus when moving between objectives. |
| Image is hazy or blurry | Dust, fingerprints, dried immersion oil, or other material may be present on the objective or eyepiece. Oil accidentally present on a dry objective can also produce a poor image. | Clean the required optical surface with lens paper and approved lens cleaner. Do not use ordinary tissue or fingers on the lenses. |
| 100× objective gives a poor or unclear image | The oil-immersion objective may not be properly immersed in oil. Too little oil or air bubbles in the oil can interfere with the light path. | Check that the objective is designed for oil immersion and that immersion oil forms continuous contact between the slide and objective. Remove contaminated oil and apply fresh oil when necessary. |
| No light is visible through the eyepiece | The microscope may be unplugged or switched off. The brightness control may be at its lowest setting, the objective may not be clicked into position, or the illumination system can have a fault. | Check the power connection, light switch, brightness control, and objective position. If illumination is still absent after these basic checks, the microscope should be reported for inspection. |
| Image is too dark | The iris diaphragm may be closed too far, the condenser may be too low, or the lamp intensity is insufficient. | Adjust the illumination controls and condenser for the objective being used. The diaphragm should provide suitable light and contrast rather than remaining completely closed. |
| Field of view is partly dark or uneven | The objective may be between two positions on the revolving nosepiece. An improperly positioned condenser or incorrectly adjusted diaphragm can also give uneven illumination. | Rotate the objective until it clicks into place. Check the condenser and diaphragm position according to the microscope setup. |
| Dark spots or dirt remain in the field | Dust may be present on the slide, eyepiece, objective, condenser, or another optical surface. | Move the slide while observing. Material present on the specimen moves with the slide, whereas dirt on an optical part remains in the field. The affected optical surface is cleaned with proper lens-cleaning material. |
| Objective touches the slide | The slide may be upside down or the specimen has not been focused in the proper plane before changing to a higher objective. | Stop moving the stage immediately. Return to low power, check the slide orientation and establish the correct specimen plane before using higher magnification. |
| Fine adjustment cannot move farther in the required direction | The fine-focus mechanism may have reached the end of its travel. | Do not force the knob. Return to a lower objective and re-establish the focus range according to the microscope instructions. |
| Focus knob, stage control, or nosepiece is unusually stiff | The mechanical part may be jammed, damaged, or already at its movement limit. | Do not apply extra force. A stiff or malfunctioning component should be reported to the instructor or laboratory staff rather than dismantled by the user. |
| Microscope remains faulty after basic checks | A lamp, electrical connection, focus mechanism, objective, stage component, or another internal part may be damaged. | Stop using the microscope when continued operation can cause further damage. Internal repairs and adjustments should be performed only by authorized laboratory or service personnel. |
References
- Backus, G., Wangerin, H. W., & Rodgers, P. (2025). Anatomy and physiology I OER lab manual: Case-based laboratory exercises for the undergraduate A&P lab. Northern Virginia Community College. https://pressbooks.nvcc.edu/ap1labmanual/
- Virtual microbiology (2nd ed.). (n.d.). University of Wisconsin–Madison, Department of Bacteriology. https://instruction.bact.wisc.edu/book/toc?bid=3
- Wingfield, D., Bess, J., & Whitlock, J. (n.d.). Microbiology lab manual (Hillsborough College Dale Mabry). Hillsborough Community College. https://pressbooks.hcfl.edu/microlabmanual/