The pour Plate Method technique was created in the laboratory by Robert Koch and is still widely used in the laboratory since his time. This technique is appropriate for Microaerophilic, facultative, or anaerobic microorganisms. It is straightforward to use, requires fewer resources, and is simple and cost-effective. However, it requires the specimen to be placed in liquid or suspended.
What is Pour Plate Method?
A pour-plate method can be described as a laboratory method that is used to identify and count the viable microorganisms that are present in a liquid specimen, which is added with or prior to the addition of molten agar before it solidifies.
- Pour plates allow the microorganisms to develop both on the surface as well as within the medium.
- The majority of colonies are found in the medium and are tiny in size, and could be confluent.
- The small colonies that form on the surface are the same size and shape like those that grow on the streak plate.
- This technique is often used to measure the number of microorganisms found in a mixed sample. The sample is then added to a molten media prior to hardening.
- The result is colonies evenly distributed throughout the medium after the proper sample dilution has been placed on the plate.
- This technique can be used for performing viable plate counts in which the amount of colonies that form in the agar and on the surfaces of the agar plate is counted. Viable Plate counts provide scientists with an efficient method to create growth curves, estimate the number of cells within the tube where the sample was prepared, and also to study the impact of different circumstances or conditions of growth on the survival rate of bacteria as well as growth.
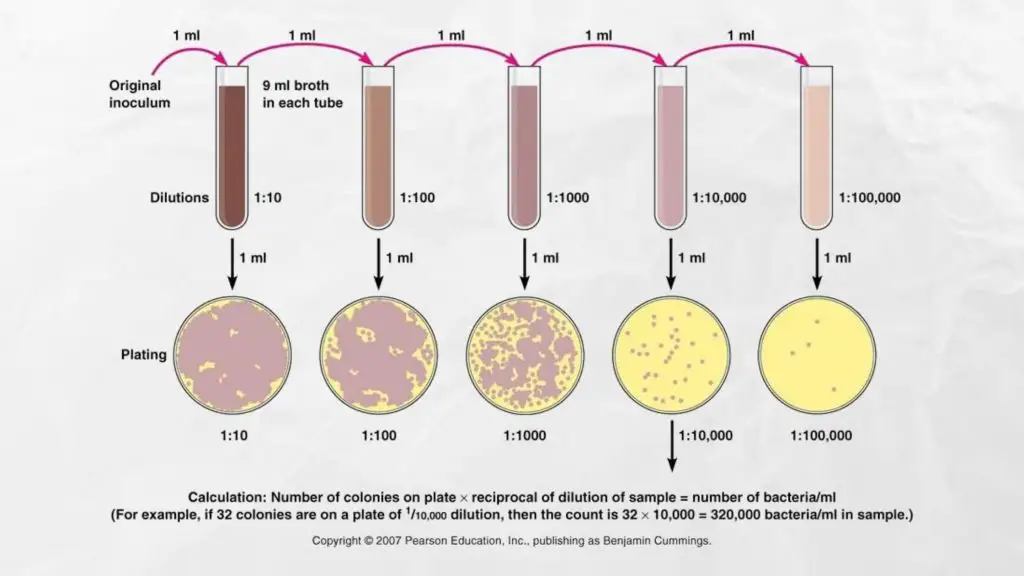
- Before performing the pour plate method the sample has to be diluted in series to bring the microbial burden within the sample ranging between 20-300 CFU/mL (suitable interval for counting colonies is 20-200 Some consider it to be 30 to 300, but on average, it is interpreted as 25-250).
- If the test sample is liquid then it is able to be serially diluted with sterile distillate water or sterile broth.
- When the specimen is either solid or semisolid it needs to be first emulsified, and then repeatedly diluted in order to decrease the amount of microbial concentration, within the acceptable limits.
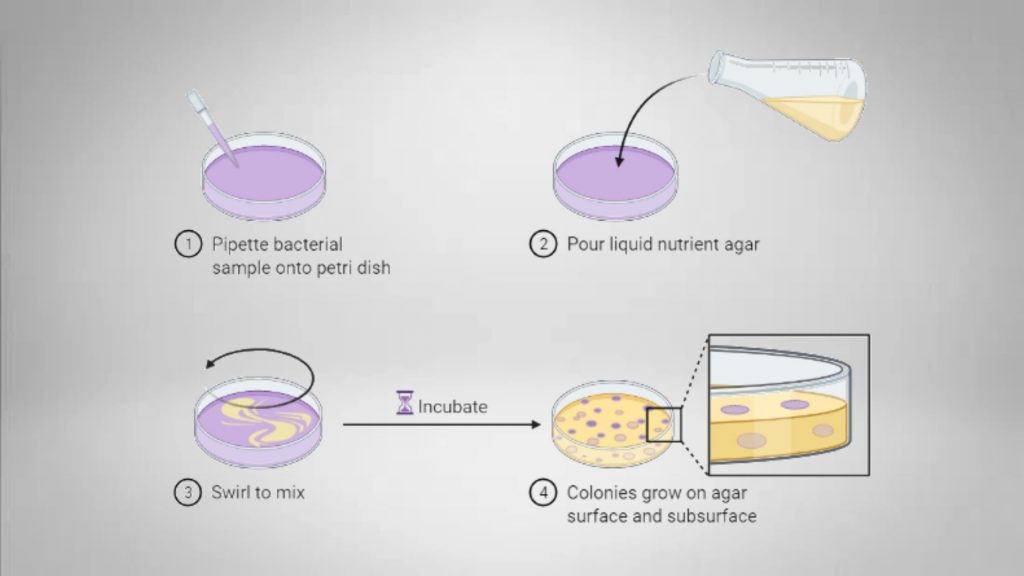
- The sample can be placed on the Petri plate and the molten agar solution is drizzled over it or the sample gets mixed into the hot medium before pouring.
- After pouring the sample into the Petri plate, the dish should be swiveled quickly in order to mix the samples with the medium.
- The mixture is allowed to be set and then incubated under appropriate conditions to develop the microorganisms within the specimen.
- After following the incubation period, the number of colonies that are isolated is counted.
- If the colonies become not countable or fused, or more than 300 CFU/mL , or under 20 CFU/mL it is suggested to repeat the process in order to get the most accurate count.
Purpose of Pour Plate Technique
- To isolate microorganisms that are present in suspension.
- To determine the amount of viable microbial population by counting colony forming units (CFU) per milliliter
- To isolate the purest microorganisms’ cultures from a mixed population
- To isolate microorganisms from distinct colonies to examine the characteristics of colonies
Principle of Pour Plate Method
For the pour-plate method, the fixed quantity of the inoculum (generally 1 milliliter) from a sample or broth is put in the middle of a sterilized Petri dish by using a sterile pipette. Agar that has been cooled to molten (approx. 15mL) is then placed in the Petri dish that contains the inoculum and then mixed thoroughly. After the agar’s solidification, the plate is then inverted and incubated at 37°C for 24 to 48 hours.
Microorganisms grow on the surface as well as inside the medium. Colonies that develop within the medium are generally tiny in size and could be confluent. The few that develop on the surface of the agar are similar in dimensions and look like the ones on the surface of a streak plate. Each (both small and large) colony is meticulously measured (using magnifying counters for colonies when needed). Each colony is a “colony-forming unit” (CFU).
The amount of microorganisms that are present in the test specimen is determined by the formula:
CFU/mL= CFU * dilution factor * 1/aliquot
To ensure accurate counts, the optimal count should fall within the 30-300 colony count range for each plate. In order to ensure that the plate is countable, it is recommended that a series of dilutions be coated. The pour plate method for bacteria’s count is much more precise than the streak plate method, but generally, it will yield less of a count since bacteria that are sensitive to heat may die when coming in contact with a hot molten medium of agar.
Materials and Equipment Required for Pour Plate Method
- Test sample: The specimen is either liquid or in suspension. The solid sample should remain suspended within a solvent that does not affect the growth of microorganisms or react with any substance in the medium.
- Plate count agar (PCA) or nutrient agar: The specific culture media is used for identification and differentiating the suspected (or specifically) bacteria. Examples of solid media include blood agar, nutrient and nutrient agar, McConkey agar, and chocolate agar. It is a solid medium that has been melted and has a temperature of 40 to 45degC.
- Petri Plates: Petri dishes is a flat, shallow dishes constructed of plastic or glass with a lid. It was used to store the agar layer for the growth of fungi and bacteria. It usually contains nutrients on which cells can thrive.
- Test-tubes: Test tubes are required to ensure that the sample is diluted in a series during preparation. The tubes need to be sterile.
- Flame: Flame is required to sterilize the tips of the pipette as well as lids, caps.
- Sterile Distilled Water (or Sterile Broth): It is utilized for serial diluting or for dissolving the semi-solid or solid sample.
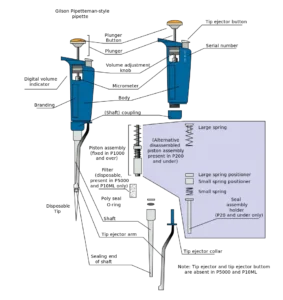
- Micropipette (e.g. 01, 1.0 and 2.0 mL): A micropipette (e.g. 01 and 1.0 2.0mL) is required to be used for measuring the sample during sampling and serial dilution.
- Laminar air flow: Essential for plating in order to decrease the chance of contamination.
- Colony Counter: Required to count colony on Petri Plates.
- Water bath: Required to maintain the the molten agar media.
- Autoclave: Required to sterilize the glaswares and pipette and prepare the agar media.
- Incubator: Required to incubate the plates.
Procedure of Pour Plate Method
1. Sterilize the glassware
- Place the petri dish and pipette in the autoclave bags prior to the autoclave.
- Place all the items into autoclave containers – ensure there is plenty of space in the bin.
- Then, autoclave for about 15 mins at 121°C (250degF).
- It is preferential to utilize a slow cool cycle for venting instead of a fast venting to decrease the chances that air pockets or steam form within the layer of glass.
- Glass is generally regarded as safe to autoclave. When autoclaving glass bottles with caps, ensure that the cap is loose prior to putting the pieces into the autoclave to stop the bottles from breaking and exploding. Often, aluminum foil and autoclave tapes are used to protect the interior of the bottle in sterile conditions.
2. Labelling
- Place sterile Petri plates. Label at the edge of the bottom of the Petri plates the dilution amount along with the date, time, or sample ID, as well as other necessary information.
3. Preparation of Sample/Serial Dilution
- When the specimen is in liquid form, then dilute it until you can get the microbial count to within 20 to 300 CFU/mL. When the specimen is semisolid or solid in form, dissolve it in sterile distilled water, sterile broth, or in any other solvent.
4. Preparation of Solid agar Media
- Choose the appropriate media according to the types of organisms. For instance, general-purpose media such as Nutrient Agar or Plate Count Aggar are suitable for bacteria and Potato Dextrose or Sabouraud Dextrose Agar are suitable for Fungi.
- Take a media bottle then Suspend 15 g of nutrient agar powder with 1 litre of distilled water. Mix it well.
- It is heated until the boil to dissolve the medium completely.
- The medium that has been dissolved is autoclaved at a pressure of 15 lbs (121degC) for 15 minutes.
- The media can cool down to around 40 – 45 degrees Celsius (maximum 55degC) However, do not let it harden.
- If the media has been prepared and is solidified, make it melt by placing it in a water bath or any other source of heat.
5. Inoculation
Direct inoculation Method
(you must hold the pipette as steady as possible.)
- Unscrew the cap or cotton wool plug in the bottle that contains the inoculum.
- Take the clean Pasteur pipette out of its container, then attach the pipette to your left hand.
- Take the bottle or test tube that contains the inoculum using your right hand.
- Take off the cap/cotton wool plug using the small finger on your right hand.
- Flam the bottle/test the tube neck.
- Take 1 mL of the sample by using a sterile pipette lightly.
- Dispense 1ml of the dilute sample into the center of the Petri plate using a sterilized micropipette or a calibrated pipette. (Put sample at the dilution you want in the Petri plate that is marked with the specific dilution percentage.)
- Take the pipette off and flame at the top of the bottle or test tube once again. Replace the cap or cotton wool plug.
- Place the test bottle or tube in the laboratory or on its rack.
- Unlock the lid of the bottle, and then flame the mouth. Pour around 15 mL of sterilized, molten media at the right temperature over the sample.
- Cover the plate, then mix the samples thoroughly with a gentle swirling motion on the plate. The plates are usually turned in the “S” or “8” shape.
(All the work is done within the Laminar airflow)
Indirect Inoculation Method
- Unscrew the cap or cotton wool plug in the bottle that contains the inoculum.
- Take the sterilized Pasteur pipette from the container, and attach the pipet to your right hand.
- Lift the test bottle or tube that contains the inoculum using the left hand.
- The cap or cotton wool plug is removed using the small finger of your right hand.
- Flam the bottle/test tube neck.
- Take 1 mL of your sample using a sterilized pipette to dilute it gently.
- In a tube that has approximately 15mL of the molten medium at a suitable temperature, add 1 milliliters of the sample.
- Remove the pipette, and then flame at the top of the bottle or test tube. Replace the cap/ wool plug.
- Place the test tube in the laboratory or on its rack.
- Mix the sample correctly within the media.
- Pour the media onto the sterile Petri plate.
- The dish should be moved gently so that the inoculum with the medium is thoroughly mixed, and to make sure that the medium is covering the dish evenly. You can either move the dish across three different directions, first, N-S followed by NW-SE and then turn it NE-SW, or move until the inoculum and the medium are well mixed and completely fill the bottom of the dish.
(All of this work will be done within the Laminar airflow)
6. Final Step
- Cover the lid of the Petri plate. Then, let the media fully solidify.
- Place the plate in an inverted position within an incubator, under the appropriate conditions for incubation (mostly for up to 24 hours at 37 degrees Celsius).
Result Interpretation of Pour Plate Method
After 24 to 48 hours of incubation, count all colonies (note that embedding colonies are smaller than those that are likely to grow in the air). A magnifying colony counter may assist in the counting of tiny embedded colonies.
Calculate CFU/mL by using the formula = (number of colonies x dilution factors) /Volume of culture plates*
Imagine that the plate from the 10^5 dilution produced 32 colonies. Then, the total amount of colony-forming units per milliliter of the samples is (32) x (104 ) x1*= 3.2 x 10⁵
*We’ve used a one-milliliter sample for this pour-plate technique.
To get the best count or optimum count, the number of colonies needed to be in the range of 20 to 300 CFU/mL. Above this threshold the entire procedure should be repeated. If the total number of colonies is less than 20 it is recommended to utilize the lower dilution sample If the number of colonies is greater than 300, then it’s recommended to choose the sample with greater dilution for subsequent repeats.
If the colonies have fused or the entire plate is covered by one colony, you should report the result that the colonies are “too numerous to count” (TNTC) and take the sample with a higher concentration.
Precautions
- The protocol must be followed in all aseptic conditions, particularly in Laminar air Flow (Safety Cabinet) to prevent contamination.
- Make sure you accurately measure the amount when preparing the serial dilutions from the sample.
- Use sterile pipettes each time to prevent any mistakes or contamination that may occur.
- Determine the exact amount of dilute specimen prior to injecting it onto Plates of Solidified Media Plates.
- Spread the specimen uniformly on the Media plate until you get clear and healthy colonies.
Applications of Pour Plate Technique
- It is used to separate pure cultures from mixed cultures.
- It is used to identify and count viable fungi and bacteria (calculate CFU per ml) from liquid samples.
- Utilized to create growth curves to study biochemical and microbial metabolic processes and the effect of environmental conditions on the growth of microbial species.
- It is used to isolate discrete colonies for the purpose of obtaining pure cultures and for studying biochemical characteristics.
- This process is employed in various industrial applications. For instance, it’s essential for wastewater treatment plants that are used to test the microbial and chemical contamination of treated water.
- Pharmaceutical companies must evaluate the level of microbial contamination or bioburden of a newly developed medication during its production, storage and transportation. By sampling the drug through different stages of the process and then plating samples with the pour-plate method to determine the microbial load or the number of bacteria that are contaminating is easily determined. Then, precautionary measures can be developed to limit or eliminate microbial contamination.
- Utilized to isolate and count microorganisms in soil for research into soil microflora.
Advantages of Pour Plate Technique
- There is no possibility of gouging during inoculation, as in spreading and streaking.
- It can be used with any kind of sample, such as environmental or clinical samples either solid or liquid (it may be dissolvable).
- It can be used to isolate anaerobic and facultative microorganisms. Aerobes can also be isolated using this method.
- It’s easy to do and doesn’t require any additional tools or equipment to inoculate. It doesn’t require a previously solidified agar medium.
- Even a minimal microbial load may be identified.
- In addition to being able to isolate microorganisms, their colonies that are isolated can be collected. The CFU/mL count can also be determined.
Limitations of Pour Plate Technique
- The organisms that are heat sensitive are susceptible to being affected by molten media between 40-45degC.
- Colonies could be smaller than those in spreading or streaking, which can increase the probability of ignoring them.
- Obligate aerobes could have trouble growing towards the lower portion of the plate. Some don’t even grow.
- It is time-consuming since it requires dissolving these solids, a series of diluting, and then melting the media at a particular temperature (42 to 45degC).
- Semisolid or solid samples should be suspended prior to the inoculation. It can be very difficult to do this to inoculate if the sample isn’t easily dissolved.
- It is necessary to perform regular dilutions of the sample or else many colonies will form that aren’t able to be counted and recognized as distinct.
- It takes time for the growth of the organisms and the creation of colonies. There will be a lower supply of oxygen to the microbial cells in the lower part of the media solidified which is why they grow slowly.
References
- VAN Soestbergen AA, Lee CH. Pour plates or streak plates? Appl Microbiol. 1969 Dec;18(6):1092-3. doi: 10.1128/am.18.6.1092-1093.1969. PMID: 4905698; PMCID: PMC378201.
- https://www.science.gov/topicpages/p/pour+plate+method.html
- https://krishi.icar.gov.in/jspui/bitstream/123456789/32554/1/4_Plating%20methods.pdf
- https://practicalbiology.org/standard-techniques/making-a-pour-plate
- https://microbenotes.com/pour-plate-technique-procedure-significance-advantages-limitations/
- https://microbeonline.com/pour-plate-method-principle-procedure-uses-dis-advantages/
- https://paramedicsworld.com/microbiology-practicals/pour-plate-culture-method-isolation-bacteria-microorganism-pure-culture/medical-paramedical-studynotes
- https://www.synbiosis.com/application-notes/pour-plate/
- https://www.researchgate.net/figure/A-comparison-between-the-pour-plate-method-and-the-spread-plate-method_fig6_257380059
- https://www.researchgate.net/figure/Pour-plate-technique-A-A-small-volume-of-sample-between-01-to-10-ml-is-dispensed_fig3_225056141
- https://biocheminsider.com/pour-plate-method-principle-procedure-uses-and-advantages/
- https://www.neutecgroup.com/resource-library/microbiology-lab-automation/application-notes/223-serial-dilution-a-nightmare-for-the-microbiologists
- https://www.fda.gov/food/laboratory-methods-food/bam-chapter-18-yeasts-molds-and-mycotoxins
Parabéns a toda equipe.Esta nota de Bio foi a melhor. Obg por compartilhar.