The term Giemsa stain originated from a name of German chemist and bacteriologist Gustav Giemsa. He apply this stain with a combination of reagents to detect the presence of malaria parasites.
This stain is used for nucleic acid staining and histopathological diagnosis of malaria and other parasites. Giemsa Stain is a types of Romanowsky stains which is universally used for the staining of blood cells.
It is also a differential stain, it can differentiate between human and bacterial cells and appeared as purple and pink colored bodies respectively. It furtehr utilized to study the adherence of pathogenic bacteria to the human cells.
Romanowsky stain is a mixture of mixture of oxidized methylene blue, azure, and Eosin Y. This stain is applied on a air-dried slide which is post-fixed with methanol. Methylene blue has a high affinity for acidic components of the cell such as Nucleus, becasue it is a basic dye. While Azure is a acidic dye thats why it has a high affinity for the basic components of the cells such as cytoplasm and Granules.
Romanowsky dyes are mostly prepared with Methyl alcohol (Methanol), therefore they act as a good fixative as well as the cellular stain.There are four types of Romanowsky stains such as;
- Giemsa Stain
- Leishman Stain
- Field’s Stain
- Wright’s Stain
Giemsa stain principle/giemsa stain mechanism
Giemsa stain is typically used when there is a need to examine the Blood smear for parasites, but it is also a good stain for routine examination of blood smear and is used to differentiate nuclear and cytoplasmic morphology of the various blood cells, including Platelets, RBCs, and WBCs, as well as parasites. This is the most reliable stain for detecting blood parasites, especially in viscous blood smears.
The same operating principle applies to Giemsa stains as described previously. As it is a form of Romanowsky stains, it contains both acidic and basic dyes, which have an affinity for the acidic and basic blood cell components, respectively. The acidic dyes, Eosin and Azure, stain the basic components of the cell, such as the cytoplasm and granules, while the basic dye, methylene blue, stains the acidic components, particularly the nucleus. Depending on the technique, the stain must be diluted with water buffered to pH 6.8 or 7.2 before application.
Almost every laboratory has distinct Standard Operating Procedures (SOPs) based on the quality of the staining solution and buffer they use and the purpose of the staining. Do not regard this article to be the only correct method for Giemsa staining the Blood smear.
Reagents Required
- Giemsa Stain (Stock Solution)
- Microscopic Glass Slide
- Phosphate buffer (pH 7.2)
- Graduated pipettes
- Measuring cylinder
- Distilled Water
- Pasteur pipette
- Coplin Jar
- Blood Specimen – The blood specimen used is typically fresh whole blood collected by finger puncture (capillary puncture) or EDTA anticoagulated whole blood collected by venipuncture, and it should be less than one hour old for optimal results. Blood samples may also be collected in Heparin or Sodium Citrate for parasite identification.
Most laboratories use commercially prepared Giemsa stain solutions, which are then diluted in various proportions for various purposes. However, it is simple to produce in the laboratory.
Preparation of Giemsa Stain
Giemsa is the most common stain used to stain blood films for the diagnosis of malaria. It is commercially available as a ready-to-use product, but the quality fluctuates by source. By adhering to simple guidelines, laboratories can produce a stock solution of Giemsa stain from Giemsa stain powder, ensuring the use of a consistent, high-quality stain.
Composition
The essential components of Giemsa stain are identical; however, depending on their application, they can be diluted.
| Ingredients | Gm/L |
| Giemsa powder | 7.6 |
| Glycerol | 500 ml |
| Methanol | 500 ml |
Supplies, Materials, and equipment
Giemsa powder or stain, 7.6 g (preferably Biological Stain Commission grade, to guarantee a very good product of standard quality; absolute methanol, pure, high-grade, acetone-free, 500 mL; glycerol, high-grade, pure, 500 mL; methanol-cleaned solid glass beads, 3-5 mm in diameter, 50-100 pieces; a spatula or measuring spoon; weighing paper; a graduated
- The person preparing the Giemsa stain should observe universal precautions, such as wearing gloves, safety eyewear, and a laboratory coat.
- Avoid contact with methanol and Giemsa stain, as well as inhalation. Methanol and Giemsa stain are exceedingly toxic and flammable if inhaled or ingested. When not in use, store both chemicals in a locked cabinet or storage.
Preparation of Giemsa Stock Solution
- Place approximately one hundred glass beads that have been cleansed with methanol into a dark or amber bottle.
- On an analytical balance, weigh 7.6 g of Giemsa stain powder, and then pour it through a funnel into the container containing the beads.
- Gently pour approximately 200 mL of methanol into the vial, ensuring that all dry stain is dissolved.
- Tighten the bottle’s screw lid and shake it for two to three minutes to begin dissolving the stain crystals.
- Add 500 mL of glycerol through the funnel to the mixture, and agitate again for 3 to 5 minutes.
- Add the remaining 300 mL of methanol to the mixture through the funnel, making sure that the final addition of methanol washes the residual glycerol from the funnel into the stain mixture.
- Tighten the bottle’s screw-on lid.
- Always keep the bottle securely sealed to prevent the absorption of water vapor and the evaporation and oxidation of the stain caused by high humidity. If the container is airtight and devoid of moisture, the Giemsa stain is more stable at room temperature.
- Shake approximately six times on the first day for two to three minutes each time.
- Shake for at least seven days daily for approximately two to three minutes, six times per day. If an agitator is available, it may be used.
- Clearly label the container with the batch number, the name of the individual who prepared the stock, the date of preparation, and the expiration date, and record this information in the quality control logbook.
- Giemsa stock solution
- Lot Number: 2022-01 Prepared by: Initial Last name
- Date of preparation: August 17
- Expiration date: 17 August 2024 The number 2022-01 denotes the year of production and the stock number.
- To prevent the bottle from absorbing water vapor from the air, tighten the screw-on closure and store it in a cool location out of direct sunlight.
- Do NOT contaminate the stock Giemsa solution with water; even the tiniest quantity of water will cause the stain to degrade, rendering staining ineffective. Avoid direct sunlight and store in a dark glass container in a cool, dry, shady location. Wrap a transparent stock bottle in thick, dark paper to prevent light from penetrating.
Working Solution of Giemsa Stain
Giemsa stain working solution must be freshly prepared from Giemsa stock solution. The Giemsa working solution for malaria blood film staining is either 10% (for the rapid technique) or 3% (for the slow method), depending on the method of staining.
In outpatient clinics and laboratories where a rapid diagnosis is essential for patient management, a rapid method is used, whereas a sluggish method is used for staining a large number of slides collected during epidemiological or field work.
Rapid (10% working solution) method
- Standard method for staining 1 to 15 specimens simultaneously.
- Utilized in crowded clinics and laboratories
- Method that is effective but costly (since more stain is consumed)
Slow (3% working solution) method
- Used for staining more than twenty transparencies.
- Ideal for staining blood films collected during cross-sectional or epidemiological surveys, field research, or preparing quantities of slides for teaching Time-consuming method, so less suitable when a rapid result is required.
- Less expensive than the rapid method because it requires significantly less stain.
Materials and Supplies
- Giemsa stain, transferred and filtered from the stock solution into a 25-or 50-ml bottle;
- buffered water, pH 7.2;
- a beaker or tube, clean, 5-10-ml capacity;
- a Pasteur pipette and
- Whatman filter paper, grade #1.
Preparation of Giemsa Working Solution
Prepare a functional solution of either 10% or 3% Giemsa, depending on your needs. Approximately 3 mL of stain is required per blood film exposure.
- Place 90 mL of pH 7.2 buffered water in a clean beaker or test tube.
- Using Whatman No. 1 filter paper, transfer the Giemsa stock solution to a 25 to 50 mL container.
- Using a clean, dry pipette, add 10 mL of Giemsa stock solution. To prevent contamination, do not remove the aliquot from the large vial containing the Giemsa stock solution.
- Prepare the Giemsa working solution immediately prior to staining the blood film(s), and use it within 15 minutes. Throw away any unused stain.
- To produce a working solution containing 3% Giemsa, repeat the steps outlined above, but combine 97 mL of buffered water with 3 mL of Giemsa stock solution.
Giemsa stain procedure
The procedure of giemsa staining may vary based on the staining purpose. Because different procedures are used for the study of blood cells or detection of parasites in blood smears (thin blood smear and thick blood smear).
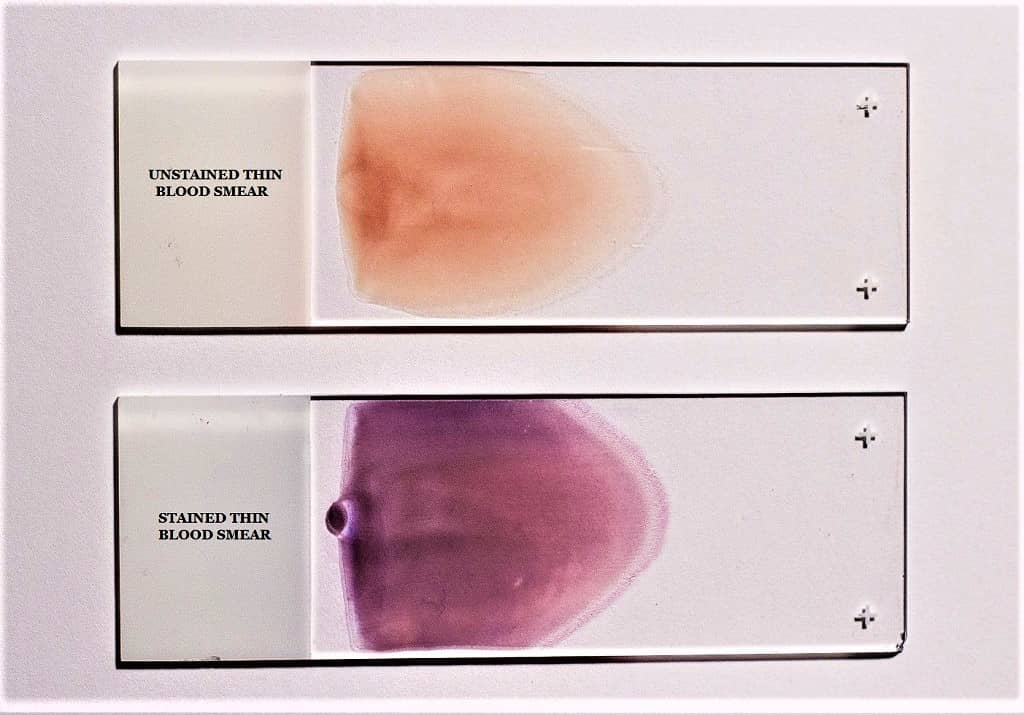
Giemsa stain procedure for thin smear (Blood)
- Prepare and air-dry a thin blood deposit on a clean and dry microscope glass slide.
- If you don’t know how to prepare it, read out the thin blood Smear preparation instructions here.
- Initially, fix the air-dried thin blood smear in absolute methanol by rapidly dipping it twice in a Coplin jar containing absolute methanol.
- Remove the slide from the Coplin jar and allow it to dry naturally.
- Giemsa Stain Dilution for Thin Blood Smear: The Giemsa stain is diluted 1:20 for the thin blood smear. Add 2 ml of Giemsa stain stock solution to 40 ml of phosphate buffer solution in a clean Coplin jar to create a 1:20 dilution. You can also substitute distilled water for the buffer, though the results may vary.
- Stain the Methanol-fixed Blood smear for 20 minutes with diluted Giemsa stain (1:20, v/v). Place the slide in the Coplin jar containing the diluted Giemsa stain, or place it smear-side up on a staining rack or any flat surface and pour the stain over the smear so that it evenly covers the smear.
- Now wash the stained slides by rapidly dunking them in and out of a Coplin jar containing buffered water or distilled water once or twice.
- Do not overexpose the stain to phosphate buffer solution (buffered water). Washing excessively may decolorize blood trace.
- Let the smear dry well in the air.
Giemsa stain procedure for thick smear (Blood)
- Prepare and air-dry a viscous blood smear on a clean and dry microscope glass slide.
- Do not dry the thick blood smear in an incubator or with heat, as this will attach the blood smear to the slide and impede the lysis of red blood cells (RBCs).
- If a rapid diagnosis of the malaria parasite is necessary, thick films can be made slightly thinner than usual, permitted to air-dry at room temperature for one hour, and then stained with Giemsa stain.
- Giemsa stain dilution for thick blood smear: The viscous blood smear is stained with the Giemsa stain at 1:20. In a clean Coplin jar, combine 1 ml of Giemsa stain stock solution with 49 ml of phosphate buffer solution to create a 1:50 dilution. You can also substitute distilled water for the buffer, though the results may vary.
- Stain the Air-Dried Blood smear for 50 minutes with diluted Giemsa stain (1:50, v/v). Place the slide in the Coplin jar containing the diluted Giemsa stain, or place it on a staining rack or any flat surface with the smear facing up and distribute the stain evenly over the smear.
- Rinse the Blood smear in buffered water or distilled water for three to five minutes.
- Allow the stain to cure thoroughly in the air.
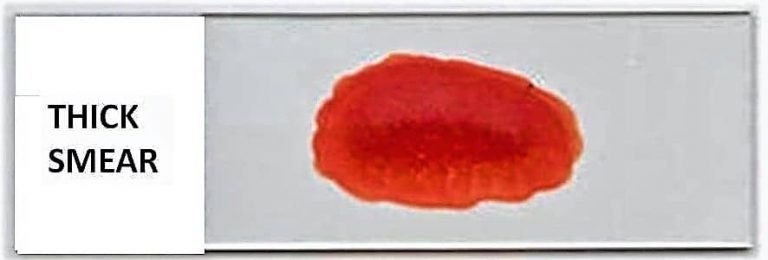
Note: Avoid dryng of smear by an incubator or by heat, becasue it may fix the blood smear onto the slide and results in lysis of RBCs.
Staining the Thin and thick blood smear on the same slide with Giemsa stain
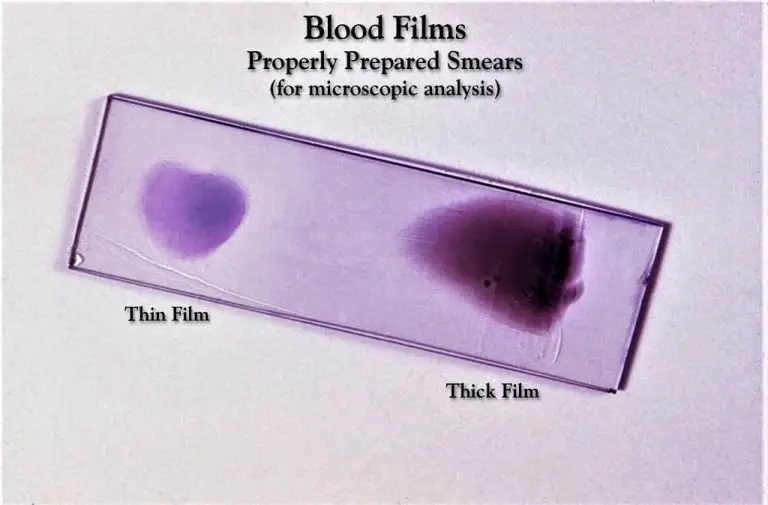
- Make both a thin and a thick smear of the specimen on the same slide by cutting it in half and following the same procedure on both halves. Let the smudge dry naturally.
- Now, in a Coplin jar containing 100% methanol, gently fix the air-dried thin blood smear by dipping the thin smear side in the methanol for a count of two or three times. Make sure the thick film is exposed to the Methanol or its vapors by tilting the slide slightly.
- Keep in mind that the lyses of the RBCs in the thick blood smears will be impeded by the introduction of even a modest quantity of methanol during staining.
- With the thick smear facing up, remove the slide from the Coplin jar and set it aside to dry. Before proceeding with staining, make sure both the thin and thick smear sides of the slide are completely dry.
- Thin and thick blood smears on the same slide necessitate dilution of the Giemsa Stain. Thick and thin blood smears are stained with Giemsa stain at a 1:50 ratio on the same slide. In a clean Coplin jar, combine 1 ml of Giemsa stain stock solution with 49 ml of phosphate buffer solution to generate a 1:50 dilution. Distilled water can be used for buffer, albeit the end outcome may be different.
- Now, for the next 50 minutes, use a Giemsa stain dilution of 1:50 (v/v) on the air-dried blood smear. To do this, place the slide, smear side up, in the Coplin jar with the diluted Giemsa stain, or stain it on a staining rack or other flat surface and pour the stain over the smear until it is completely covered.
- To avoid having RBC particles fall onto the thin blood smear, place the slide in the Coplin jar with the thick smear facing down.
- The next important step is to rinse the slide. Using a Coplin jar filled with phosphate buffer, swiftly dip the thin side of the smear in and out of the jar once or twice to rinse it. You should use phosphate buffer or distilled water to wash the heavy smear side for three to five minutes. Make sure the thick smear is completely submerged, but don’t let the water reach the thin smear. The thin layer of paint would go away otherwise.
- Allow plenty of air time for the smear to dry.
Giemsa stain procedure for Chlamydia trachomatis
Follow the above-mentioned steps but use 1:40 ratio of Giemsa stain, prepare by mixing 0.5 ml stock Giemsa solution to 19.5 ml buffered water. After that leave the stain for 90-120 minutes.
Microscopic examination of thick film
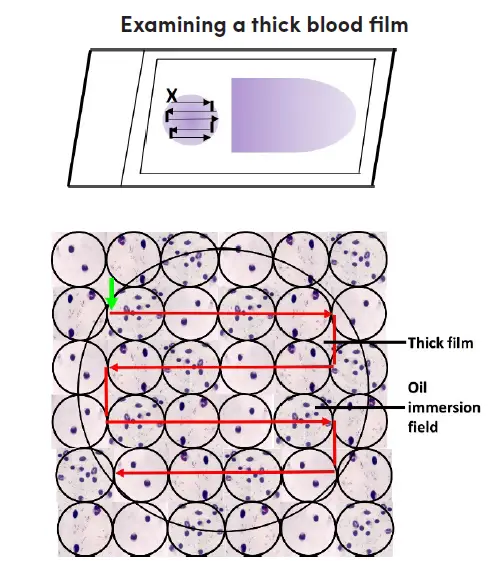
- The label should face left when placing the Giemsa-stained blood film on the microscope stage. Align the thick film with the 10X eyepiece.
- Turn on the microscope, fine-tune the illumination, and focus the 10x objective and ocular by examining the sample through the lenses.
- Look for parasites and other blood components by scanning the blood film. Pick a section of film where the white blood cells are uniformly dispersed and well-stained.
- Immersion oil should be applied to the thick layer. Make sure the immersion oil applicator is kept well away from the slide to prevent any contamination. The 40x objective must not come into contact with the oil.
- Put the area of the thick film you’ve chosen under the microscope’s 100x oil immersion objective. If the image is blurry, try adjusting the fine focus. Raise the mechanical stage to prevent the slide from being scratched.
- The film should have a thickness of 15-20 white blood cells per thick film field to be suitable for routine examination; this can be determined by adjusting the fine adjustment. White blood cell counts per field will be lower on these films, necessitating more thorough inspection.
- Carefully analyze the slide in question. You should begin at the top left of the film (where there is a green arrow pointing vertically) and work your way through the film, field by field, to the right.
- Slide slightly lower, then to the left, field by field, until the opposite end of the film is reached. Focus and concentrate using the fine adjustment repeatedly as you move from field to field to ensure a thorough analysis.
- Use an oil immersion objective to look at the thick film in horizontal or vertical slices. Focus by means of the fine knob.
- At least one hundred high-power fields must be analyzed before a thick film is confirmed to have “no malaria parasites seen.” The entire heavy film should be scanned if at all possible.
- If parasites are discovered, a further 100 fields should be scanned to improve the likelihood of detecting co-infections.
- Identify and document all species and life-stages seen.
Microscopic examination of thin film
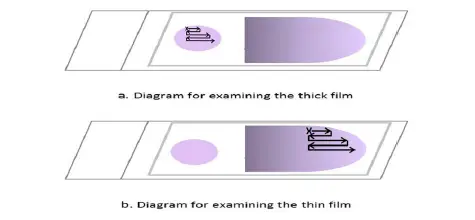
After analyzing the thick blood film, the thin blood film must always be examined to identify parasite species or mixed infections. Thin film, unlike thick film, permits the visualization of parasite and red cell morphology. Examine the extremity or edge of the thin film where it is feathery.
- Place a drop of immersion oil on the thin film’s feathered edge.
- Change from the 10x oil immersion lens to the 100x oil immersion lens.
- Examine the feathery end of the thin film’s edge, where there is minimal overlap between adjacent red cells. Move along the edge of the film, then move the slide one field outwards, then one field inwards, and so on.
- Examine the thin film until the presence and species of malaria parasites are confirmed. Identify and record all observed species and stages in the malaria blood microscopy register.
Result and Observation
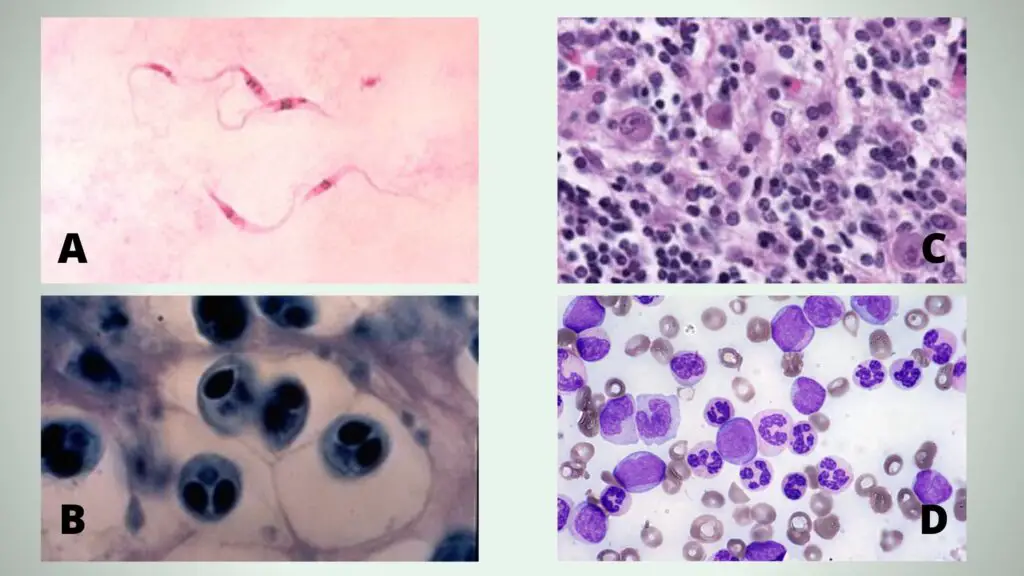
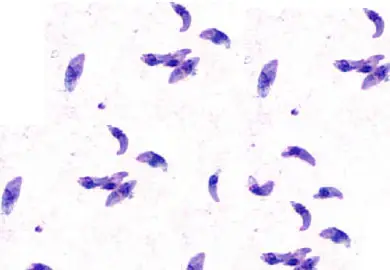
A = Giemsa stained Trypanosoma parasites (Chagas disease pathogen), B= Whirling disease section stained with Giemsa stain, C = “Owl’s-eye” viral inclusions, associated with Cytomegalovirus infection, D = Peripheral blood smear, May-Gr€ unwald Giemsa stain, 600x. In detail: medium-sized myeloblasts, promonocytes, and atypical neutrophils with a characteristic “clumped” chromatin, in irregularly compacted nuclei, and hypergranular cytoplasm can be noticed.
Cytoplasm and cytoplasmic granules appears red in color while nucleus appears blue-purple in color.
| Cell Components | Staining color observed |
|---|---|
| Red blood cells | Mauve-pink |
| Neutrophils | Reddish purple nuclei with pink cytoplasm |
| Eosinophils | Purple nuclei, faintly pink cytoplasm, and red to orange granules. |
| Basophils | Purple nuclei, blue coarse granules. |
| Lymphocytes | Dark blue nucleus with light blue cytoplasm. |
| Monocytes | Pink cytoplasm with a purple color nucleus. |
| Platelets | Violet to purple color granules. |
| Nuclei of host cells | Dark purple |
| Nuclei of WBCs | Dark purple |
| Cytoplasm of host cells | Pale blue |
| Cytoplasm of white cells | Pale blue or grey-blue |
| Melanin granules | Black green |
| Bacteria | Pale or dark blue |
| Chlamydia trachomatis inclusion bodies | Blue-mauve to dark purple depending on the stage of development |
| Borrelia spirochetes | Mauve-purple |
| Yersinia pestis coccobacilli | Blue with dark stained ends (bipolar staining) |
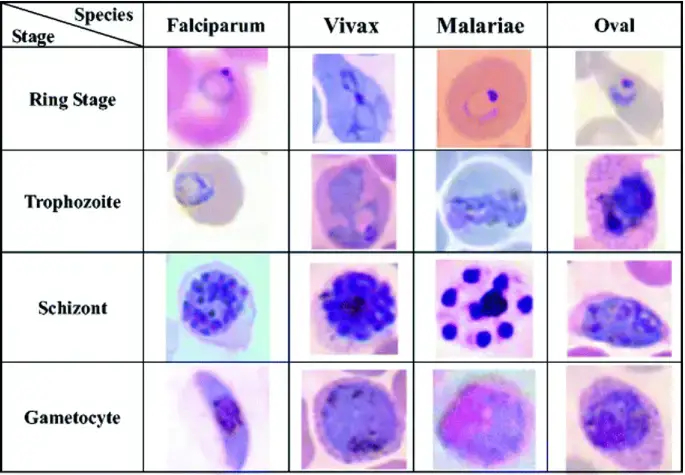
| Malaria parasite | P. vivax – red or pink nucleus with blue cytoplasm, Schüffner dots seen as an even carpet of pink dots in the cytoplasm of red blood cells; P. falciparum – Maurer clefts seen as unevenly distributed, coarse bodies in the red cell cytoplasm. |
Interpretation
- The basic dye Azure and methylene blue interacts with the acidic nucleus and produces blue-purple color.
- The acidic dye Eosin binds with the cytoplasm and cytoplasmic granules which are alkaline-producing red-orange coloration.
Parasitology
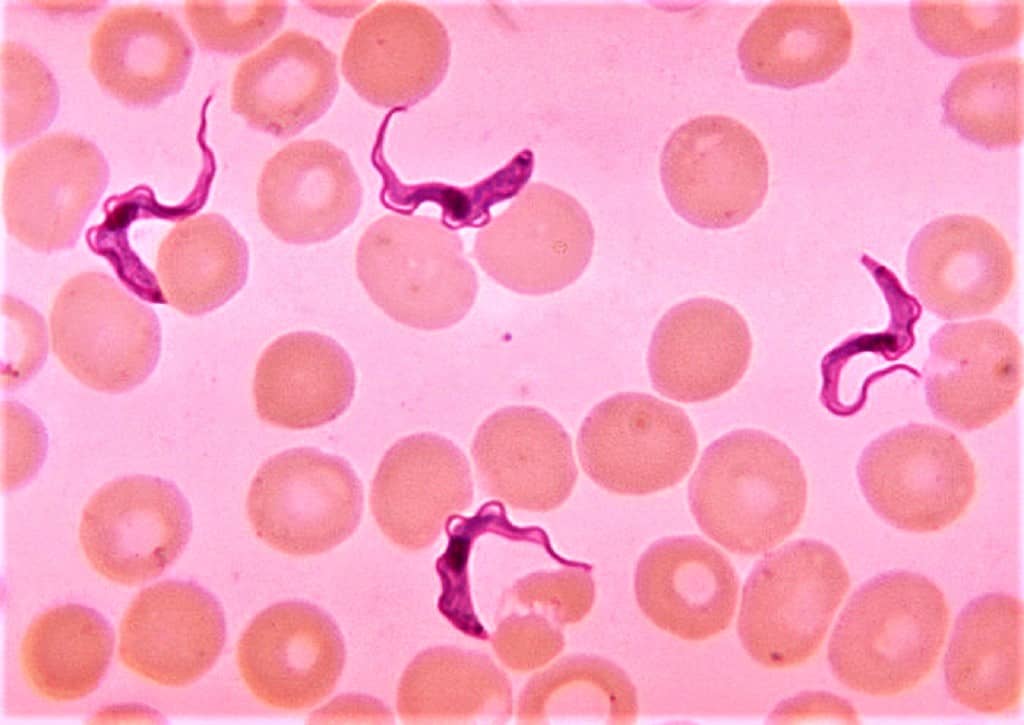
To identify both intraerythrocytic (plasmodia, babesiae) and exoerythrocytic (trypanosomes, microfilaria) parasites, this dye is frequently employed in parasitology. It can also be utilized to spot Leishmania or Trypanosoma intracellular amastigotes.
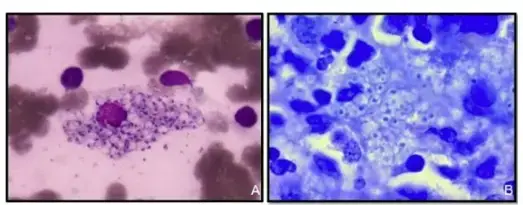
Toxoplasmosis can also be diagnosed in the lab with the help of Giemsa stain. Needle aspirates or Wright-Giemsa-stained impression smears are the ideal mediums for observing Toxoplasma gondii tachyzoites. Bow-shaped or crescent-shaped tachyzoites with a dark-staining nucleus can be seen in Giemsa-stained smears.
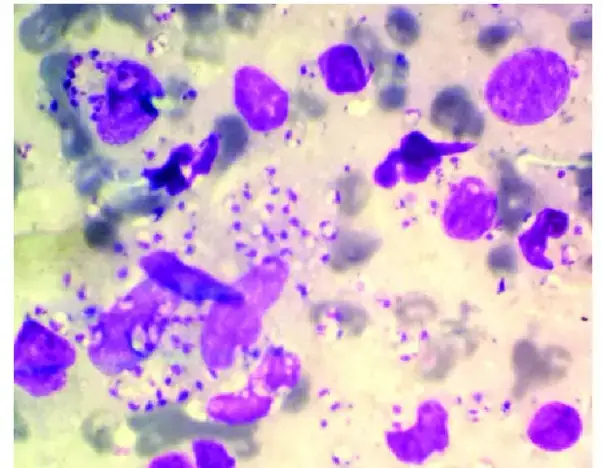
Wright-Giemsa staining of an impression smear shows a small number of macrophages in the background together with several, very small Leishmania amastigotes (stages 2 and 3). These morphologies frequently look similar to Histoplasma capsulatum yeast cells. Leishmania amastigotes, which are seen in many of these types, are distinguishable by their small size and rod-shaped kinetoplast.
Bacteriology
Wright-Giemsa stain is not useful for staining bacteria but is useful in the laboratory for diagnosing several different types of obligate intracellular parasites.
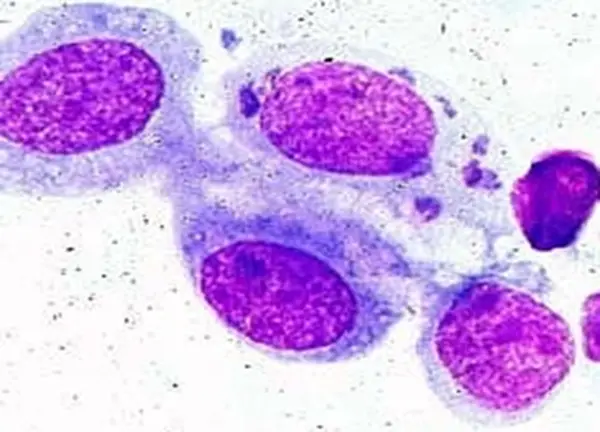
If many chlamydial inclusion bodies are present in a Giemsa- or Gimenez-stained sample, a Chlamydia trachomatis infection has been confirmed.
A granuloma inguinale can be diagnosed in the lab by using Giemsa and Wright stains to detect intracellular bacteria in mononuclear cells and “Donovan bodies” in tissue smears or biopsy specimens.
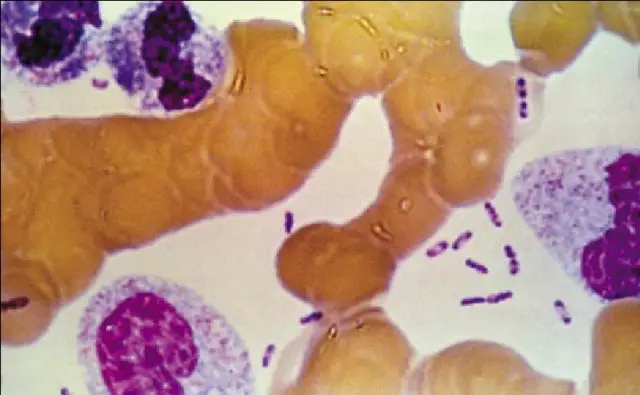
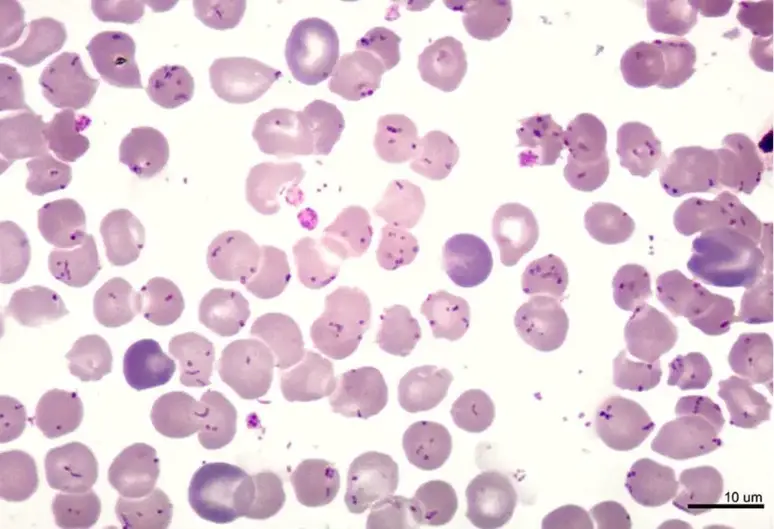
Bartonella bacilliformis is found intracellularly and extracellularly in Carrion’s disease patients’ tissues. Blood films stained with Giemsa reveal the organism to be blue to purple bacilli and coccobacilli both outside and inside of red blood cells.
Mycology
Detect the intracellular yeast forms of Histoplasma capsulatum.
Applications Giemsa stain
- The phosphate groups of DNA are what the Giemsa stain targets specifically. It binds to areas of DNA where there is a lot of adenine-thymine interaction.
- Giemsa stain is used to stain chromosomes in the technique known as Giemsa banding (G-banding), and is frequently employed in the generation of an idiogram, or graphical depiction, of chromosomes.
- Since Giemsa stain is a differential stain, it can be used to examine how pathogenic bacteria adhere to human cells; human cells will appear purple, while bacterial cells would appear pink.
- Histopathological examination of the parasite can be used to identify malaria, as well as spirochetes and protozoan parasites in the blood.
- Wolbach’s tissue stain, which identifies bacteria and rickettsia, also makes use of this dye.
- Blood smears and bone marrow specimens are commonly stained with the traditional Giemsa stain. Pink represents RBCs, pale pink represents platelets, blue represents lymphocyte cytoplasm, light blue represents monocyte cytoplasm, and magenta represents leukocyte nuclear chromatin.
- Giemsa stains Histoplasma fungus, Chlamydia bacteria, and Mast cells, and it is also used to view chromosomes, allowing for the identification of chromosomal aberrations such as translocation and rearrangement.
Advantages of Giemsa Stain
- Giemsa Stain is Readily available.
- It is easy to prepare.
- Easily maintain and use.
Limitation of Giemsa Stain
- The Giemsa stain must be prepared just prior to use.
FAQ
What is Giemsa staining?
Giemsa staining is a histological staining method used to visualize the structure and morphology of cells, such as red blood cells, white blood cells, and cells from blood smears.
Why is Giemsa staining used?
Giemsa staining is used in hematology and medical microbiology to differentiate between different types of cells, including red and white blood cells, as well as to diagnose diseases such as malaria, leukemia, and other blood disorders.
How does Giemsa staining work?
Giemsa staining works by using a combination of dyes that are absorbed by the cells and then visualized under a microscope. The dyes stain the cell membranes, cytoplasm, and nucleus in different shades of blue or purple, allowing for the differentiation of different types of cells.
What dyes are used in Giemsa staining?
The dyes used in Giemsa staining include eosin and methylene blue.
Is Giemsa staining reliable?
Giemsa staining is a widely used and reliable staining method in the field of hematology and medical microbiology, with a long history of successful use in the diagnosis of blood disorders.
How long does Giemsa staining take?
Giemsa staining typically takes about 30 minutes to an hour to complete, depending on the specific protocol being used. The length of time can vary based on the type of sample being stained and the type of staining equipment being used.
Can Giemsa staining be performed on fixed or unfixed samples?
Giemsa staining can be performed on both fixed and unfixed samples, although it is typically performed on unfixed samples, such as blood smears, to maintain the integrity of the cells.
What are the limitations of Giemsa staining?
The limitations of Giemsa staining include the need for specialized equipment, such as a microscope, to visualize the stained cells, as well as the potential for staining artifacts and errors in interpretation.
How are the results of Giemsa staining interpreted?
The results of Giemsa staining are typically interpreted by a trained hematologist or medical microbiologist, who will analyze the stained cells under a microscope and determine the type and structure of the cells, as well as any potential abnormalities or disease markers.
Can Giemsa staining be used in combination with other staining techniques?
Yes, Giemsa staining can be used in combination with other staining techniques, such as Wright-Giemsa staining or May-Grünwald-Giemsa staining, to enhance the resolution and specificity of the results.
References
- https://en.wikipedia.org/wiki/Giemsa_stain#:~:text=Giemsa%20stain%20is%20a%20classic,leukocyte%20nuclear%20chromatin%20stains%20magenta.
- https://chlorine.americanchemistry.com/Science-Center/Chlorine-Compound-of-the-Month-Library/Methylene-Blue-Part-2-The-Chemists-Indicator/
- https://microbenotes.com/giemsa-stain-principle-procedure-results-interpretation/
- https://answers.yahoo.com/question/index?qid=20080712002122AAAhrqK
- https://www.ncbi.nlm.nih.gov/pmc/articles/PMC540181/
- https://clinicalgate.com/preparation-and-staining-methods-for-blood-and-bone-marrow-films/
- https://paramedicsworld.com/hematology-practicals/giemsa-staining-technique-principle-preparation-procedure-interpretation/medical-paramedical-studynotes
- https://www.researchgate.net/publication/24346194_Histopathology_for_the_diagnosis_of_infectious_diseases
- https://microbeonline.com/giemsa-stain-principle-procedure-and-results/
- https://www.ncbi.nlm.nih.gov/pmc/articles/PMC1453983/
- Text Highlighting: Select any text in the post content to highlight it
- Text Annotation: Select text and add comments with annotations
- Comment Management: Edit or delete your own comments
- Highlight Management: Remove your own highlights
How to use: Simply select any text in the post content above, and you'll see annotation options. Login here or create an account to get started.