What is Western Blotting?
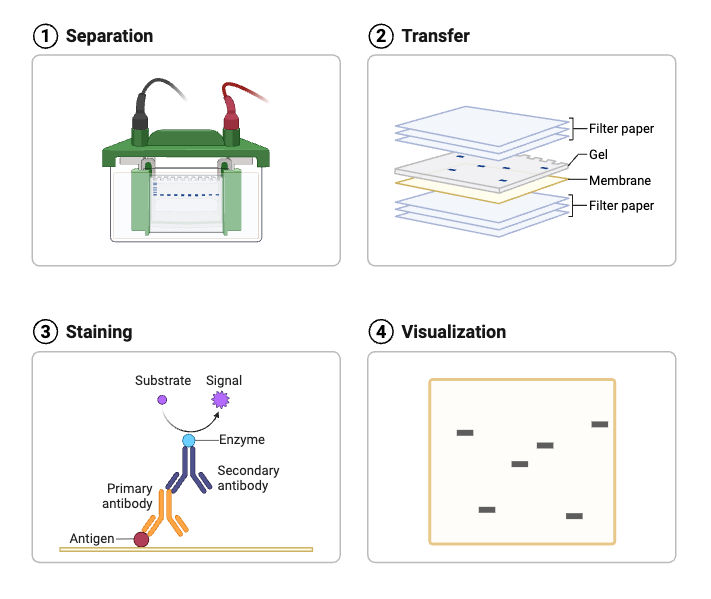
Immunoblotting, or western blotting, is a common lab method in molecular biology and biochemistry for finding and studying certain proteins in a complicated mixture. There are a few important steps in the method: First, proteins are taken out of cells or tissues.
This is usually done with a detergent like sodium dodecyl sulphate (SDS), which changes the proteins’ shape and gives them a consistent negative charge. Gel electrophoresis, usually SDS-polyacrylamide gel electrophoresis (SDS-PAGE), is then used to separate these proteins by size. After separation, the proteins are moved from the gel to a membrane, which is commonly constructed of nitrocellulose or polyvinylidene difluoride (PVDF). This is called blotting. Electroblotting is a frequent way to do this transfer.
In this process, an electric field moves the proteins onto the membrane. After the transfer, the membrane is blocked to stop nonspecific binding. This is usually done with bovine serum albumin (BSA) or non-fat dry milk. After that, the membrane is put in contact with a primary antibody that only binds to the target protein. A secondary antibody is added after washing away the primary antibody that isn’t bound.
This antibody recognises and attaches to the primary antibody. A reporter enzyme, such horseradish peroxidase (HRP), is usually attached to this secondary antibody to make a signal that can be seen. Chemiluminescence, colorimetric staining, and fluorescence are some of the ways that the target protein can be seen. Western blotting is an important tool for protein analysis and diagnosis since it lets scientists find out if certain proteins are present, how big they are, and how many of them there are.
W. Neal Burnette came up with the idea in the late 1970s. He called it “Western blot” as a joke about Southern blot (a DNA detection method by Edwin Southern). Since then, it has become a key tool for protein analysis in molecular biology and biochemistry research because it is so specific and sensitive.
Aim
To learn the technique of Western Blotting for the detection of a specific protein.
Principle of Western Blot – How does western blot work?
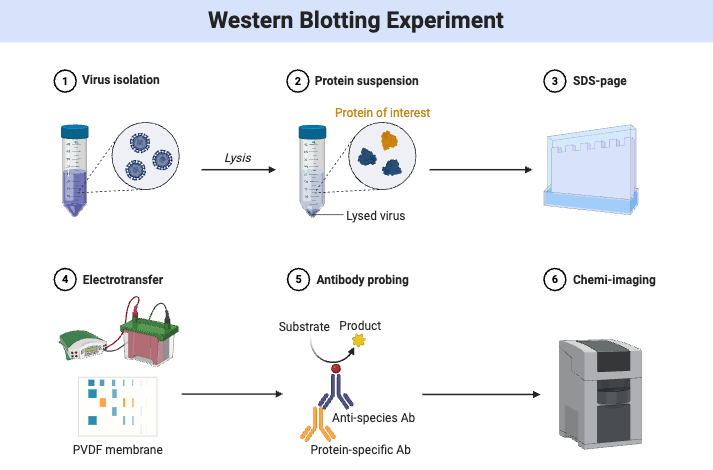
The principle relies on the specific interaction between proteins and detection probes, usually antibodies. First, proteins are separated by gel electrophoresis, which arranges them by size within a gel matrix. Then, these separated proteins are transferred, or “blotted,” onto a membrane made of nitrocellulose or PVDF, where they become immobilized. Detection happens by applying a reporter-labeled primary antibody that binds directly to the target protein, or a reporter-labeled secondary antibody that binds to the primary antibody. The reporter, often an enzyme, produces a color change or luminescent signal at the binding site when exposed to a specific substrate. This generated signal is captured using a suitable detection system, allowing visualization and analysis of the target protein.
Materials Required for Western Blot
| Component | Description |
|---|---|
| Gel Electrophoresis | |
| Gel (NuPAGE) | Used for separating proteins based on size. |
| Basic Power Supply | Provides the necessary voltage for electrophoresis. |
| Sample buffer | Denatures and loads proteins onto the gel. |
| Heating block | Heats samples before loading onto the gel. |
| Sample reducing buffer | Reduces disulfide bonds in proteins. |
| Protein Transfer | |
| Mini Trans-Blot system | Includes a tank, lid, and blot module, stored with cooling ice. |
| 0.45 µm nitrocellulose filter paper | Used for transferring proteins from the gel. |
| NuPAGE transfer buffer | Used for protein transfer. |
| Methanol | Used for protein transfer. |
| Square Pyrex dish and disposable plastic Petri dish | For assembling the transfer system. |
| Razor blade and gel knife | For cutting the gel for transfer. |
| Western Blotting | |
| 10x Tris-buffered saline with 1% Tween 20 | Used for washing and antibody incubation. |
| Shaker | For shaking and mixing solutions during incubation steps. |
| 10% powdered nonfat dry milk | Blocks nonspecific binding sites on the membrane. |
| Square disposable plastic Petri dish | For incubating the membrane with antibodies. |
| Plastic pouches and impulse heat sealer | For sealing membranes with antibodies for incubation. |
| Primary antibody | Binds specifically to the target protein. |
| Secondary antibody conjugated with HRP | Against the host species of the primary antibody. |
| Chemiluminescent substrate | For visualizing HRP activity. |
| Gel documentation system | For imaging and analyzing the results. |
Western Blot Steps/Western blot protocol
Simple Steps of Western blot
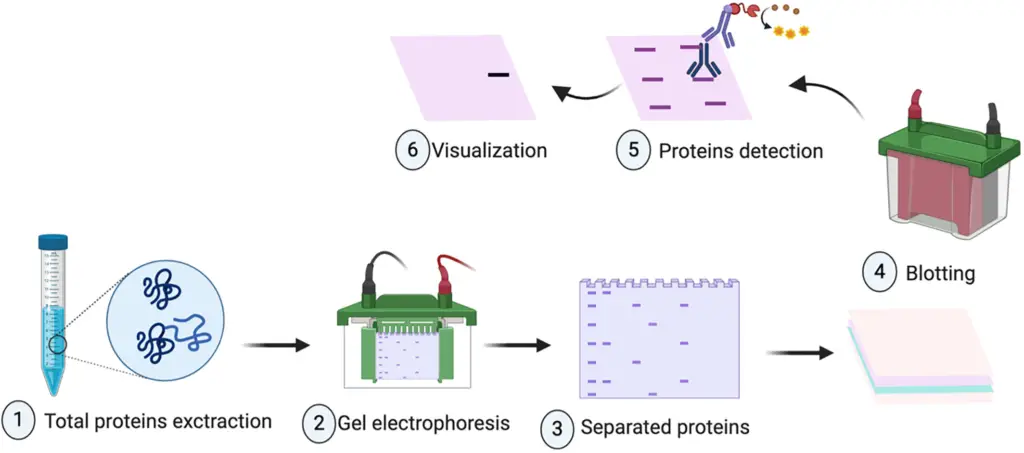
- Sample Preparation – Cells or tissues are lysed using a lysis buffer containing protease inhibitors to extract proteins, ensuring the prevention of proteolytic degradation during the process.
- Protein Quantification – Protein concentration in the lysate is determined using methods like the Bradford assay or BCA assay to ensure equal loading of samples in subsequent steps.
- Sodium Dodecyl Sulfate-Polyacrylamide Gel Electrophoresis (SDS-PAGE) – The protein samples are mixed with SDS sample buffer, denatured by boiling, and loaded onto an SDS-PAGE gel. An electric current is applied, causing proteins to migrate through the gel matrix; smaller proteins move faster, allowing separation based on molecular weight.
- Protein Transfer to Membrane – After electrophoresis, proteins are transferred from the gel onto a nitrocellulose or polyvinylidene fluoride (PVDF) membrane using an electric field in a transfer buffer. This step is crucial for subsequent antibody detection.
- Blocking – The membrane is incubated with a blocking solution, typically 5% non-fat dry milk or bovine serum albumin (BSA) in Tris-buffered saline with Tween 20 (TBST), to prevent non-specific binding of antibodies to the membrane.
- Primary Antibody Incubation – The membrane is incubated with a primary antibody specific to the target protein. This incubation is usually done overnight at 4°C or for 1 hour at room temperature with gentle agitation.
- Washing – The membrane is washed multiple times with TBST to remove unbound primary antibody, reducing background noise in the final detection.
- Secondary Antibody Incubation – The membrane is incubated with a secondary antibody that binds to the primary antibody. This secondary antibody is conjugated to a reporter enzyme, such as horseradish peroxidase (HRP), facilitating detection.
- Washing – The membrane is washed again with TBST to remove unbound secondary antibody, ensuring specific signal detection.
- Detection – A chemiluminescent or colorimetric substrate is applied to the membrane, reacting with the reporter enzyme to produce a detectable signal, which is captured using imaging equipment.
- Analysis – The resulting bands are analyzed to determine the presence and quantity of the target protein, often using software to quantify band intensity and compare across samples.

Step 1: Sample Preparation
- A lysis buffer is prepared by adding protease and phosphatase inhibitors to a base solution, such as RIPA buffer, to prevent protein degradation during the extraction process. Optional: To inhibit metalloproteases, EDTA can be added at a final concentration of 0.5 mM. The buffer is kept on ice to maintain protein integrity.
- The cell culture dish is placed on ice, and the culture medium is carefully removed. The cells are washed with ice-cold PBS to remove any residual medium. After aspirating the PBS, ice-cold lysis buffer is added at approximately 1 mL per 10⁷ cells or 100 mm dish. The cells are scraped off using a cold plastic cell scraper and transferred into a pre-cooled microcentrifuge tube.
- The tissue of interest is dissected on ice using clean tools to minimize protein degradation. The tissue is weighed, and a ratio of approximately 50 mg tissue to 1,000 µL of ice-cold lysis buffer is maintained. The tissue is then immersed in liquid nitrogen to snap freeze or kept on ice for immediate homogenization.
- For cell samples, the cell suspension is maintained on ice and subjected to gentle agitation for 5–10 minutes. For tissue samples, the tissue is homogenized in ice-cold lysis buffer using a motorized homogenizer or a Dounce homogenizer to ensure complete disruption.
- The homogenized samples are centrifuged at approximately 10,000 × g for 10–15 minutes at 4°C to pellet cellular debris. The supernatant, containing the soluble proteins, is carefully transferred to a new pre-chilled microcentrifuge tube. The pellet is discarded.
- The protein concentration in the supernatant is determined using a protein assay, such as the BCA assay. A standard curve is prepared using known concentrations of BSA, and the absorbance is measured at 562 nm. The protein concentration of the sample is calculated based on the standard curve.
- The protein samples are mixed with an appropriate sample buffer (e.g., LDS Sample Buffer) to achieve a final concentration of 1×. If reducing conditions are required, a reducing agent (e.g., NuPAGE Sample Reducing Agent) is added to a final concentration of 1×. The samples are then heated at 70°C for 10 minutes to denature the proteins.
- If not proceeding immediately to electrophoresis, the prepared samples are stored at −80°C to preserve protein integrity. Frequent freeze-thaw cycles should be avoided, as they can lead to protein degradation.
Step 2: Gel Electrophoresis
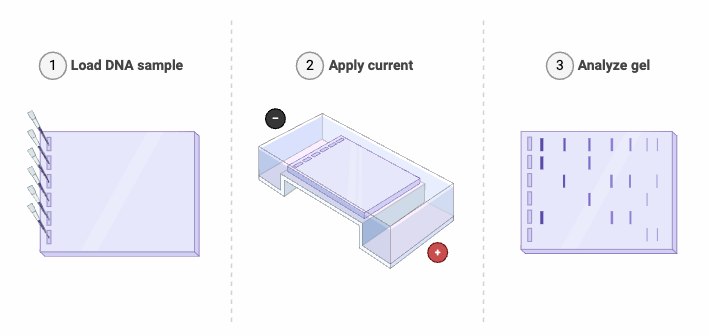
- The preparation of a polyacrylamide gel involves the polymerization of acrylamide and bis-acrylamide within a buffer solution, commonly Tris-Glycine, resulting in a gel matrix that facilitates the separation of proteins according to their molecular size. The gel is formed between two glass plates, with a comb positioned to generate wells for the purpose of sample loading. The concentration of acrylamide plays a critical role in determining the pore size of the gel matrix, where increased concentrations facilitate enhanced resolution for smaller protein entities. The gel undergoes polymerization at ambient temperature for a duration of 30 to 60 minutes.
- Protein samples are combined with a loading buffer that includes SDS (sodium dodecyl sulfate), a reducing agent such as β-mercaptoethanol or dithiothreitol, glycerol, and a tracking dye like bromophenol blue. Sodium dodecyl sulfate (SDS) disrupts the structural integrity of proteins and confers a negative charge that is directly proportional to their molecular weight, thereby facilitating consistent migration patterns during electrophoresis through the gel matrix. The reducing agent cleaves disulfide bonds, thereby contributing to the denaturation of proteins. The addition of glycerol enhances the density of the sample, thereby promoting its effective deposition into the wells. The utilization of tracking dye facilitates the observation of the electrophoresis progression.
- The polymerized gel is positioned within the electrophoresis chamber, and the wells are subsequently filled with running buffer to ensure complete submersion of the gel. Protein samples are meticulously introduced into the wells utilizing a micropipette, with particular attention to ensure that the pipette tip does not make contact with the bottom of the wells, thereby preventing potential sample contamination. A molecular weight ladder is introduced into a designated lane to facilitate the estimation of protein sizes present in the samples.
- The electrophoresis chamber is interfaced with a power supply, facilitating the application of an electric field. Proteins exhibit migration through the gel matrix towards the anode, with smaller proteins demonstrating a higher rate of movement compared to their larger counterparts. The parameters of voltage and run duration are modulated in accordance with the gel concentration and the molecular size range of the proteins under examination. A constant voltage ranging from 100 to 150 volts is generally applied for a duration of 1 to 2 hours.
- Subsequent to the electrophoresis process, the gel undergoes a staining procedure to facilitate the visualization of the separated proteins. Coomassie Brilliant Blue and silver staining represent widely utilized techniques in the field. The gel undergoes incubation with the staining solution, subsequently followed by a destaining process to eliminate excess stain and improve contrast. The stained gel is subsequently subjected to imaging via a gel documentation system, facilitating the capture of the protein bands.
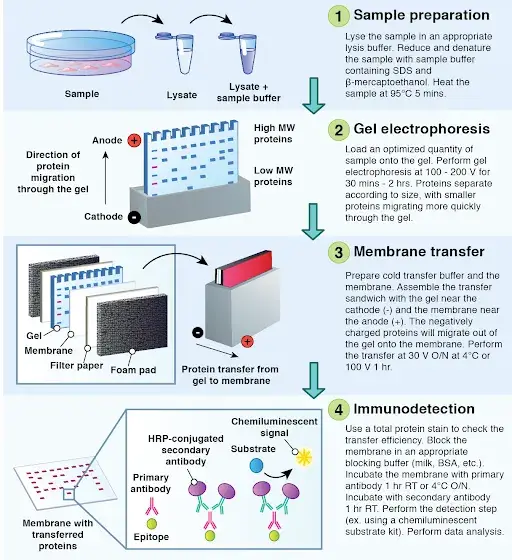
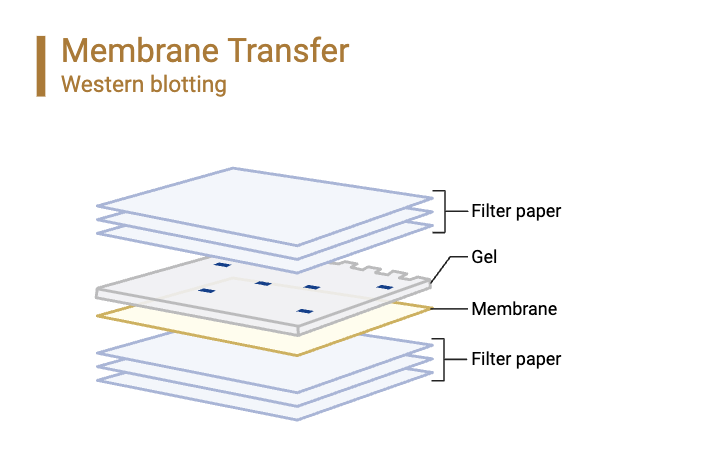
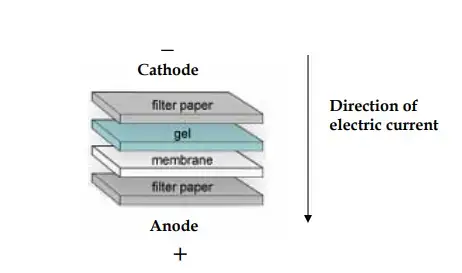
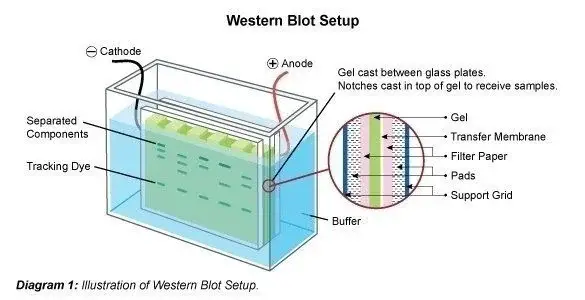
- The isolated proteins undergo a transfer from the gel to a membrane, commonly composed of nitrocellulose or PVDF, facilitated by an electric field in a procedure known as electroblotting. The gel and membrane are systematically arranged into a sandwich configuration, incorporating filter papers and sponges, and subsequently positioned within a transfer apparatus. The application of an electric current induces the migration of proteins onto the membrane. The transfer is typically conducted at a voltage of 100 V for a duration of 1 hour.
- Subsequent to the transfer process, the membrane undergoes a washing procedure to eliminate any remaining transfer buffer residues. The sample is subsequently incubated in a blocking solution, which generally comprises 5% nonfat dry milk or bovine serum albumin, to inhibit non-specific binding of antibodies in the following immunodetection procedures.
Step 3: Protein Transfer
- To make a transfer buffer, 10% methanol is added to a base buffer, usually Tris-Glycine, to help proteins move during electroblotting.
- To get the gel ready for effective protein transfer, it is equilibrated in transfer buffer for 10 minutes. If you are using a PVDF membrane, you should wet it with 100% methanol for 30 seconds, rinse it quickly in deionized water, and then let it sit in transfer buffer for 5 minutes. It takes 5 minutes for nitrocellulose membranes to directly equilibrate in transfer buffer.
- To make a transfer sandwich, you put the membrane, gel, and filter sheets that have been soaked in transfer buffer on top of each other. The transfer device has two sponges in it, and this sandwich goes between them. The gel is next to the membrane, which makes sure that the proteins can easily move from one place to another.
- The transfer device is plugged into a power source, and an electric field is used to move the proteins from the gel to the membrane. Proteins go toward the membrane, where they get stuck. The transfer usually takes place at 100 V for an hour.
- After the transfer is done, the membrane is rinsed four times in deionized water, with each wash lasting five minutes and being gently agitated to get rid of any leftover transfer buffer.
- The membrane is put in blocking buffer, which is commonly Tris-buffered saline with Tween 20 (TBST) and 5% nonfat dried milk or bovine serum albumin. It is then left at room temperature for 30 to 60 minutes, with moderate shaking. This process stops antibodies from sticking to the membrane in a way that isn’t specific.
- You may check how well proteins are transferred by coloring the membrane with a reversible dye like Ponceau S. This dye sticks to proteins and shows the pattern of the transfer. Before moving on to the next procedures, the dye is washed off with water.
Step 4: Immunodetection
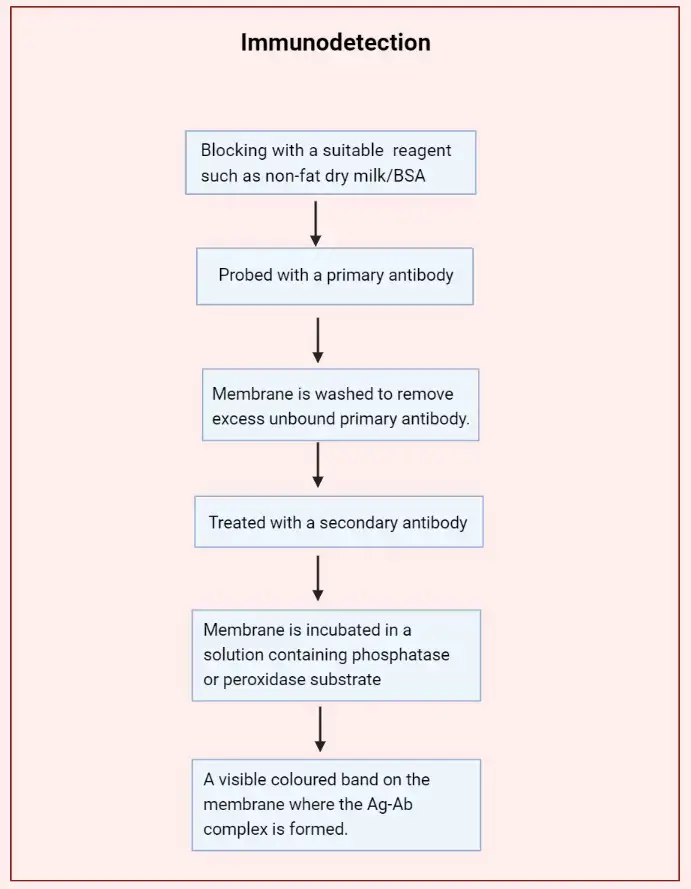
- After transferring proteins to the membrane, it’s incubated in a blocking buffer, typically containing 5% nonfat dry milk or bovine serum albumin (BSA) in Tris-buffered saline with Tween 20 (TBST), for 1 hour at room temperature with gentle agitation. This step prevents non-specific binding of antibodies to the membrane by saturating available binding sites.
- The membrane is incubated with a primary antibody specific to the target protein, diluted in blocking buffer, for 1 hour at room temperature or overnight at 4°C with gentle agitation. The dilution factor and incubation time may vary depending on the antibody’s specifications.
- Post-incubation, the membrane is washed three times with TBST, each wash lasting 5 minutes with gentle agitation, to remove unbound primary antibody and reduce background noise.
- The membrane is then incubated with a secondary antibody conjugated to horseradish peroxidase (HRP), diluted in blocking buffer, for 1 hour at room temperature with gentle agitation. This secondary antibody binds to the primary antibody, facilitating detection.
- Following secondary antibody incubation, the membrane is washed six times with TBST, each wash lasting 5 minutes with gentle agitation, to remove any unbound secondary antibody and minimize background.
- The membrane is incubated with a chemiluminescent substrate that reacts with HRP, producing light. The emitted light is captured using a chemiluminescence imaging system, revealing the presence and abundance of the target protein as bands on the membrane.
- The captured images are analyzed using appropriate software to quantify the intensity of the bands, which correlates with the amount of target protein present in the sample.
Western Blot Result Interpretation
- Band Detection –
- Positive Result – Presence of a single, distinct band at the expected molecular weight indicates the target protein is present.
- Negative Result – Absence of the expected band suggests the target protein is not present or below the detection limit.
- Multiple Bands – Presence of additional bands may indicate degradation products, post-translational modifications, or non-specific binding.
- Band Intensity –
- Strong Intensity – Higher protein abundance in the sample.
- Weak Intensity – Lower protein abundance or suboptimal detection conditions.
- No Signal – Possible issues with antibody binding, sample loading, or transfer efficiency.
- Molecular Weight Estimation –
- Comparison with Ladder – Bands are compared to a molecular weight ladder to estimate the size of the target protein.
- Expected Size – The observed band should correspond to the expected molecular weight of the target protein.
- Normalization –
- Loading Control – Housekeeping proteins (e.g., β-actin, GAPDH) are used to normalize protein levels across samples.
- Total Protein Staining – Methods like Ponceau S staining can be used to assess total protein loading and transfer efficiency.
- Common Issues –
- High Background – May result from inadequate blocking, excessive antibody concentration, or prolonged exposure.
- Smiling Bands – Curved bands can occur due to uneven gel polymerization or transfer.
- Ghost Bands – Faint, non-specific bands may appear due to antibody cross-reactivity or overexposure.
- Quantification –
- Densitometry – Band intensity can be quantified using imaging software to assess relative protein abundance.
- Linear Range – Ensure that the signal falls within the linear range of detection for accurate quantification.
- Interpretation in Diagnostics –
- HIV Testing – Presence of specific bands (e.g., gp160, gp120) indicates HIV infection.
- Disease Biomarkers – Altered expression levels of certain proteins can be indicative of disease states.
- On staining SDS-Polyacrylamide gel, different proteins will appear as dark blue bands against a light blue backgroud.
- On immunodetection, a single blue band will be observed on NC membrane.
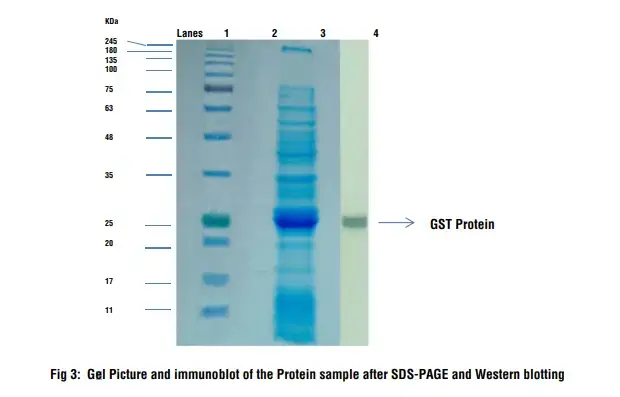
- Lane 1: Prestained Protein Ladder
- Lane 3: Protein Sample
- Lane 4: Immunodetection on the blotted membrane
Limitations of Western Blot
- Time-consuming process – Western blotting involves multiple labor-intensive steps, including protein extraction, gel electrophoresis, transfer, and antibody incubation, making it a lengthy procedure.
- Semi-quantitative nature – While it provides approximate estimations of protein abundance, Western blotting lacks the precision of quantitative methods like mass spectrometry.
- Antibody-dependent specificity – The accuracy of Western blotting is heavily reliant on the availability and quality of specific antibodies; without a suitable antibody, detection is not possible.
- Requires substantial sample and antibody amounts – Effective detection often necessitates microgram quantities of both protein samples and antibodies, which can be limiting when dealing with scarce or precious samples.
- Potential for high background noise – Improper blocking, inadequate washing, or suboptimal antibody concentrations can lead to non-specific binding, resulting in high background and reduced signal clarity.
- Limited multiplexing capability – Detecting multiple proteins simultaneously is challenging due to the need for distinct antibodies and potential cross-reactivity, unlike methods such as reverse phase protein lysate microarrays.
- Sensitivity issues with low-abundance proteins – Western blotting may not detect proteins present in low quantities, making it less suitable for analyzing rare or transient proteins.
- Potential for artifacts – Issues such as uneven transfer, incomplete protein denaturation, or proteolytic degradation can lead to artifacts, complicating result interpretation.
- Reproducibility concerns – Variations in experimental conditions, such as antibody batch differences or gel inconsistencies, can affect reproducibility, necessitating careful standardization.
- Not suitable for high-throughput analysis – Due to its manual and time-intensive nature, Western blotting is not ideal for analyzing large numbers of samples simultaneously.
Advantages of western blotting
- High specificity – Western blotting offers superior specificity by detecting proteins based on their molecular weight and antibody binding, reducing the likelihood of false positives compared to methods like ELISA .
- Molecular weight determination – The technique provides information about the size of the target protein, aiding in the confirmation of its identity and integrity .
- Detection of post-translational modifications – Western blotting can identify modifications such as phosphorylation, glycosylation, and ubiquitination, which are crucial for understanding protein function and regulation .
- Ability to detect both native and denatured proteins – Unlike ELISA, which typically detects denatured proteins, Western blotting can assess both native and denatured forms, providing a more comprehensive analysis of protein status .
- Confirmatory diagnostic tool – Western blotting serves as a confirmatory test following initial screenings, such as ELISA, to verify the presence of specific proteins or antibodies, enhancing diagnostic accuracy .
- Visualization of protein integrity – The technique allows for the visualization of protein degradation products or isoforms, aiding in the assessment of protein quality and processing .
- Reduced risk of false positives – The specificity of Western blotting minimizes the likelihood of false positives, making it a reliable method for confirming the presence of target proteins .
- Flexibility in antibody usage – Western blotting can utilize a wide range of antibodies, including those against denatured proteins, providing flexibility in experimental design .
- Quantitative analysis – While semi-quantitative, Western blotting allows for the estimation of protein levels based on band intensity, providing insights into relative protein abundance .
- Multiplexing capability – By probing with multiple antibodies sequentially, Western blotting can analyze several proteins in a single sample, facilitating multiplex analysis .
Advantages of western blotting over ELISA
- Higher specificity—Western blotting separates proteins by size, allowing the identification of target protein bands and minimizing cross-reactivity and false positives.
- Molecular weight determination – This method estimates protein molecular weight, revealing their size and integrity.
- Western blotting can detect and analyse post-translational changes such phosphorylation, glycosylation, and ubiquitination, which are essential for protein function and regulation.
- Western blotting can detect both native and denatured proteins, unlike ELISA, which only identifies denatured proteins. This provides a more complete protein status study.
- Western blotting confirms the presence of certain proteins or antibodies after first screenings like ELISA, improving diagnostic accuracy.
- Protein integrity visualization – The technique helps analyze protein quality and processing by visualizing protein breakdown products or isoforms.
- Western blotting’s specificity reduces false positives, making it a trustworthy approach for validating target protein presence.
- Western blotting allows experimental design versatility by using a wide spectrum of antibodies, including those against denatured proteins.
- Western blotting, while semi-quantitative, estimates protein levels based on band intensity, revealing protein abundance.
- Multiplexing – Western blotting can evaluate many proteins in one sample by probing with multiple antibodies successively.
Application of western blotting
- Protein identification and characterization in research – used extensively to detect specific proteins within complex mixtures, determine their molecular weight, and analyze expression levels in cell and tissue samples
- Quantification of protein expression – semi‑quantitative analysis is enabled by band intensity comparison to standards or internal controls, supporting studies in gene expression, development, or treatment effects
- Detection of post‑translational modifications – employed to identify phosphorylated, glycosylated, ubiquitinated or cleaved forms of proteins, critical for signaling pathway research
- Verification of protein production – essential for validating successful recombinant protein expression following cloning or expression system optimization
- Clinical diagnostics – infectious diseases
- HIV confirmation test by detecting antibodies against specific viral proteins (e.g., gp160, gp120)
- Creutzfeldt–Jakob disease (BSE/prion protein detection), Lyme disease, tularemia, hepatitis B, HSV‑2, and FIV in veterinary diagnostics
- Clinical diagnostics – autoimmune diseases – used to detect autoantibodies against cell or tissue antigens, such as connective‑tissue disorder antigens
- Preclinical and oncology research – used to validate protein biomarkers identified via high‑throughput screening or ‘omics’ studies; assists in investigating oncogenesis, treatment response, and target validation
- Anti‑doping and forensic testing – applied by agencies like WADA to identify erythropoietin (EPO) misuse in athletes through detection of variant EPO isoforms
- Epitope mapping and antibody characterization – helps determine antibody binding regions for vaccine development, therapeutic antibody design, and validating antibody specificity Wikipedia
- Immunoproteomics and biomarker discovery – integrated into workflows to discover novel antibody targets or protein biomarkers in various diseases, including multiple sclerosis and Crohn’s disease
Elisa vs Western blot
| Characteristics | ELISA | Western Blot |
|---|---|---|
| Principle | Based on antibody-antigen interaction | Based on antibody-antigen interaction followed by protein separation |
| Detection | Colorimetric or fluorescent signal | Colorimetric, chemiluminescent, or fluorescent signal |
| Sensitivity | Moderate to high sensitivity | High sensitivity |
| Specificity | High specificity | High specificity |
| Sample requirement | Small amount of sample required | Larger amount of sample required |
| Time | Quick turnaround time (few hours) | Longer turnaround time (few hours to overnight) |
| Multiplexing | Can measure multiple analytes simultaneously | Limited multiplexing capabilities |
| Quantitation | Quantitative measurement possible | Semi-quantitative measurement possible |
| Automation | Highly automated process | Some steps require manual handling |
| Cost | Relatively low cost per test | Relatively higher cost per test |
Western blot troubleshooting
- Weak or no signal –
- Possible causes –
- Low protein expression in the sample.
- Inefficient transfer of proteins to the membrane.
- Degradation of proteins during sample preparation.
- Antibody issues, such as low affinity or improper storage.
- Solutions –
- Increase the amount of protein loaded onto the gel.
- Optimize transfer conditions (e.g., time, voltage, buffer composition).
- Use fresh samples and include protease inhibitors during extraction.
- Verify antibody specificity and reactivity; consider using a positive control.
- Ensure proper antibody dilution and incubation times.
- Use freshly prepared detection reagents.
- Perform a dot blot to confirm antibody binding.
- Possible causes –
- High background –
- Possible causes –
- Inadequate blocking of the membrane.
- Excessive antibody concentrations.
- Insufficient washing steps.
- Contaminated reagents or buffers.
- Solutions –
- Increase blocking time and use appropriate blocking agents (e.g., 5% non-fat dry milk or BSA).
- Optimize antibody concentrations based on manufacturer’s recommendations.
- Perform multiple washing steps with TBS or PBS containing 0.1% Tween-20.
- Use freshly prepared buffers and reagents.
- Ensure that all equipment and surfaces are clean to prevent contamination.
- Possible causes –
- Multiple bands or non-specific binding –
- Possible causes –
- Antibody cross-reactivity with other proteins.
- Proteolytic cleavage of the target protein.
- Post-translational modifications leading to altered migration patterns.
- Solutions –
- Use antigen-affinity purified antibodies to reduce non-specific binding.
- Include protease inhibitors during sample preparation.
- Optimize antibody dilution and incubation conditions.
- Consider using different blocking agents to reduce background.
- Use specific inhibitors or treatments to prevent post-translational modifications.
- Possible causes –
- Smiling or curved bands –
- Possible causes –
- Uneven gel polymerization.
- Improper transfer conditions.
- Solutions –
- Ensure uniform gel polymerization by mixing thoroughly and allowing proper setting time.
- Optimize transfer conditions (e.g., time, voltage, buffer composition) to achieve even protein transfer.
- Use a gel casting tray that allows for even distribution of the polymerizing solution.
- Possible causes –
- Uneven or blotchy background –
- Possible causes –
- Contaminated transfer sponges or buffers.
- Improper membrane handling.
- Solutions –
- Use fresh, clean transfer sponges and buffers.
- Ensure proper membrane handling to avoid physical damage or uneven blocking.
- Avoid touching the membrane with bare hands; use tweezers or gloves.
- Possible causes –
- Ghost or white bands –
- Possible causes –
- Overexposure during imaging.
- Inadequate washing steps.
- Solutions –
- Reduce exposure time during imaging to prevent saturation.
- Increase the number of washing steps to remove excess antibody.
- Use appropriate exposure settings on imaging equipment.
- Possible causes –
For a comprehensive troubleshooting guide, refer to the resources provided by Thermo Fisher Scientific and Cell Signaling Technology.
Western Blotting vs Southern Blotting
| Characteristics | Western Blotting | Southern Blotting |
|---|---|---|
| Purpose | Detects and analyzes specific proteins in a sample | Detects and analyzes specific DNA sequences in a sample |
| Target molecules | Proteins | DNA |
| Technique | Uses antibodies to detect and bind target proteins | Uses DNA probes to detect and bind target DNA sequences |
| Separation method | Protein separation by gel electrophoresis | DNA separation by gel electrophoresis |
| Transfer to membrane | Protein transfer from gel to PVDF or nitrocellulose membrane | DNA transfer from gel to nylon or nitrocellulose membrane |
| Hybridization | Antibodies bind to target proteins on the membrane | DNA probes bind to target DNA sequences on the membrane |
| Detection | Enzyme-conjugated secondary antibodies generate a signal | Radioactive or fluorescent probes generate a signal |
| Sensitivity | High sensitivity, can detect small amounts of proteins | Moderate sensitivity, can detect specific DNA sequences |
| Target specificity | Specific binding to target proteins | Specific binding to target DNA sequences |
| Application | Protein expression analysis, protein-protein interactions | DNA sequence analysis, DNA fragment identification |
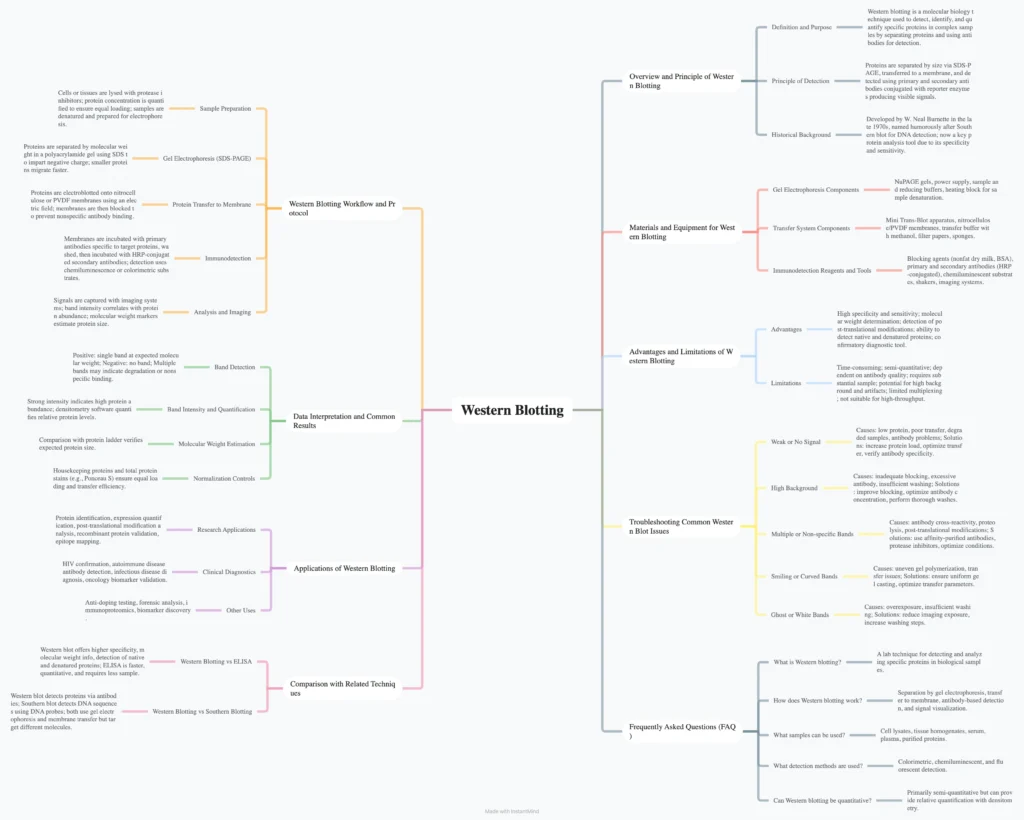
Western Blot Summary Mind map Download
FAQ
What is Western blotting?
Western blotting is a laboratory technique used to detect and analyze specific proteins in a biological sample.
What is the principle behind Western blotting?
Western blotting involves separating proteins by size using gel electrophoresis, transferring them to a membrane, and then using specific antibodies to detect the target proteins.
What are the steps involved in performing a Western blot?
The typical steps include sample preparation, protein separation by gel electrophoresis, transfer to a membrane, blocking to prevent non-specific binding, incubation with primary and secondary antibodies, and detection of protein bands.
What type of samples can be used for Western blotting?
Western blotting can be performed on a variety of samples, including cell lysates, tissue homogenates, serum, plasma, and purified protein samples.
What are the applications of Western blotting?
Western blotting is commonly used in molecular biology research to study protein expression, protein-protein interactions, and post-translational modifications. It is also used for clinical diagnosis and drug development.
How is protein size determined in Western blotting?
Protein size is determined by comparing the migration of protein standards (molecular weight markers) run alongside the sample proteins on the gel. The size can be estimated by comparing the migration distance of the protein bands.
What is the role of antibodies in Western blotting?
Antibodies are used to specifically bind to the target proteins of interest. Primary antibodies recognize the target protein, while secondary antibodies conjugated with a detection molecule provide a signal for visualization.
What are the detection methods used in Western blotting?
Various detection methods are used, including colorimetric (enzyme substrates), chemiluminescent (enzyme-catalyzed light emission), and fluorescent (fluorescently labeled antibodies) detection.
How can I troubleshoot common issues in Western blotting?
Common issues include non-specific binding, weak or no signal, high background, and band distortion. Troubleshooting strategies involve optimizing antibody concentration, blocking conditions, washing steps, and protein sample quality.
Can Western blotting provide quantitative results?
Western blotting is primarily a semi-quantitative technique. However, with appropriate calibration and densitometry analysis, it can provide relative quantification of protein expression levels.
- Mahmood T, Yang PC. Western blot: technique, theory, and trouble shooting. N Am J Med Sci. 2012 Sep;4(9):429-34. doi: 10.4103/1947-2714.100998. PMID: 23050259; PMCID: PMC3456489.
- https://iubmb.onlinelibrary.wiley.com/doi/full/10.1002/bmb.21516
- https://www.bosterbio.com/protocol-and-troubleshooting/western-blot-principle
- https://himedialabs.com/td/hti009.pdf
- http://www.ispybio.com/search/protocols/WesternBlotting.pdf
- https://en.wikipedia.org/wiki/Western_blot
- https://www.mybiosource.com/learn/westernblotting
- https://www.antibodies.com/western-blotting
- https://www.creative-proteomics.com/blog/index.php/the-principle-and-procedure-of-western-blot/
- https://www.sinobiological.com/category/wb-procedures#:~:text=To%20perform%20a%20Western%20Blot,%2C%20(8)%20Data%20analysis.
- https://www.h-h-c.com/western-blot-procedures-analysis-and-purpose/
- https://www.abcam.com/protocols/general-western-blot-protocol
- https://www.thermofisher.com/in/en/home/life-science/protein-biology/protein-biology-learning-center/protein-biology-resource-library/pierce-protein-methods/overview-western-blotting.html
- https://www.novusbio.com/support/support-by-application/western-blot/protocol.html
I been confused before but this post make it sooo simple now.