

Microtome is an instrument used to cut very thin sections of tissues and other materials. These thin sections are used for microscopic examination. The sections are generally about 1 to 100 micrometer in thickness.
The word Microtome is derived from Greek words. Mikros means small and temnein means to cut. So microtome means an instrument which cut small and thin sections.
It is mainly used in histology, pathology, botany and research laboratory. Biological tissues, plant materials and some hard materials are cut by using microtome. The section should be thin enough so that light or electrons can pass through it.
Different blades are used in microtome according to the sample. Steel blade, glass knife and diamond knife are used. Soft tissues are usually cut by steel blade, while very hard or very thin sections need glass or diamond knife.
Before microtome was made, sections were cut by hand with razor or knife. This was difficult and the thickness was not equal. Later mechanical cutting instruments were developed to get uniform sections.
The first early cutting device was made by George Adams Jr. in 1770 and later improved by Alexander Cummings. In 1835, Andrew Prichard made a table mounted type. It reduced vibration and helped to cut better sections.
In 1846, Johann Friedrich August von Reiss made mechanical microtome for more regular sections. Later Wilhelm His Sr. is often known for making microtome as scientific instrument in 1865. Jan Evangelista Purkyně also made early practical models.
Later rotary microtome and rocking microtome were developed. A. Pfeifer and C.S. Minot developed rotary microtome. Caldwell and Threlfall made rocking microtome at University of Cambridge. These designs became important for modern microtome used in pathology laboratory.
Principle of Microtome
Principle of Microtome is based on the cutting of specimen block into very thin and uniform sections. The specimen block is moved slowly towards a sharp knife. The knife cuts the block and thin section is obtained.
The movement of specimen is controlled by mechanical feed system. It has micrometer screw, ratchet wheel and pawl mechanism. These parts move the specimen by very small fixed distance.
When the hand wheel is rotated, the specimen holder moves forward. The distance moved by the specimen decide the thickness of section. If the setting is 5 µm, the block is advanced only 5 µm for each cut.
After this movement, the specimen passes across the knife edge. The knife cuts the tissue in thin slice. This process is repeated again and again.
In this way, microtome produces many sections of equal thickness. The sections are thin enough for light or electron to pass through them. So they can be observed under microscope.
Parts of a microtome
- Base – Base is the lower heavy part of microtome. It supports the whole instrument. It is generally made of cast iron or heavy metal, so vibration is reduced during cutting.
- Housing – Housing covers the internal parts of microtome. It protects gears, screws and other mechanism from dust and damage. It also keeps the instrument strong and stable.
- Specimen holder – Specimen holder is also called clamp or chuck. It holds the tissue block tightly during cutting. The block should not move, otherwise section becomes uneven.
- Orienting head – Orienting head is present in many modern microtome. It helps to adjust the position of tissue block. By this, the cutting face of tissue is brought parallel to the knife edge.
- Knife holder – Knife holder holds the blade in fixed position. It also allows adjustment of knife angle. This angle is important for smooth cutting of the section.
- Knife or blade – Knife is the cutting part of microtome. It may be made of steel, glass, diamond or sapphire. The type of knife is selected according to hardness of specimen and thickness of section.
- Hand wheel – Hand wheel is rotated by the operator. It moves the specimen block up and down against the knife. Its heavy weight gives smooth movement during cutting.
- Feed mechanism – Feed mechanism moves the specimen block forward by very small distance after each cut. It consists of micrometer screw, pawl and ratchet wheel. In automatic microtome, motor may be used.
- Thickness adjustment knob – This knob is used to set the thickness of section. The thickness may be adjusted in micrometer range. The section thickness depends on this setting.
- Safety guard – Safety guard protects the operator from sharp blade. Some microtome also have hand wheel lock and brake. These are used to stop accidental movement.
- Specimen retraction system – It pulls the specimen slightly backward during return stroke. This prevents rubbing of tissue block on the knife edge. So tissue and knife both are protected.
- Waste tray – Waste tray is present below the knife area. It collects paraffin shavings and tissue waste. It helps to keep the working area clean.
Types of Microtome
- Rotary microtome – In this microtome, the specimen moves vertically against a fixed knife. The movement is done by rotating hand wheel. It is commonly used for routine paraffin section cutting in histology.
- Sliding microtome – It is also called sledge microtome. In this type, the knife or specimen moves in horizontal direction. It is used for large specimen and hard tissue blocks.
- Cryostat microtome – It is also called cryomicrotome. The microtome is kept inside a cold chamber. It is used for cutting fresh frozen tissue, mainly in quick diagnosis during operation.
- Ultramicrotome – This microtome is used to cut extremely thin sections. The sections are measured in nanometer. It is mainly used for Transmission Electron Microscope (TEM) study.
- Vibrating microtome – It is also called vibratome. In this type, the blade vibrates very fast and cuts the soft tissue. It is used for soft and unfixed biological tissues.
- Laser microtome – In this microtome, laser is used for cutting the material. It is a non-contact method. Infrared femtosecond laser cuts the tissue without much thermal damage.
- Saw microtome – This microtome has rotating saw blade. It is used for very hard materials like bone and teeth. The saw cuts the sample into thin sections.
- Rocking microtome – In this type, the specimen holder moves in rocking or arc like motion. The knife remains fixed. It is simple and strong microtome, used in teaching and small laboratory.
Types of Microtome Knife
A. On the basis of shape
- Plane-concave knife – It is flat on one side and concave on another side. It is used for very soft samples. Celloidin embedded tissue can be cut by this knife.
- Biconcave knife – It is concave on both sides. It gives very sharp cutting edge but the edge is not very strong. It was used for very thin paraffin section cutting.
- Plane-wedge knife – It is also called wedge shaped knife. Both sides are straight and meet at the cutting edge. It is the common knife used for paraffin and frozen sections.
- Chisel-shaped knife – It has strong and blunt type edge. It is used for hard materials. Undecalcified bone, wood and teeth can be cut by this knife.
B. On the basis of material
- Steel knife – It is made of carbon steel or tool grade steel. It is used in routine histology work. Plant and animal tissues can be cut by it.
- Glass knife – It is made by breaking glass bar in proper way. It is very sharp but fragile. It is used for semi-thin and ultra-thin sections in electron microscope work.
- Diamond knife – It is made from industrial or gem quality diamond. It is very hard and durable. It is used for high precision section cutting and electron microscopy.
- Sapphire knife – It is a special knife. It has sharpness like glass and durability more than glass. It is often used with vibrating microtome.
C. On the basis of use
- Disposable blade – It is used once or for limited time. It does not need sharpening. Low profile blade is used for small biopsy and soft tissue. High profile blade is used for firm and hard tissue.
- Reusable knife – It is strong and can be used many times. It needs honing and stropping. Honing removes nicks and stropping polishes the cutting edge.
Operating Procedure of Microtome
- The paraffin embedded tissue block is first kept on ice. It makes the block hard and suitable for cutting. At the same time, warm water bath is prepared.
- The water bath is filled with distilled water. The temperature is kept about 30-40°C. It should be little lower than the melting point of paraffin wax.
- The microtome knife or disposable blade is fixed in the knife holder. It should be fitted tightly. The clearance angle is adjusted according to the type of block and blade.
- The tissue block is fixed in the specimen clamp of microtome. The block is oriented properly. The cutting surface should come straight in front of the blade.
- The blade is brought near the block carefully. Thick sections are first cut for trimming. Usually 10-30 µm thickness is used to remove extra wax and expose the tissue.
- After the tissue surface is exposed, the section thickness is adjusted. For routine tissue section, about 4-6 µm thickness is selected.
- The hand wheel is rotated slowly and uniformly. The blade cuts the block and thin sections are formed. The section should come out smoothly without tearing.
- The cut sections are picked with forceps or brush. They are floated on warm water bath. The section spreads on water and wrinkles become reduced.
- Clean coated glass slide is taken. The flattened section is lifted from the water bath on the slide. Extra water is allowed to drain.
- The slides are kept in slide rack. Then they are dried in oven at about 37°C for few hours or overnight. This helps the section to attach properly on the slide.
- After drying, the slides are ready for staining. Then coverslip is placed after staining and the section is observed under microscope.
Steps of Tissue Sectioning
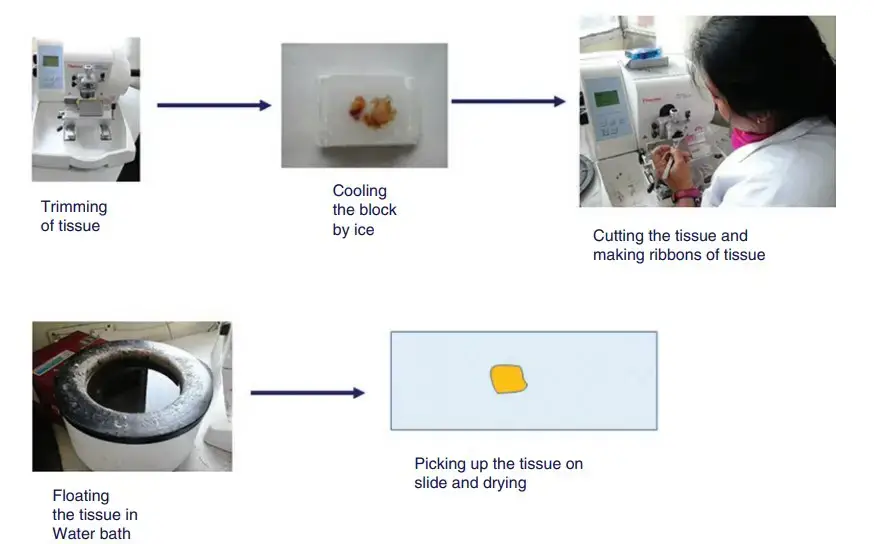
- The trimmed tissue is kept in formaldehyde or neutral buffered formalin. It preserves the tissue and cellular structures are kept in stable condition.
- The fixed tissue is passed through increasing grades of alcohol. Water is removed from the tissue. This is needed because paraffin wax does not mix with water.
- The alcohol is removed by using xylene. The tissue becomes clear and suitable for wax infiltration.
- The tissue is placed in melted paraffin wax. After cooling, the wax becomes hard and supports the tissue for cutting.
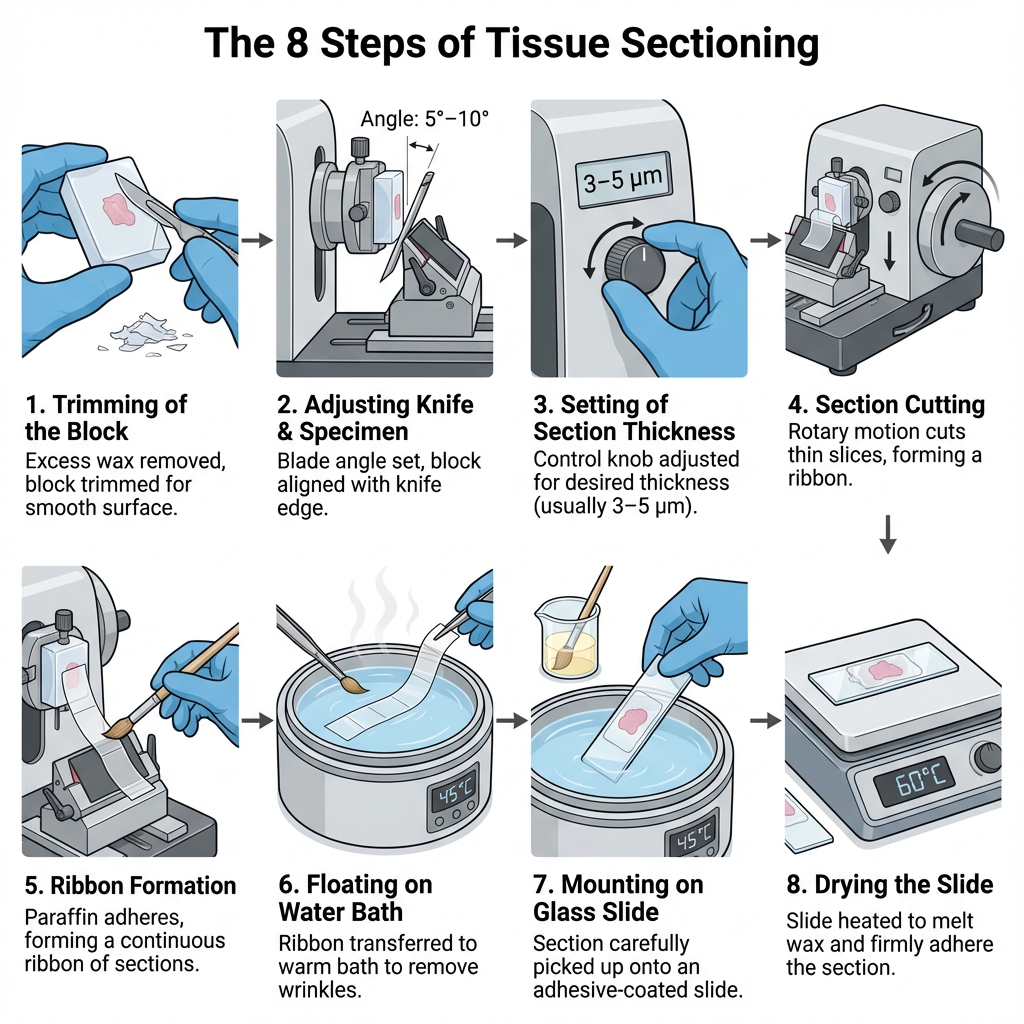
- Extra wax around the tissue block is removed. The tissue surface is exposed slowly. The block is chilled on ice for better cutting.
- The paraffin block is fixed in the specimen clamp of microtome. It should be held tightly because loose block gives uneven section.
- The microtome blade cuts the block into very thin sections. The thickness is usually 3 to 5 µm. Smooth and regular cutting is required.
- The thin sections are placed on warm water bath. The section spreads flat on water. Wrinkles and folds are reduced.
- The flattened section is picked up on clean glass slide. It is lifted carefully so that the section does not tear.
- The section on slide is treated with suitable stain. The stain makes nucleus, cytoplasm and other cell parts clear.
- A coverslip is placed over the stained section with mounting medium. It protects the section for microscopic observation.
Uses of Microtome
- Microtome is used in diagnostic histopathology. Thin tissue sections are prepared and observed under microscope. It helps in diagnosis of cancer, infection and other tissue diseases.
- It is used during operation for quick diagnosis. Frozen tissue is cut by cryostat microtome. It helps to check surgical margin and give fast report.
- It is used in medical and biological research. Animal and human tissues are cut into thin sections. Cell structure and disease changes can be studied.
- It is used in pharmaceutical study. Tissue sections are used to study drug effect, drug delivery and toxicity. It helps to see how drug changes the tissue.
- It is used in forensic pathology. Post-mortem tissue samples are sectioned. It helps to find cause of death, disease process and microscopic injury.
- It is used in electron microscopy. Ultramicrotome cuts very thin sections in nanometer range. These sections are used to see fine cell details.
- It is used in botanical studies. Plant tissues and hard plant materials like wood can be cut. The internal anatomy of plant parts can be observed.
- It is used in material science. Thin sections of polymer, hard plastic, composites and paint are prepared. Their structure and manufacturing defects can be studied.
- It is used in tissue bioengineering. Soft bioengineered materials like biogels, tissue matrices and scaffolds are sectioned. These are studied for tissue engineering work.
- It is used in FTIR spectroscopy. Thin polymer slices are prepared so that infrared beam can pass through the sample.
- It is used in nanotechnology. Microtome helps in making very small channels and devices. These may be used for DNA sensing and other single molecule studies.
Advantages of Microtome
- Microtome produces very thin sections. The section may be below 10 µm. Due to this, light or electrons can pass through the section during microscopic study.
- It gives controlled and repeatable cutting. Same thickness sections can be produced again and again. The cutting is more accurate than hand sectioning.
- It gives precise tissue slices. The tissue block is moved by small fixed distance. So the section thickness remains almost uniform.
- It helps to get intact part of the specimen. The tissue segment is cut in proper way. Such thin and regular section is difficult to prepare manually.
- It can produce continuous ribbon of sections. This is useful in serial sectioning. Many sections can be prepared one after another for diagnosis and study.
- It gives stable cutting condition. The heavy base and proper mechanism reduce vibration. So the section is less damaged during cutting.
- Cutting angle and clearance angle can be adjusted. Different knife profile and different specimen can be used. This helps to cut soft and hard tissues.
- It is used for many types of specimen. Soft tissue, frozen tissue, plant tissue, bone, teeth, polymer and plastic can be sectioned by suitable microtome.
- It improves section quality. Thickness, orientation and shape of section are more regular. Artifacts are less than ordinary hand cutting.
Limitations of Microtome
- Microtome has sharp blade. The blade can cut the hand very easily. So care is needed during fixing, trimming and sectioning.
- In some microtome, the blade is facing upward. This is more dangerous during operation. The hand wheel should be locked when sectioning is not done.
- It needs trained person for proper use. Blade angle, block position and section thickness should be adjusted correctly. Without practice, good section is not obtained.
- It takes time for specimen preparation. Most tissue should be fixed, dehydrated and embedded in paraffin wax or resin before cutting. So direct cutting is not always possible.
- The instrument is costly. Advanced microtome, automatic microtome, ultramicrotome and laser microtome need high cost. Small laboratory may not afford these instruments.
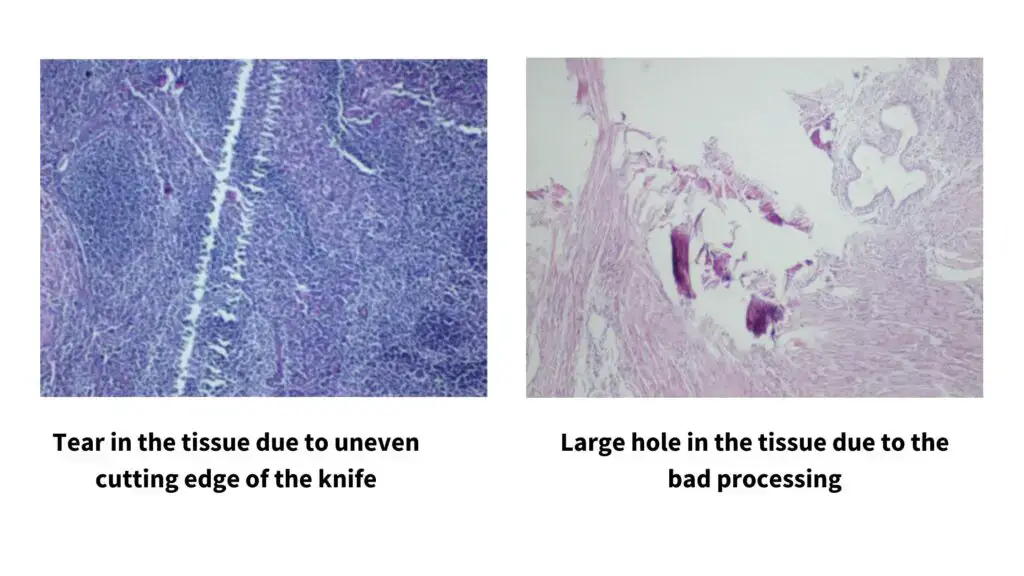
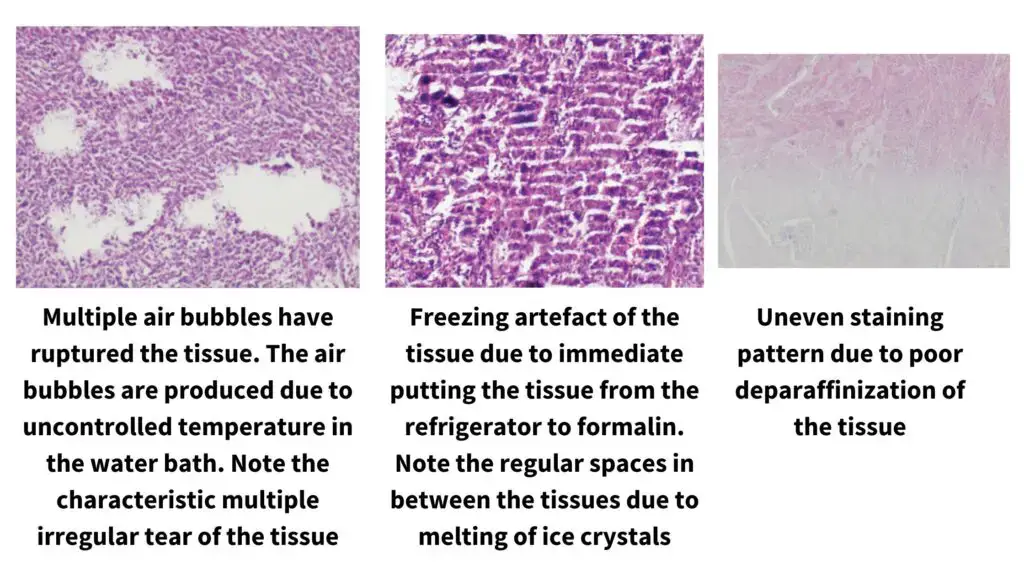
- Sectioning artifacts may be produced. If blade angle, cutting speed or temperature is not proper, the section may tear or fold. Uneven thickness may also occur.
- Ribbon formation may become poor. Sections may crumble, roll up or break. Sometimes chatter marks are formed, which look like venetian blind pattern.
- Rotary microtome has limitation that usually one knife is used at a time. So trimming and sectioning adjustment may take more time.
- Sliding microtome cuts one section at one movement. It is slow process. It is not very suitable for small biopsy tissues.
- Cryostat microtome needs proper low temperature. The tissue and knife temperature should be balanced. If temperature is not correct, tissue may smear, shatter or crumble.
- Hard tissue cannot be cut by ordinary microtome. Bone, teeth and hard polymer need special microtome or special knife. Otherwise blade damage and bad section may occur.
References
- Abd El-Aziz, Y. M., Sobh, M. S., Saad, H. M., Morsy, M. H. E., El-Haroun, E., Abass, K. S., Abdul Kari, Z., Mathew, R. T., Eissa, M. E. H., & Eissa, E. S. H. (2025, August 24). Mastering the art of sectioning: A comprehensive guide to slide-microtome technology and histological applications. Frontiers in Veterinary Science, 12. https://doi.org/10.3389/fvets.2025.1635706
- Anonymous. (n.d.). Precision instrumentation in histology: A comprehensive analysis of microtomy principles, evolution, and technological integration.
- Buchbinder, N. (2025, December 15). We asked AI what’s next in digital pathology for 2026. Then we checked it. Proscia.
- Cambridge Instrument Company, Ltd. (1957, January 18). Cambridge rocking microtomes.
- Clinical Lab Products. (2026, April 17). Clarapath releases updated robotic microtomy platform for clinical histology labs.
- Cunanan, M. J. (2018, July 18). Honing. Lecture Notes in Medical Technology.
- De Bock, J. (2024, March 19). Automatic alignment of sample and knife for high sectioning quality. Leica Microsystems.
- E-Learn with Zakir. (n.d.). Microtome knife part2 [Video]. YouTube.
- GCC Pathology. (2025, October 13). Microtome in pathology: Complete guide to principles, applications & maintenance.
- Greene, J. (2024). Microtome. EBSCO Research Starters.
- Jinhua Yidi Medical Appliance Co., Ltd. (2024, August 26). The evolution of microtome pathology: Unraveling its significance in modern medicine.
- Jinhua Yidi Medical Appliance Co., Ltd. (2024, August 26). The evolution of microtome pathology: Unraveling its significance in modern medicine-Jinhua Yidi Medical Appliance Co.,Ltd.
- Kuhlmann, W. D. (2024, February 3). Microtomy of tissue specimens, collection of sections. Laboratory Diagnostics & Cell Science.
- Labec. (2026, January 22). A beginner’s guide to microtomes: Types, uses, and best practices in histology.
- LLS ROWIAK LaserLabSolutions GmbH. (n.d.). TissueSurgeon – Laser microtome.
- Meehan. (2023, February 3). Early microtome. Archives at Alfred University.
- Milestone Medical. (n.d.). HistoDream microtomes.
- Mordor Intelligence. (n.d.). Microtome market size, trends report 2026 – 2031 | Industry forecast.
- National Center for Biotechnology Information. (n.d.). Artificial intelligence in digital pathology diagnosis and analysis: Technologies, challenges, and future prospects. PubMed Central.
- National Center for Biotechnology Information. (n.d.). Automation of a pathology laboratory – current developments. PubMed Central.
- National Center for Biotechnology Information. (n.d.). Mastering the art of sectioning: A comprehensive guide to slide-microtome technology and histological applications. PubMed Central.
- Photonics Spectra. (2007, May). Microtomy with femtosecond lasers.
- Precisionary Instruments. (n.d.). Slicing for materials & bioengineering applications.
- RWD Life Science. (2023, January 16). Common microtome tissue sectioning troubleshooting and tips.
- RWD Life Science. (2023, February 15). Introduction to rotary microtome parts and functions.
- Scouten, C. W. (n.d.). Microtome blade clearance angle in microtomy. Leica Biosystems.
- SlideShare. (n.d.). Honing and stropping.pptx.
- SlideShare. (n.d.). microtomy.pptx.
- Smolinski, J. (2025, September 19). Enabling the future of digital pathology with DICOM at Pathology Visions 2025. Merative.
- StatLab. (n.d.). Six simple adjustments to take your microtomy from menacing to manageable.
- The Royal College of Pathologists. (n.d.). Object 25: Cambridge rocker microtome.
- Vibro International. (n.d.). Cambridge rocking microtome.
- Wali, H. F. T., Sayed, S. A. A., & Thamer, A. A. (2026, March 14). Polymer science: From basics to nanotechnology applications. Academia Open, 11(1). https://doi.org/10.21070/acopen.11.2026.13893
- Wax-it Histology Services Inc. (2025, January 21). Tissue microtomy: The ultimate guide to mastering this essential technique.
- Wikipedia. (2026, January 31). Microtome.
- Wikipedia. (2026, April 20). Laser microtome.
- Wu, E. (2025, September 7). Rotary microtome guide: Parts, functions & applications. AELAB.