Gram Staining – Procedure, Principle, and Results

What is Gram staining?

  • Gram staining, a pivotal technique in microbiology, was pioneered by the Danish bacteriologist Hans Christian Gram in 1884. The primary objective of this method is to differentiate bacterial species into two principal groups based on the chemical and physical properties of their cell walls: gram-positive bacteria and gram-negative bacteria.
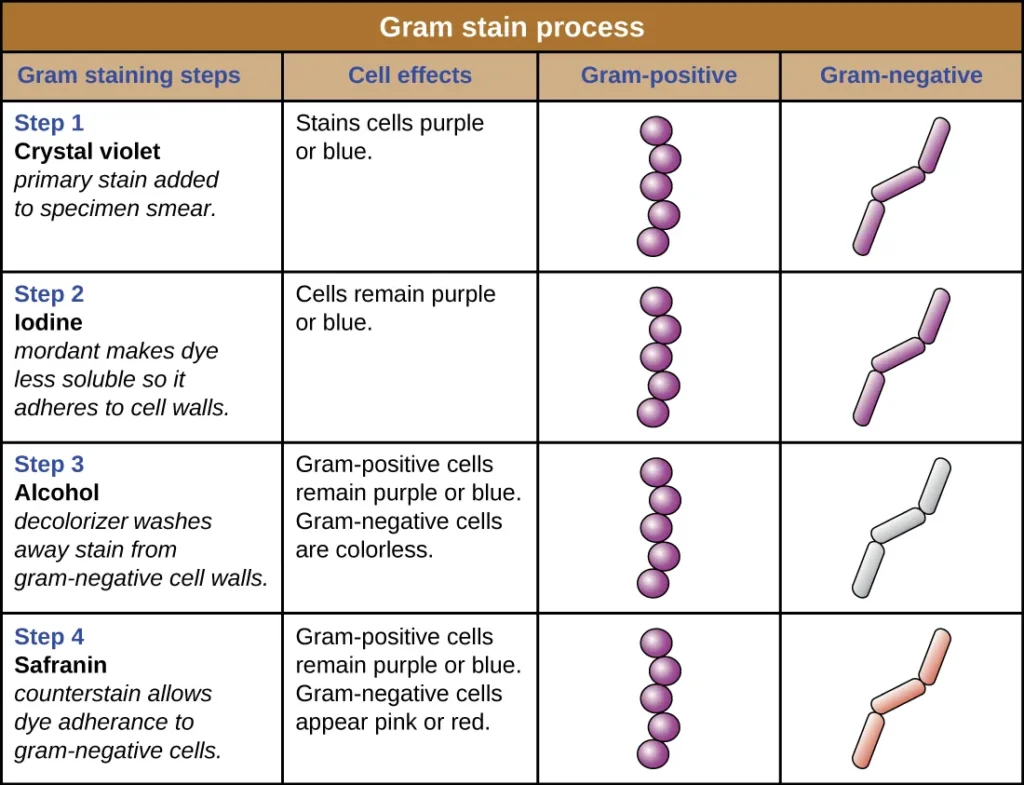
  • The procedure begins with the application of a primary stain, crystal violet, to the bacterial sample. Following this, Lugol’s iodine solution, which acts as a mordant, is added to strengthen the bond between the stain and the bacterial cell membrane. Then, the sample is treated with ethanol, a decolorizer. The ethanol’s role is crucial as it determines the final coloration of the bacteria. Gram-positive bacteria, characterized by a thick layer of peptidoglycan in their cell walls, retain the crystal violet stain, resulting in a blue/violet appearance. In contrast, gram-negative bacteria possess a thinner peptidoglycan layer, causing the crystal violet to be washed out during the ethanol treatment. Therefore, a counterstain, typically safranin or fuchsine, is applied, rendering the gram-negative bacteria pink or red.
  • Besides its role in distinguishing between gram-positive and gram-negative bacteria, the Gram stain provides valuable insights into the bacterial cell wall’s composition. For instance, the thick peptidoglycan layer in gram-positive bacteria is responsible for retaining the primary stain. On the other hand, the thinner peptidoglycan layer in gram-negative bacteria allows the primary stain to be easily decolorized, necessitating the use of a counterstain.
  • Moreover, Gram staining plays a crucial role in both clinical and research settings, often serving as the initial step in bacterial identification. However, it’s essential to note that while the Gram stain is an indispensable tool, not all bacteria can be definitively classified using this method alone. Some bacteria exhibit properties of both groups, leading to classifications such as gram-variable and gram-indeterminate.
  • In conclusion, Gram staining is a fundamental, differential staining technique in bacteriology that offers a clear and concise method to categorize bacteria based on their cell wall properties. By understanding the functions and characteristics of different bacterial groups, researchers and clinicians can make informed decisions regarding treatment and further investigations.

Definition of Gram Staining

Gram staining is a microbiological technique used to differentiate bacterial species into two groups, gram-positive and gram-negative, based on the chemical properties of their cell walls.

Purpose of Gram Staining

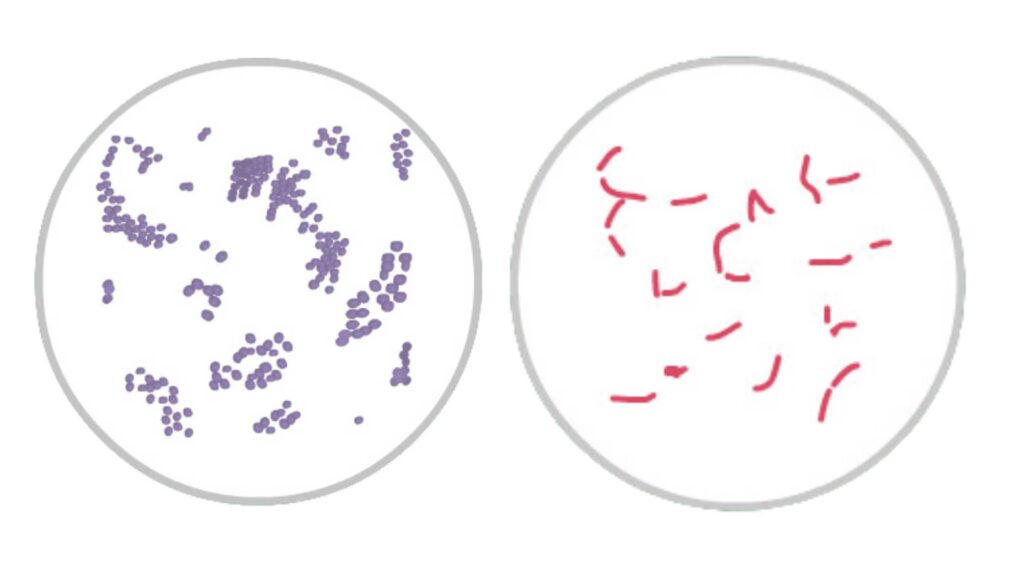
  • The primary objective of Gram staining is to categorize bacteria into two distinct groups: Gram-positive and Gram-negative. This differentiation is achieved by observing the coloration of the bacterial cells post-staining. Gram-positive bacteria, characterized by a thick peptidoglycan layer in their cell walls, retain the primary stain, resulting in a blue to purple appearance. On the other hand, Gram-negative bacteria, possessing a thinner peptidoglycan layer, do not retain the primary stain and, therefore, take up the counterstain, leading to a red to pink hue.
  • Besides this primary classification, another objective of Gram staining is to study the morphological structure of bacteria. By understanding the thickness and composition of the peptidoglycan layer, researchers can gain insights into the bacterial cell wall’s structural intricacies. This knowledge, in turn, aids in understanding the bacteria’s physiological properties, potential pathogenicity, and possible mechanisms of resistance.

Gram Staining Principle

Gram staining Principle or Mechanism
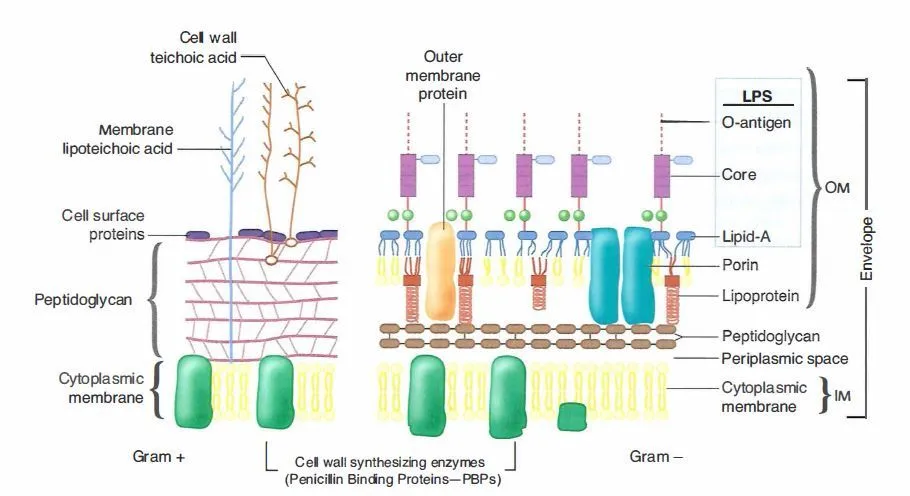
  • Gram staining is a fundamental technique in microbiology, serving as a differential staining method to classify bacteria based on their cell wall composition. The principle behind this method lies in the structural differences between Gram-positive and Gram-negative bacteria, particularly in the composition and thickness of their peptidoglycan layers.
  • Bacteria with a thick peptidoglycan layer, characteristic of Gram-positive bacteria, retain the primary stain, crystal violet, even after the decolorization step. This results in these bacteria appearing violet or purple under the microscope. On the other hand, Gram-negative bacteria, which have a thinner peptidoglycan layer and a more complex cell wall structure, lose the primary stain during decolorization and instead take up the counterstain, appearing pink or red.
  • During the Gram staining process, the crystal violet dye dissociates in an aqueous solution, forming positively charged CV+ ions and negatively charged Cl- ions. These ions easily penetrate the bacterial cell walls, with the CV+ ions interacting with negatively charged components within the cell. The addition of Gram’s iodine, acting as a mordant, causes the formation of a CV-I complex within the cytoplasm and the various cell wall layers. This complex is crucial as it is what ultimately determines whether a bacterium will retain or lose the primary stain.
  • When a decolorizing agent, typically ethanol or a mixture of ethanol and acetone, is applied, it interacts differently with the cell walls of Gram-positive and Gram-negative bacteria. In Gram-negative bacteria, the decolorizing solution disrupts the outer membrane, exposing the thinner peptidoglycan layer, which allows the CV-I complex to leak out. As a result, these bacteria lose the violet stain. In contrast, Gram-positive bacteria, which lack an outer membrane and possess a thick peptidoglycan layer with high cross-linkage, have their peptidoglycan layer dehydrated by the decolorizing agent. This dehydration effectively traps the CV-I complexes within the cell wall, ensuring that these bacteria retain their purple or violet color.
  • The final step in the staining process involves the application of a counterstain, typically safranin. Safranin is positively charged and interacts with the negatively charged components of the Gram-negative bacterial cell wall, causing these bacteria to appear pink or red. However, in Gram-positive bacteria, the dehydrated and CV-I complex-saturated cell wall prevents the safranin from entering, ensuring that these bacteria continue to display the purple or violet hue.
Gram Staining
Gram Staining

Requirements for Gram Staining

Below is a list of the key requirements:

  • Sample Bacterial Colonies or Suspension:
    Source of the bacteria to be stained, which could be from colonies grown on an agar plate or a bacterial suspension prepared in a liquid medium.
  • Gram Staining Kit (Reagents):
    Includes the primary stain (crystal violet), mordant (Gram’s iodine), decolorizing agent (ethanol or a mixture of ethanol and acetone), and counterstain (safranin). These reagents are essential for the step-by-step staining process.
  • Glass Slide:
    A clean surface where the bacterial sample is smeared, heat-fixed, and subsequently stained. The quality of the slide is important for clear microscopic observation.
  • Inoculating Loop:
    A tool used to transfer the bacterial sample to the glass slide. It is crucial for obtaining an appropriate quantity of bacteria for staining.
  • Bunsen Burner:
    Used to heat-fix the bacterial smear on the slide, which helps in attaching the bacteria firmly to the slide and ensures the sample is ready for staining.
  • Staining Rack:
    A supportive structure that holds the slide during the staining process, allowing for the easy application and removal of stains and reagents.
  • Wash Bottle (or Tap Water):
    Used to rinse the slide between staining steps, ensuring the removal of excess reagents and preventing contamination of subsequent stains.
  • Microscope with 100X Objective Lens (Compound Microscope):
    A high-magnification microscope is necessary for observing the stained bacteria. The 100X objective lens, combined with oil immersion, provides the necessary resolution to distinguish between Gram-positive and Gram-negative bacteria.

Reagents Required for Gram Staining

The Gram staining procedure employs a series of chemicals and dyes, each serving a specific function in the differentiation of bacterial cells. These reagents can be categorized as follows:

  1. Primary Stain (Crystal Violet)
    • Description: Crystal violet is an intensely purple-colored dye, chemically known as triphenylmethane dye. It is also referred to as hexamethyl pararosaniline chloride, methyl violet 10B, or gentian violet. The color of crystal violet varies with the pH of the dissolving medium; it appears yellow at pH 1.0 or below, green at acidic pH 1 to 2, purple (deep blue-violet) at neutral pH, and colorless at highly basic pH.
    • Function: In Gram staining, crystal violet acts as a basic dye in its ionized form (CV+ and Cl-), providing a violet color to Gram-positive bacteria. It is used in microbiology for staining bacteria, histological slides, and DNA, and it also possesses antibacterial and antifungal properties.
  2. Mordant (Gram’s Iodine)
    • Description: Gram’s iodine is an aqueous solution containing iodine and potassium iodide.
    • Function: This mordant interacts with the crystal violet to form a complex known as CV-I. This CV-I complex gets trapped within the dehydrated peptidoglycan layer of Gram-positive bacterial cell walls, aiding in the retention of the primary stain.
  3. Decolorizing Solution
    • Description: The decolorizing solution is typically composed of acetone, ethanol (95%), or a mixture of acetone and ethanol in a 1:1 ratio by volume.
    • Function: The decolorizing agent dissolves the lipid content in the outer membrane of Gram-negative bacteria, increasing their permeability and causing them to lose the primary stain. In contrast, it dehydrates the thick peptidoglycan layer of Gram-positive bacteria, trapping the CV-I complex inside and preserving the violet color.
  4. Counterstain (Safranin)
    • Description: Safranin is a red-colored counterstain, a basic dye that interacts with the negatively charged components of the bacterial cell wall and membrane.
    • Function: Safranin is used to stain decolorized Gram-negative bacteria, imparting a pink or red color. This allows for the differentiation between Gram-negative and Gram-positive bacteria. Additionally, dilute carbol fuchsin can also be used as an alternative counterstain.
ReagentFunctionPreparation
Primary Stain: Crystal VioletServes as the primary stain, providing a violet color to Gram-Positive bacteria.Solution A: Combine 2g of crystal violet (with a certified 90% dye content) with 20 ml of 95% ethanol.
Solution B: Dissolve 0.8g of ammonium oxalate in 80 ml of distilled water.
Mix Solutions A and B to obtain the crystal violet staining reagent. Allow it to sit for 24 hours and then filter through paper before use.
Mordant: Gram’s IodineActs as a mordant, forming a complex with the crystal violet, which gets trapped in the Gram-Positive cell wall’s dehydrated peptidoglycan layer.Grind 1.0g of iodine and 2.0g of potassium iodide in a mortar. Slowly add water while continuously grinding until the iodine dissolves. The resulting solution should be stored in amber bottles.
Decolorizing SolutionDissolves the lipid content in bacterial cell walls, affecting their permeability.Standard Decolorizing Agent: Use 95% ethanol.
Alternate Decolorizing Agent: Combine 50 ml of acetone with 50 ml of 95% ethanol. Some variations might include small quantities of isopropyl alcohol or methanol.
Counterstain: SafraninServes as a counterstain, staining decolorized Gram-Negative cells pink or red. It interacts with the negatively charged components of the bacterial cell wall and membrane.Stock Solution: Dissolve 2.5g of Safranin O in 100 ml of 95% ethanol.
Working Solution: Mix 10 ml of the stock solution with 90 ml of distilled water.

Reagent Preparation for Gram Staining

Below is a detailed guide for preparing each reagent used in Gram staining:

  1. Crystal Violet Preparation
    • Solution A (Crystal Violet Stock Solution):
      Combine 20 grams of 85% crystal violet dye with 100 milliliters of 95% ethanol. Stir thoroughly until the dye is completely dissolved.
    • Solution B (Oxalate Stock Solution):
      Dissolve 1 gram of ammonium oxalate in 100 milliliters of distilled water. Mix thoroughly to ensure complete dissolution.
    • Working Solution:
      To prepare the working solution, mix 1 milliliter of the crystal violet stock solution with 10 milliliters of distilled water. Then, add 40 milliliters of the oxalate stock solution. Allow the solution to sit at room temperature for 24 hours before use. Store the prepared solution in a dark bottle to protect it from light.
  2. Gram’s Iodine Preparation
    • Preparation:
      Dissolve 1 gram of iodine and 2 grams of potassium iodide in 300 milliliters of distilled water. Stir until the iodine is completely dissolved. Store the solution in a dark bottle to prevent degradation by light.
  3. Decolorizing Solution
    • Preparation:
      Mix 50 milliliters of acetone with 50 milliliters of 95% ethanol. This mixture is used to decolorize Gram-negative bacteria by dissolving lipids in their outer membrane and increasing permeability.
  4. Safranin Preparation
    • Preparation:
      Dissolve 2.5 grams of safranin-O in 100 milliliters of 95% ethanol. To make the working solution, mix 10 milliliters of this safranin solution with 90 milliliters of distilled water. Safranin is used as a counterstain to color Gram-negative bacteria pink or red.
  5. Carbol-Fuchsin Preparation
    • Preparation:
      Dissolve 3 grams of basic fuchsin in 100 milliliters of 95% ethanol. Prepare a 5% phenol solution by mixing 5 milliliters of liquid phenol with 95 milliliters of distilled water. Combine 10 milliliters of the basic fuchsin solution with 100 milliliters of the 5% phenol solution. Allow this mixture to sit at room temperature for 24 hours before use. Store in a dark bottle to maintain reagent stability.

Gram Staining Procedure

a. Preparation of a slide smear for Gram Staining

The preparation of a Gram stain slide is a critical step in the Gram staining process. It ensures that bacterial cells are properly adhered to the glass slide and ready for staining. The following steps outline the procedure for preparing a Gram stain slide:

  1. Prepare the Glass Slide
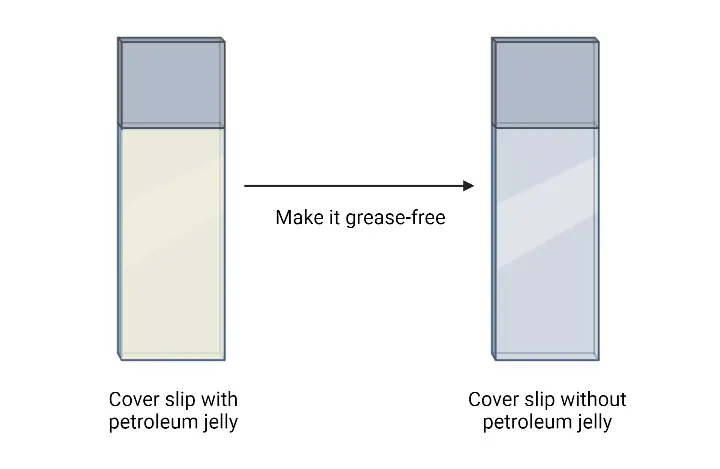
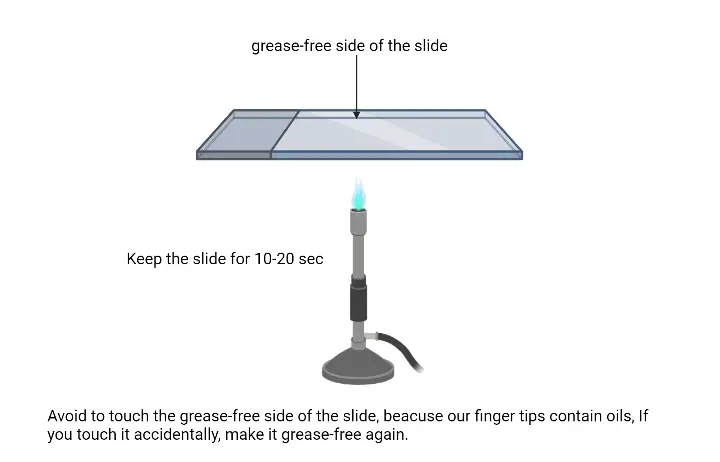
    • Cleanliness: Begin with a clean, clear, and grease-free glass slide. Ensure that the slide is free from any contaminants that could interfere with staining.
  2. Transfer Bacterial Culture
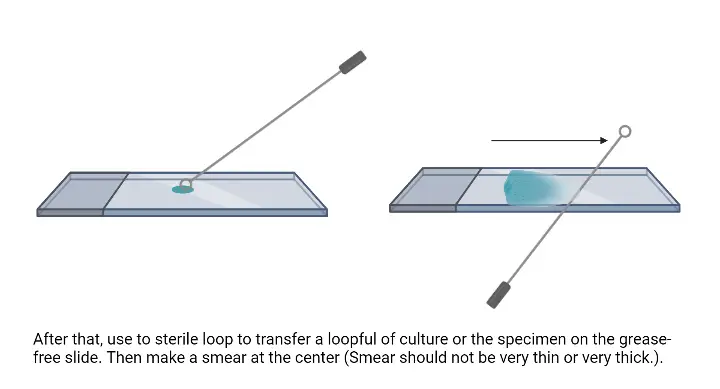
    • From Suspension: Sterilize the inoculating loop by flaming it. Then, transfer a loopful of bacterial culture suspension to the center of the glass slide.
    • From Solid Media: If using a petri dish or slant, place a drop of water in the center of the slide. Use a sterile loop to pick a small amount of bacterial colony from the media and mix it with the water drop on the slide.
  3. Prepare the Smear
    • Spread the Suspension: Use the sterile inoculating loop to spread the bacterial suspension evenly across the slide. Aim for a thin, even smear; the smear should not be too thick or too thin. A well-prepared smear is crucial for clear visualization of bacterial morphology.
  4. Air Dry the Smear
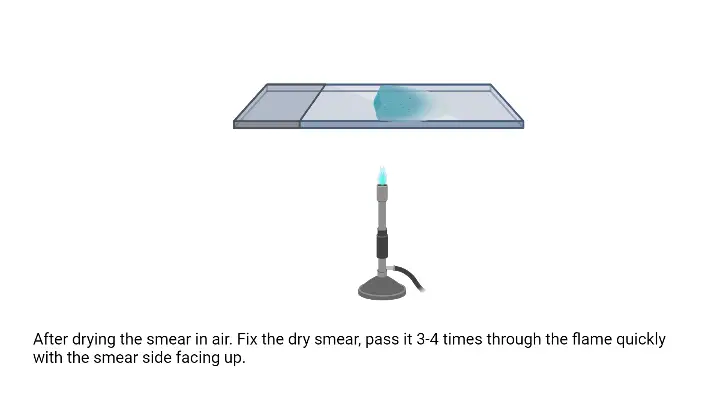
    • Drying: Allow the smear to air dry completely. This step ensures that the bacterial cells adhere firmly to the slide.
  5. Fix the Smear
    • Flaming: Fix the dried smear by passing the slide gently over the flame of a Bunsen burner. Hold the slide at an angle and move it up and down or in a circular motion over the flame to avoid overheating. Proper fixation secures the bacterial cells to the slide and prevents them from washing away during the staining process.
Gram Staining Procedure
Smear preparation
Smear preparation

b. Gram Staining Protocol

The following steps outline the Gram staining process:

  1. Apply Crystal Violet Stain
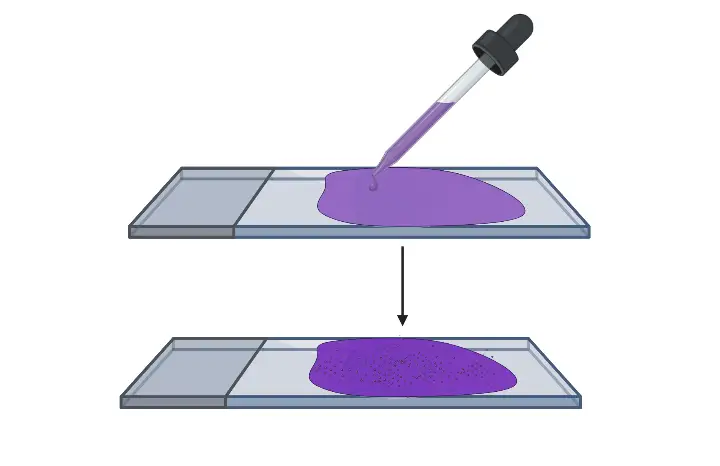
    • Flood the Slide: Begin by flooding the fixed smear with crystal violet solution. Ensure that the entire smear is covered with the dye.
    • Incubation: Allow the crystal violet to remain on the smear for 30 to 60 seconds. This primary stain imparts a purple color to all bacterial cells.
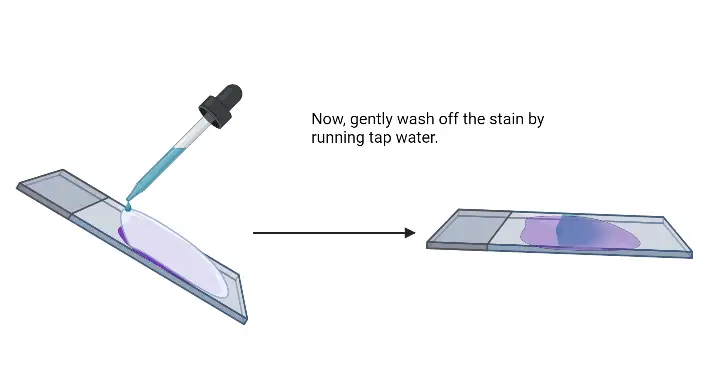
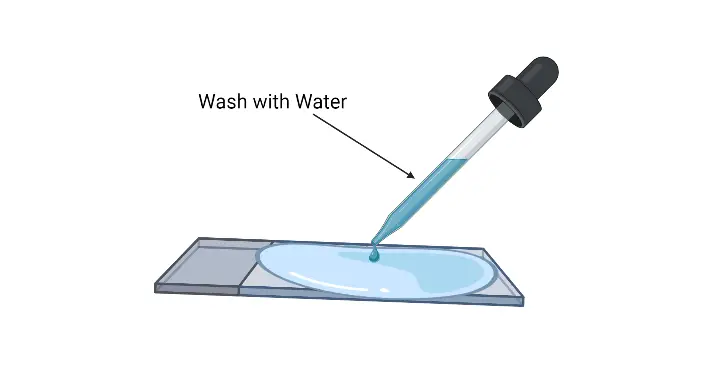
    • Rinse: After the incubation period, pour off the crystal violet solution and rinse the slide gently with running water. This removes excess dye and prepares the slide for the next step.
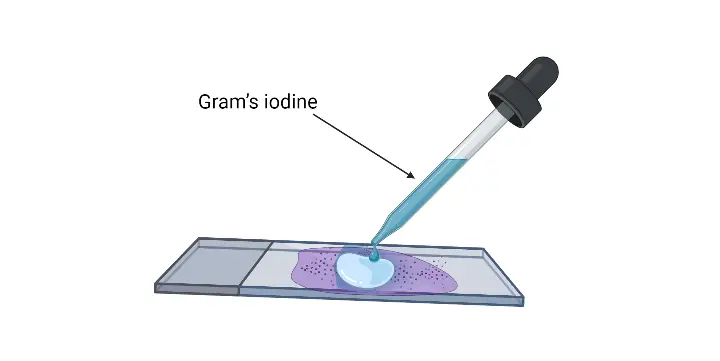
  2. Apply Gram’s Iodine
    • Flood the Slide: Apply Gram’s iodine solution to the smear, ensuring complete coverage.
    • Incubation: Let the iodine solution sit for 30 to 60 seconds. The iodine acts as a mordant, forming a complex with the crystal violet dye.
    • Rinse: Pour off the excess iodine and rinse the slide gently with running water to remove any surplus iodine.
  3. Decolorize
    • Decolorization: Proceed with the decolorizing solution. This can be done by either:
      • Passing the slide through the decolorizing solution until it runs clear, indicating the removal of the crystal violet-iodine complex from Gram-negative bacteria.
      • Alternatively, adding a few drops of decolorizing solution to the smear, gently shaking, and then rinsing with distilled water after 5 seconds. This step differentiates between Gram-positive and Gram-negative bacteria based on their cell wall structure.
    • Rinse: Wash the slide with distilled water to remove residual decolorizer.
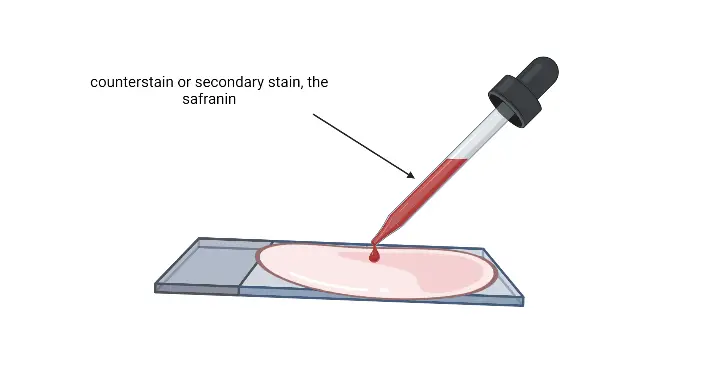
  4. Apply Counterstain (Safranin)
    • Flood the Slide: Pour the counterstain (safranin) over the smear.
    • Incubation: Allow the safranin to remain on the smear for 30 to 60 seconds. Safranin stains the Gram-negative bacteria, which have lost the crystal violet dye.
    • Rinse: Wash the slide gently with running water to remove excess safranin.
  5. Dry the Slide
    • Drying: Air dry the slide or use a blow dryer to speed up the process. Ensure that the slide is completely dry before microscopic examination.
Gram Staining Procedure

b. Procedure of Microscopic Observation of Gram Stain

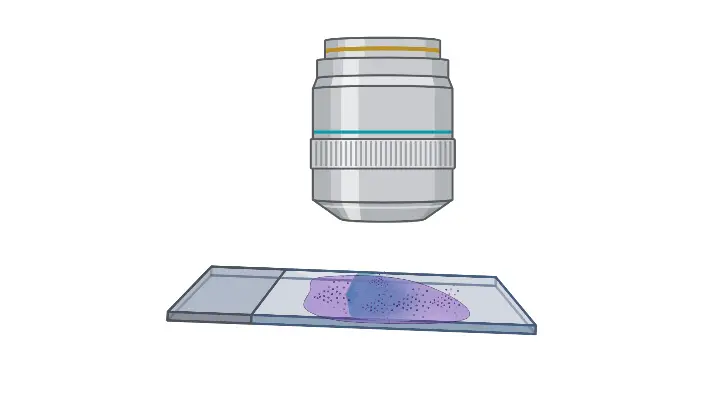
Microscopic observation of a Gram-stained smear involves precise steps to ensure accurate visualization and analysis of bacterial morphology. The following steps outline the procedure for examining a Gram-stained slide under a compound microscope:

  1. Prepare the Slide
    • Place the Slide: Position the air-dried Gram-stained smear onto the stage of a compound microscope. Secure the slide in place using the stage clips to prevent movement.
  2. Adjust Lighting
    • Focus Light: Adjust the microscope stage to ensure that the light is appropriately focused on the smear. Proper lighting enhances visibility and contrast of the bacterial cells.
  3. Initial Focusing
    • 10X Objective Lens: Begin with the 10X objective lens. Use the coarse adjustment knob to bring the smear into initial focus. This lower magnification provides a broader view of the specimen.
  4. Increase Magnification
    • 40X Objective Lens: Switch to the 40X objective lens for more detailed observation. Adjust the focus using the fine adjustment knob to achieve a clear image of the bacterial cells.
  5. Prepare for Higher Magnification
    • Immersion Oil: Rotate the nosepiece to position the slide between the 40X and 100X objective lenses. Apply a drop of immersion oil onto the smear. Immersion oil enhances resolution by minimizing light refraction.
  6. Final Focusing
    • 100X Oil Immersion Lens: Rotate the nosepiece to align the 100X oil immersion objective lens over the smear. Use the fine adjustment knob to focus the microscope, ensuring a detailed view of the bacterial structures.
  7. Observation
    • Study the Bacteria: Examine the bacteria under the 100X objective lens. Observe the color, shape, and arrangement of bacterial cells to determine their Gram-positive or Gram-negative characteristics.
Procedure for Change Magnification in Microscope

Changing the magnification in a microscope is a fundamental skill for anyone working in a laboratory setting. It allows for detailed examination of specimens at varying levels of magnification. The following is a detailed and sequential explanation of the procedure to change the magnification in a microscope:

  1. Positioning: Begin by positioning yourself comfortably in front of the microscope. Ensure that your eyes are level with the eyepieces and that you have a clear view of the specimen.
  2. Initial Focus: Look through the eyepieces and use the coarse and fine focusing knobs to bring the specimen into clear focus at the current magnification level, which in this case is 10x.
  3. Locating the Objective Lenses: Direct your attention to the objective lenses located on the rotating nosepiece beneath the stage of the microscope. These lenses are responsible for magnifying the specimen. Each lens is labeled with its magnification power, such as 10x, 40x, or 100x.
  4. Selecting the Desired Magnification: Gently turn the nosepiece either to the right or left until the 100x objective lens clicks into place directly above the specimen. Ensure that the lens is aligned correctly to avoid any obstructions in the viewing field.
  5. Refocusing: After changing the objective lens, the specimen’s focus may be slightly off. Therefore, look through the eyepieces once again and use the fine adjustment knob to bring the specimen into sharp focus at the new 100x magnification level.
  6. Observation: With the specimen now in focus at the desired magnification, you can proceed with your observations, taking note of any details or structures that were not visible at the lower magnification.
Oil Immersion steps in microscope for 100x magnification

The oil immersion technique is a pivotal method in microscopy, especially when one aims to achieve the highest resolution with 100x magnification. This technique employs immersion oil to bridge the gap between the microscope slide and the objective lens. The following is a systematic guide to the oil immersion steps for 100x magnification:

  1. Preparation: Begin by ensuring that the microscope is positioned on a stable surface. Switch on the microscope’s light source to ensure adequate illumination.
  2. Slide Placement: Place the prepared microscope slide on the stage, ensuring that the specimen is facing upwards. Adjust the slide so that the area of interest is directly beneath the objective lens.
  3. Initial Magnification: Before applying the oil, it’s essential to first use a lower magnification objective, such as the 40x, to locate the area of interest on the slide.
  4. Applying Immersion Oil: Once the area of interest is located, rotate the nosepiece away from the slide and place a drop of immersion oil directly onto the specimen. The oil serves to reduce light refraction, thereby enhancing image clarity at high magnifications.
  5. Engaging the 100x Objective: Carefully rotate the nosepiece to align the 100x oil immersion objective lens with the specimen. The objective lens should immerse into the oil drop placed on the slide.
  6. Focusing: With the 100x objective lens in place, look through the eyepieces. Utilize the fine adjustment knob to bring the specimen into sharp focus. The immersion oil will ensure that more light rays are captured, providing a clearer and more detailed image.
  7. Observation: At this magnification, cellular structures and minute details become more evident. Therefore, take your time to study the specimen, noting any intricate details that were not discernible at lower magnifications.
  8. Post-Observation Cleanup: After completing the observations, rotate the nosepiece to disengage the 100x objective. Carefully clean the objective lens using lens tissue or a soft, lint-free cloth to remove any residual immersion oil. Similarly, clean the slide to remove the oil before storing it.
gram staining procedure in flowchart

Gram Staining Result and Interpretation

Here is an overview of the results and their interpretations:

  1. Gram-Positive Bacteria
    • Appearance: Gram-positive bacteria retain the crystal violet stain and appear violet or purple under the microscope.
    • Cell Wall Structure: These bacteria possess a thick peptidoglycan layer in their cell walls, which traps the crystal violet-iodine complex, resisting decolorization.
    • Examples:
      • Gram-Positive Cocci: Staphylococcus spp., Streptococcus spp., Enterococcus spp.
      • Gram-Positive Bacilli: Bacillus spp., Clostridium spp., Lactobacillus spp., Streptomyces spp., Listeria spp., Corynebacterium spp.
  2. Gram-Negative Bacteria
    • Appearance: Gram-negative bacteria lose the crystal violet stain during the decolorization step and take up the counterstain, appearing pink or red.
    • Cell Wall Structure: These bacteria have a thinner peptidoglycan layer and an outer membrane. The decolorizing agent disrupts the outer membrane, allowing the crystal violet-iodine complex to wash out, but they subsequently absorb the counterstain.
    • Examples:

Interpretation of Results

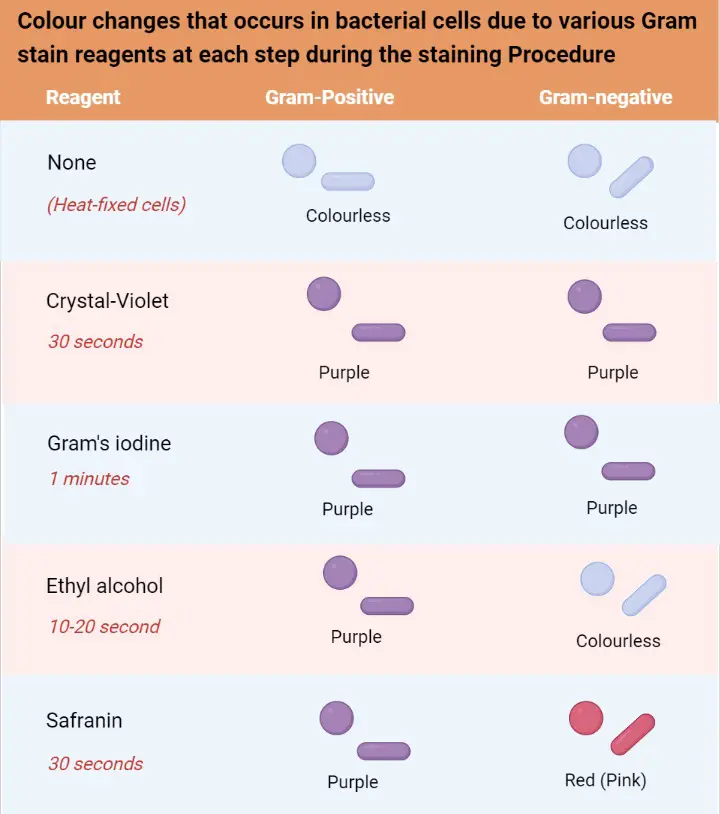
  • Violet/Purple Staining: Indicates Gram-positive bacteria. The thick peptidoglycan layer retains the primary stain and appears violet or purple.
  • Pink/Red Staining: Indicates Gram-negative bacteria. The thinner peptidoglycan layer and outer membrane allow the primary stain to be washed out, and the counterstain is absorbed, giving a pink or red appearance.
Gram Staining Result
Colour changes that occurs in bacterial cells due to various Gram stain reagents at each step during the staining Procedure
Gram-Positive BacteriaGram-Negative Bacteria
Staphylococcus aureusEscherichia coli
Streptococcus pneumoniaeSalmonella spp.
Bacillus anthracisKlebsiella pneumoniae
Clostridium tetaniProteus mirabilis
Listeria monocytogenesPseudomonas aeruginosa
Corynebacterium diphtheriaeHaemophilus influenzae
Streptococcus pyogenesNeisseria gonorrhoeae
Enterococcus faecalisShigella spp.
Clostridium perfringensVibrio cholerae
Mycobacterium tuberculosisFrancisella tularensis
Gram Staining Result and Interpretation
False Positive Results
  • Thick Smears: When the bacterial smear on the slide is too thick, it can cause uneven staining. This results in poor differentiation of bacterial types, as the dye might not penetrate uniformly through the thick layer.
  • Dye Contamination: Deposits or impurities in the dye, such as in the gentian violet bottle, can affect staining quality. Filtering the dye can help eliminate these contaminants and improve staining accuracy.
  • Improper Iodine Drainage: If the iodine solution is not adequately drained from the slide, it can lead to uneven staining. Ensuring thorough drainage of the iodine solution is essential for accurate results.
  • Inadequate Decolorization: If the decolorizing agent is left on the slide for too short a time, it may not effectively remove the crystal violet from Gram-negative bacteria, leading to a false positive result.
  • Counterstain Issues: Fuchsin, when used with certain bacteria like Neisseria and Acinetobacter, can be absorbed excessively, producing a dark red color that may be difficult to distinguish from violet. This issue can complicate the interpretation of Gram-positive versus Gram-negative results.
False Negative Results
  • Gram-Positive Bacteria Appearing Gram-Negative: Sometimes, Gram-positive bacteria may appear as Gram-negative under certain conditions. This can occur with dead or degraded Gram-positive cells, which can exhibit characteristics of Gram-negative bacteria.
  • Diluted or Poor-Quality Dyes: Using dyes that are too diluted or of poor quality can impair the staining process, leading to incorrect classification of bacteria.
  • Inadequate Iodine Exposure: If Lugol’s iodine solution is not left on the slide for the recommended duration, it may not form a stable complex with the crystal violet, affecting the staining outcome.
  • Over-Decolorization: Prolonged exposure to decolorizing agents or improper rinsing can result in excessive removal of the crystal violet stain, leading to false negative results where Gram-positive bacteria appear Gram-negative.

Complications of Gram Staining

  1. Smear Thickness: The interpretation of slides can become challenging if the microscopic smear is too thick or clumped. Thicker smears necessitate a longer decolorizing time, which can affect the outcome.
  2. Decolorization: The time taken for decolorization requires meticulous monitoring. Both under-decolorization and over-decolorization can lead to inaccurate results.
  3. Age of Cultures: It’s imperative to evaluate cultures when they are fresh. Older cultures might lose their peptidoglycan cell walls, causing gram-positive cells to appear as gram-negative or gram variable.
  4. Limitations of the Technique: Gram staining is not effective for organisms without a cell wall, such as Mycoplasma species. Additionally, smaller bacteria like Chlamydia and Rickettsia species are not accurately detected using this method.
  5. Potential for False Negatives: Several scenarios can lead to a Gram stain not revealing organisms accurately:
    • Prior use of antibiotics before specimen collection.
    • Evaluating cultures that are too young or too old.
    • Fixing the smear before it has dried completely.
    • Excessively thick smears.
    • Using a low concentration of crystal violet.
    • Overheating during fixation.
    • Washing excessively between steps.
    • Insufficient exposure to iodine.
    • Extended decolorization.
    • Overdoing counterstaining.
    • Lack of experience in both slide preparation and review.
  6. Mismatched Results: There are instances where the results of the Gram stain may not align with the final culture results. This discrepancy can potentially lead to the inappropriate use of antibiotics.

Therefore, while the Gram staining technique is invaluable in microbiology, it’s crucial to be aware of its potential complications. Proper training, adherence to protocols, and understanding the intricacies of the method can help mitigate these challenges and ensure accurate results.

Potential Diagnosis Using Gram Staining

Gram staining is a pivotal technique in microbiology, offering a rapid method to differentiate bacterial types and subsequently aid in the diagnosis of various diseases or pathological conditions. By distinguishing bacteria based on their cell wall composition, medical professionals can identify the potential causative agents of infections and tailor treatment accordingly.

  1. Gram-Positive Organisms:
    • Cocci:
      • Staphylococcus species: These are often responsible for skin infections, food poisoning, and sometimes more severe conditions like pneumonia or bloodstream infections.
      • Streptococcus species: These can cause a range of diseases, from throat infections (streptococcal pharyngitis) to severe conditions like rheumatic fever.
    • Bacilli:
      • Corynebacterium species: One notable member is Corynebacterium diphtheriae, the causative agent of diphtheria.
      • Clostridium species: These can cause conditions like tetanus or botulism.
      • Listeria species: Listeria monocytogenes, for instance, can cause a severe foodborne illness known as listeriosis.
  2. Gram-Negative Organisms:
    • Cocci:
      • Neisseria gonorrhoeae: The causative agent of gonorrhea, a sexually transmitted infection.
      • Neisseria meningitidis: Responsible for meningococcal meningitis.
      • Moraxella species: Some species can cause infections in the respiratory system.
    • Bacilli:
      • Escherichia coli (E. coli): While many strains are harmless, some can cause food poisoning, urinary tract infections, and other illnesses.
      • Pseudomonas species: These can lead to skin rashes, ear infections, and more severe conditions in immunocompromised individuals.
      • Proteus species: Often associated with urinary tract infections.
      • Klebsiella species: Can cause conditions ranging from pneumonia to bloodstream infections.
  3. Gram-Variable Organisms:
    • Actinomyces species: These bacteria are typically found in the human mouth and can cause actinomycosis, a rare kind of slowly progressing infection.

Therefore, by identifying the type of bacteria present in a sample, Gram staining provides invaluable information that can guide medical professionals in their diagnostic process and subsequent treatment decisions.

Normal and Critical Findings Using Gram Staining

Gram staining is a fundamental technique in microbiology that differentiates bacteria based on their cell wall composition. This method provides crucial insights into the potential causative agents of infections, guiding subsequent diagnostic and treatment decisions.

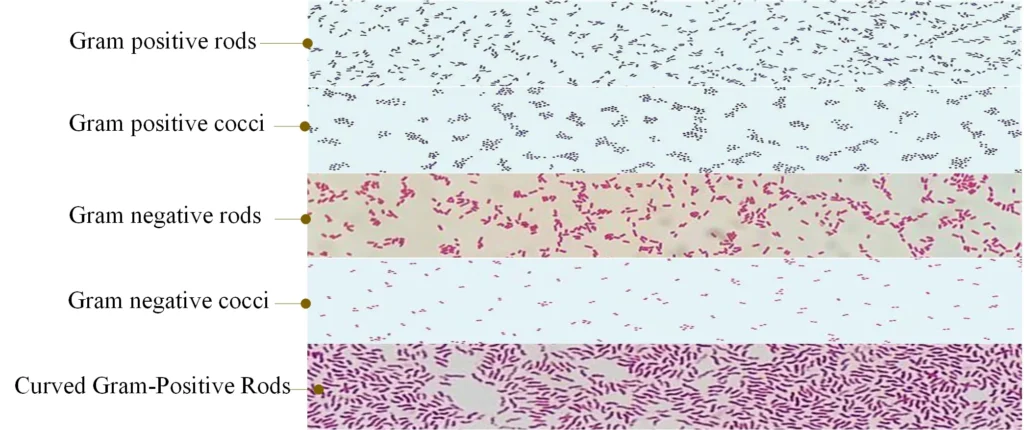
Normal Findings: In sterile body fluids, the expected normal finding is the absence of any pathogenic organisms. When observing under the microscope, the organisms, if present, are identified based on their color and shape. Gram-positive organisms will appear purple or blue, while gram-negative organisms will manifest as pink or red. The shape further classifies them: bacilli are rod-shaped, and cocci are spherical.

Critical Findings: Certain morphological characteristics on a Gram-stained smear can suggest specific bacterial infections:

  1. Gram-Positive Organisms:
    • Cocci in clusters: Typically indicative of Staphylococcus species, such as S. aureus.
    • Cocci in chains: Characteristic of Streptococcus species like S. pneumoniae and B group streptococci.
    • Cocci in tetrads: Often associated with Micrococcus spp.
    • Thick bacilli: Commonly seen in Clostridium spp., including C. perfringes and C. septicum.
    • Thin bacilli: Indicative of Listeria spp.
    • Bacilli with branches: Characteristic of Actinomyces and Nocardia.
  2. Gram-Negative Organisms:
    • Diplococci: Often seen in Neisseria spp., such as N. meningitidis. It’s worth noting that Moraxella spp. and Acinetobacter spp. can also exhibit a diplococcal morphology. Acinetobacter might sometimes appear as Gram-positive cocci and can be pleomorphic.
    • Coccobacilli: Typically associated with Acinetobacter spp. They can vary in their staining, appearing as gram-positive, gram-negative, or gram-variable.
    • Thin bacilli: Commonly associated with Enterobacteriaceae, such as E. coli.
    • Coccobacilli: Indicative of Hemophilus spp., like H. influenzae.
    • Curved rods: Characteristic of Vibrio spp. and Campylobacter spp., including V. cholerae and C. jejuni.
    • Thin, needle-shaped rods: Often seen in Fusobacterium spp.
  3. Gram-Variable Organisms: These organisms do not distinctly fall into either the gram-positive or gram-negative categories, making them unique in their staining properties.

Therefore, understanding the morphology and staining characteristics of bacteria is pivotal in the diagnostic process, allowing clinicians to make informed decisions about patient care.

Interfering Factors in Gram Staining

Gram staining is a pivotal technique in microbiology, allowing for the differentiation of bacterial species based on their cell wall properties. However, several factors can interfere with the accuracy and reliability of this method. Understanding these interfering factors is crucial to ensure the validity of the results.

  1. Specimen Collection Issues:
    • Contamination: If the specimen collection is not carried out under sterile conditions, it can lead to contamination by multiple organisms, thereby affecting the accuracy of the results.
    • Improper Collection: The manner in which the specimen is collected can influence the outcome. For instance, prior use of antibiotics can hinder the growth of organisms, leading to false-negative results.
  2. Interpretation of the Gram Stain: As outlined by the World Health Organization in 2003, several steps should be meticulously followed during the interpretation:
    • Low Power Magnification (10X): At this magnification, the general nature of the smear should be analyzed. The background of the slide should predominantly be gram-negative or clear. White blood cells, if present, should also stain gram-negative. It’s essential to ensure that thin crystal violet or gentian violet precipitates are not misinterpreted as gram-positive bacillus bacteria. Ideally, the smear should be one cell thick without any overlapping of cells.
    • Observations under Low Power Magnification: This magnification level is used to observe:
      • The relative numbers of polymorphonuclear neutrophils (PMNs), mononuclear cells, and red blood cells (RBCs).
      • The relative numbers of squamous epithelial cells and normal microbiota bacteria.
      • The location, arrangement, and shape of the organisms.
    • Oil Immersion Examination: A thorough examination under oil immersion across multiple fields is vital to note:
      • Micro-organisms: If identified, their numbers and morphology should be noted.
      • Shapes: These can range from coccus, bacillus, coccobacillus, to filaments and yeast-like forms.
      • End Appearances: These can be rounded, tapered, concave, clubbed, or flattened.
      • Side Appearances: These can be parallel, ovoid, irregular, or concave.
      • Axis of the Organism: This can be straight, curved, or spiral.
      • Pleomorphism: This refers to the variation in shape.
      • Branching or Cellular Extensions: These are unique features that some bacteria might exhibit.

Therefore, while Gram staining is a valuable diagnostic tool, it’s imperative to be aware of the potential interfering factors and ensure meticulous adherence to the procedure to achieve accurate results.

Variations in Gram Reaction

Gram staining is a fundamental technique in microbiology, pivotal for distinguishing between different bacterial groups based on their cell wall properties. However, various factors can influence the results, leading to unexpected outcomes.

  1. Gram-Positive Bacteria Variations: Gram-positive bacteria, typically retaining the crystal violet stain and appearing purple, might sometimes stain as Gram-negative due to several reasons:
    • Damage to the bacterial cell wall, which can be a result of antibiotic therapy or excessive heat fixation of the smear.
    • Over-decolorization of the smear.
    • Utilization of an old iodine solution that has turned yellow instead of its original brown color. It’s crucial to store iodine in brown glass or other light-opaque containers to maintain its efficacy.
    • Preparing smears from old cultures.
    • The thickness of the smear also plays a role. A thick smear might require more decolorization than a thin one. If not fully decolorized, Gram-negative bacteria might appear as Gram-positive.
  2. Pitfalls in Interpretation: Certain organisms can present variations in their staining, leading to potential misinterpretations:
    • Streptococcus pneumoniae: Typically seen as Gram-positive, lancet-shaped diplococci, they can sometimes appear as elongated cocci resembling short bacilli. Over-decolorized cells might be mistaken for gram-negative coccobacilli.
    • Acinetobacter spp.: Generally observed as Gram-negative coccobacilli, they can sometimes appear as Gram-negative cocci or even demonstrate gram-variable staining. They might be mistaken for Neisseria spp. and reported as gram-negative cocci. It’s essential to search the smear for elongated forms, which Neisseria doesn’t exhibit.
    • Clostridium perfringens: Known for their boxcar-shaped gram-positive bacilli appearance, they can sometimes appear as Gram-positive cocci or even Gram-variable or Gram-negative bacilli. The unique boxcar shape is a clue that the organism is gram-positive. Other Clostridia and Bacillus spp. might also appear similar.
    • Yeast, especially Cryptococcus neoformans: Typically appearing as Gram-positive round or oval cells with budding, they might sometimes demonstrate gram-variable staining. Their size and shape distinguish them from bacteria, ensuring they aren’t mistaken for artifacts.

Therefore, while Gram staining remains an invaluable tool in microbiology, it’s imperative to be aware of these variations and potential pitfalls to ensure accurate interpretation and diagnosis.

Gram-positive bacteria and Gram-negative bacteria

Gram positive cocci

Description of the MorphotypeMost Common Organisms
PairsStaphylococcus, Streptococcus, Enterococcus spp.
tetradsMicrococcus, Staphylococcus, Peptostreptococcus spp
GroupsStaphylococcus, Peptostreptococcus, Stomatococcus spp.
ChainsStreptococcus, Peptostreptococcus spp.
Clusters, intracellularStreptococcus spp. Microaerophilic, viridans streptococci, Staphylococcus spp.
EncapsulatedStreptococcus pneumoniae, Streptococcus pyogenes (rarely), Stomatococcus mucilaginosus
In the form of an ancestorStreptococcus pneumoniae

Gram-negative cocci

Neisseria spp., Moraxella catarrhalis.

Gram-positive bacilli

Description of the MorphotypeMost Common Organisms
LittleListeria monocytogenes, Corynebacterium spp.
MediumLactobacillus, anaerobic bacilli
BigClostridium, Bacillus spp.
DiphtheroidCorynebacterium, Propionibacterium, Rothia spp.
Pleomorphic, Gram variablesGardnerella vaginalis
PearlMycobacteria, lactobacilli affected by antibiotics and corynebacteria
FilamentousAnaerobic morphotypes, cells affected by antibiotics
Filamentous, beaded, branchedActinomycetes, Nocardia, Nocardiopsis, Streptomyces, Rothia spp.
Bifid or V shapesBifidobacterium spp., brevibacteria
Gram-negative coccobacilliBordetella, Haemophilus spp. (pleomorph)
MassesVeillonella spp.
ChainsPrevotella, Veillonella spp.

Gram-negative bacilli

Description of the MorphotypeMost Common Organisms
LittleHaemophilus, Legionella (thin with filaments), Actinobacillus, Bordetella, Brucella, Francisella, Pasteurella, Capnocytophaga, Prevotella, Eikenella spp.
BipolarKlebsiella pneumoniae, Pasteurella spp., Bacteroides spp.
MediumEnterics, pseudomonads
BigClostridia or devitalized bacilli
CurvedVibro, Campylobacter spp.
SpiralCampylobacter, Helicobacter, Gastrobacillum, Borrelia, Leptospira, Treponema spp
FusiformFusobacterium nucleatum
FilamentsFusobacterium necrophorum (pleomorph)

Applications of Gram Staining

  1. Bacterial Classification in Research: Gram staining is employed extensively in research settings to classify bacteria into two primary groups: Gram-positive and Gram-negative. This classification aids researchers in understanding the structural and functional differences between these groups.
  2. Diagnostic Identification: In diagnostic laboratories, Gram staining is a crucial step for the preliminary identification of pathogens. By observing the staining pattern, microbiologists can infer the nature of the bacterial invader and its potential implications.
  3. Hospital Applications: In clinical settings, especially hospitals, Gram staining plays a vital role in guiding the initial choice of antibiotics for treatment, even before the complete identification of the bacterial species. This rapid intervention can be life-saving, especially in cases of severe infections.
  4. Studying Bacterial Morphology: Besides classification, Gram staining is also used to study the morphology or shape and structure of bacteria, providing insights into their biology and behavior.
  5. Identification of Bacterial Species: As a preliminary step, Gram staining aids in narrowing down the potential bacterial species in a sample. By discerning whether a bacterium is Gram-positive or Gram-negative, further specific tests can be conducted to confirm the bacterium’s identity.
  6. Detection of Bacterial Infections: Clinical samples, such as sputum, urine, and wound swabs, often undergo Gram staining to detect bacterial infections. Identifying the type of bacteria and its Gram nature helps healthcare providers determine the most effective treatment strategy.
  7. Antibiotic Susceptibility Testing: The Gram nature of bacteria can hint at their susceptibility or resistance to certain antibiotics. For instance, Gram-negative bacteria often exhibit resistance to specific antibiotics, necessitating alternative treatment strategies.
  8. Research and Discovery: Beyond clinical applications, Gram staining is invaluable in research. By analyzing bacterial cell structures and their staining patterns, scientists can delve deeper into bacterial biology, understanding their interactions with various environments and other organisms.

Advantages of Gram Staining

Gram staining has several advantages over other methods of bacterial identification, including:

  1. Widely available and relatively easy to perform: Gram staining is a simple and inexpensive procedure that can be performed in most laboratories. It requires only basic equipment, such as a microscope, a heat source, and a few chemical reagents.
  2. High degree of accuracy: Gram staining has a high degree of accuracy, especially when combined with other identification techniques. This makes it a reliable method for identifying bacterial species in clinical samples.
  3. Can be performed on a variety of samples: Gram staining can be performed on a wide range of samples, including liquid cultures, solid media, and clinical specimens. This makes it a versatile technique for identifying bacteria in different types of samples.
  4. Provides information about the structure of bacterial cells: In addition to identifying bacterial species, Gram staining can also provide information about the structure of bacterial cells. By examining the appearance of the cells under the microscope, microbiologists can learn more about the characteristics and behavior of different bacterial species.

Limitation of Gram Staining

  1. Inability to Stain Specific Bacteria: Gram staining cannot effectively stain Acid Fast Bacilli, notably Mycobacterium species. Additionally, bacteria without a cell wall, such as Mycoplasma species, remain unstained.
  2. Ineffectiveness for Minute Bacteria: The technique is unsuitable for staining minute bacteria like Rickettsia species and Chlamydia species.
  3. Requirement of Multiple Reagents: The procedure necessitates the use of multiple reagents, complicating the process.
  4. Risk of Over-decolorization: Over-decolorizing the smear can lead to false gram-negative results, while under-decolorizing can produce false gram-positive outcomes.
  5. Issues with Smear Thickness: Thick or viscous smears might retain excessive primary stain, complicating the differentiation between Gram-positive and Gram-negative organisms.
  6. Age of Cultures: Cultures that have aged beyond 16 to 18 hours consist of both living and dead cells. The deteriorating dead cells might not retain the stain appropriately.
  7. Stain Precipitation: With time, the stain can form a precipitate. Filtering the stain through gauze can help remove these excess crystals.
  8. Impact of Antibiotics: Gram stains from patients undergoing antibiotic or antimicrobial treatment might display altered Gram stain reactivity due to the medication’s effectiveness.
  9. Growth Limitations: Occasionally, pneumococci identified in the lower respiratory tract might not grow in culture, as some strains are obligate anaerobes.
  10. Toxin-producing Organisms: Organisms that produce toxins, such as Clostridia, staphylococci, and streptococci, might destroy white blood cells in a purulent specimen.
  11. Faintly Staining Organisms: Some Gram-negative organisms, like Campylobacter and Brucella, may stain faintly. Using an alternative counterstain, such as basic fuchsin, can help visualize these organisms.

What is the correct order of staining reagents in gram-staining?

The correct order of staining reagents in gram staining is as follows:

  1. Crystal violet
  2. Iodine
  3. Alcohol or acetone
  4. Safranin (counterstain)

Here is a brief description of each step:

  1. Crystal violet: The sample is first treated with crystal violet, a violet-colored dye, which stains the bacterial cells.
  2. Iodine: The sample is then rinsed and treated with an iodine solution, which serves as a mordant to help the crystal violet dye bind to the bacterial cell walls.
  3. Alcohol or acetone: The sample is then rinsed again and treated with a decolorizing solution, which typically contains alcohol or acetone. This step helps to remove the excess crystal violet dye from the sample, resulting in the decolorization of the sample.
  4. Safranin: Finally, the sample is treated with a counterstain called safranin, which stains the bacteria that were not retained by the crystal violet-iodine staining. This step allows for the differentiation between Gram-positive and Gram-negative bacteria based on their different responses to the crystal violet-iodine staining.

Comments And Tips

  1. Smear Thickness: The thickness of the smear directly influences the outcome of the Gram stain. A thin smear with no clumping or inconsistency is recommended for optimal results.
  2. Decolorizing Step: This is the most critical step in the staining process. Over-decolorizing can cause gram-positive cells to appear as gram-negative, while under-decolorizing can produce the opposite effect. The decolorizing time varies based on the smear’s thickness. Some experts suggest flooding the slide for 15 seconds or less, while others recommend a drop-wise approach for 5-15 seconds.
  3. Use of Young Cultures: For accurate Gram staining, young, actively growing cultures are preferred. Older cultures might have compromised cell walls, leading to gram-variable results.
  4. Gram Stain Control: Including a known gram stain reaction sample on the same slide as the test culture can serve as a control, ensuring the technique’s success.
  5. Microscopy: After staining, bacteria should be viewed under a brightfield microscope at 1000X magnification using oil immersion. Proper brightness adjustment is crucial to discern the specimen’s color.
  6. Fresh Staining Reagents: It’s recommended to use freshly made staining reagents. If using older reagents, filtering before use is advised.
  7. Positive Charge Confusion: The Gram stain technique uses two positively charged dyes: crystal violet and safranin. The term “gram-positive” should not be confused with staining cells with a simple stain carrying a positive charge.
  8. KOH String Test: This test can confirm the Gram Stain results. The formation of a string (DNA) in 3% KOH indicates a gram-negative organism.
  9. Decolorizing Agents: Various formulations can be used, including acetone, acetone/ethanol, and ethanol. Acetone is the fastest decolorizer, followed by acetone/ethanol and then ethanol. For student use, ethanol is recommended to prevent over-decolorization.
  10. Counterstain Duration: Overexposure to counterstain can affect results. The mordant’s presence slows down the counterstaining process, so it’s essential to monitor the exposure time.

Gram Staining Procedure Simulation

Gram Staining Procedure Simulation

Animation of gram staining

Gram Staining Images
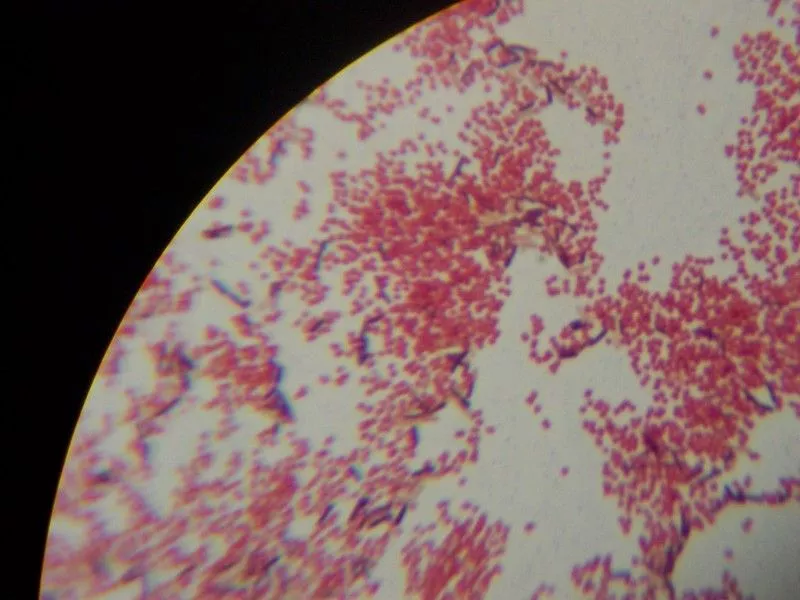
Gram Staining Images
Gram Staining Images – gram-positive and gram-negative staining. Gram positive- purple, in contrast alcohol or acetone removes the crystal violet(primary stain) -iodine(mordant) complex form gram neg. bacteria, they are counterstained with a red dye, safranin (for 1 min.)….all in all gram pos would look purple, and gram neg. is pinkish. (look at lab manual pg 101)…(note wilma y.’s work)
Gram Staining Images
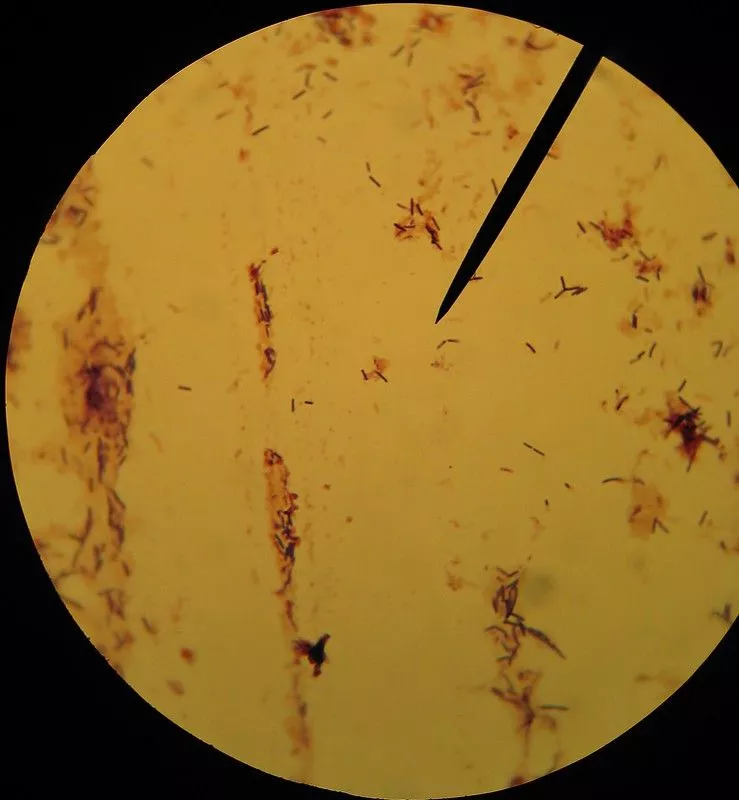
Gram Staining Images – Gram stain of fresh/new bacteria (as opposed to old.)
Gram Staining Images

MCQ on Gram Staining

FAQ

What is gram staining?

Gram staining is a laboratory technique used to differentiate bacterial species based on the structure and composition of their cell walls. It was developed by Danish bacteriologist Hans Christian Gram in 1884 and is still widely used today.
In the Gram staining procedure, a bacterial sample is first treated with a crystal violet stain, which colors the cells purple. The sample is then washed with a decolorizing solution, which removes the stain from most bacterial cells. However, the cells of Gram-positive bacteria are able to retain the crystal violet stain due to the thick peptidoglycan layer in their cell walls. The sample is then treated with a counterstain, typically safranin, which colors the cells red.
When observed under the microscope, Gram-positive bacteria will appear purple due to the retained crystal violet stain, while Gram-negative bacteria will appear red due to the counterstain. This allows microbiologists to differentiate between the two groups based on the appearance of the cells.
Gram staining is a widely used technique for the identification and characterization of bacterial species, as well as for the detection and treatment of infections. It is a simple and inexpensive procedure that can be performed in most laboratories, and it provides rapid and accurate results.

Who discovered gram staining?

Gram staining is a laboratory technique that was developed by Danish bacteriologist Hans Christian Gram in 1884. It is used to differentiate bacterial species based on the differences in their cell wall composition. Gram staining is still widely used today in microbiology laboratories to identify and classify bacteria.

What is the role of alcohol during gram staining?

Alcohol is used during the gram staining procedure to decolorize the sample after it has been dyed with crystal violet. After the sample has been dyed with crystal violet, it is rinsed with water and then treated with an iodine solution, which serves as a mordant to help the crystal violet dye bind to the bacterial cell walls. The sample is then rinsed again and treated with a decolorizing solution, which typically contains alcohol. The alcohol in the decolorizing solution helps to remove the excess crystal violet dye from the sample, resulting in the decolorization of the sample. This step is important because it allows for the differentiation between Gram-positive and Gram-negative bacteria based on their different responses to the crystal violet-iodine staining.

Gram stain is example of which staining?

Gram staining is an example of a differential stain. Differential stains are used to distinguish between different types of cells or microorganisms based on their physical or chemical properties. In the case of gram staining, the technique is used to differentiate between two major groups of bacteria: Gram-positive and Gram-negative. Gram-positive bacteria have a thick peptidoglycan layer in their cell walls, which retains the crystal violet dye during the gram staining procedure and appears purple or blue under the microscope. Gram-negative bacteria have a thinner peptidoglycan layer and an outer membrane made of lipopolysaccharides, which does not retain the crystal violet dye and appears pink or red when counterstained with safranin.

Which dye is used for gram staining?

The dye used for gram staining is crystal violet. Crystal violet is a violet-colored dye that is used to stain bacterial cells during the gram staining procedure. After the bacterial cells have been treated with crystal violet, they are rinsed and treated with an iodine solution, which serves as a mordant to help the crystal violet dye bind to the bacterial cell walls. The sample is then rinsed again and treated with a decolorizing solution, typically containing alcohol or acetone, which removes the excess crystal violet dye from the sample. Finally, the sample is treated with a counterstain called safranin, which stains the bacteria that were not retained by the crystal violet-iodine staining. This allows for the differentiation between Gram-positive and Gram-negative bacteria based on their different responses to the crystal violet-iodine staining.

Which primary stain is used during gram staining?

The primary stain used during gram staining is crystal violet. Crystal violet is a violet-colored dye that is used to stain bacterial cells during the gram staining procedure. After the bacterial cells have been treated with crystal violet, they are rinsed and treated with an iodine solution, which serves as a mordant to help the crystal violet dye bind to the bacterial cell walls. The sample is then rinsed again and treated with a decolorizing solution, typically containing alcohol or acetone, which removes the excess crystal violet dye from the sample. Finally, the sample is treated with a counterstain called safranin, which stains the bacteria that were not retained by the crystal violet-iodine staining. This allows for the differentiation between Gram-positive and Gram-negative bacteria based on their different responses to the crystal violet-iodine staining.

Which bacteria appears purple violet colour after gram staining?

Gram-positive bacteria appear purple or blue after gram staining. Gram-positive bacteria have a thick peptidoglycan layer in their cell walls, which retains the crystal violet dye during the gram staining procedure. The retained dye gives the bacterial cells a purple or blue color when viewed under the microscope. Gram-negative bacteria, on the other hand, have a thinner peptidoglycan layer and an outer membrane made of lipopolysaccharides, which does not retain the crystal violet dye. These bacteria appear pink or red when counterstained with safranin, a counterstain used in the gram staining procedure.

What is mordant in gram staining?

In gram staining, a mordant is a substance that is used to fix the crystal violet dye to the cells being stained. The most commonly used mordant in gram staining is crystal violet, which is used to color the cells purple. Other mordants that can be used in gram staining include iodine and safranin. The choice of mordant will depend on the specific protocol being used and the characteristics of the cells being stained.

Reference
  1. Tripathi N, Sapra A. Gram Staining. [Updated 2023 Aug 14]. In: StatPearls [Internet]. Treasure Island (FL): StatPearls Publishing; 2024 Jan-. Available from: https://www.ncbi.nlm.nih.gov/books/NBK562156/
  2. https://asm.org/getattachment/5c95a063-326b-4b2f-98ce-001de9a5ece3/gram-stain-protocol-2886.pdf
  3. https://serc.carleton.edu/microbelife/research_methods/microscopy/gramstain.html
  4. https://microbiologie-clinique.com/gram-stain-principle-steps-interpretation.html
  5. Jay Hardy – Gram’s Serendipitous Stain
  6. Andreia Popescu – The Gram Stain after More than a Century
  7. Clinical Microbiology Procedures Handbook 4ed
  8. TEXtBOOK Diagnostic Microbiology 4ed
  9. T J Beveridge – Mechanism of gram variability in select bacteria

Latest Questions

Start Asking Questions

This site uses Akismet to reduce spam. Learn how your comment data is processed.

⚠️
  1. Click on your ad blocker icon in your browser's toolbar
  2. Select "Pause" or "Disable" for this website
  3. Refresh the page if it doesn't automatically reload