What is a serial dilution?
- Serial dilution is a meticulously sequenced procedure, entailing the stepwise dilution of a substance to derive solutions of varying concentrations. The technique primarily involves the systematic dilution of a concentrated solution, making it more applicable and manageable for scientific experimentation.
- The very essence of serial dilution lies in its principle of sequentially reducing the concentration of a solution through established dilution factors. Particularly in the realm of biology, this approach is crucial for manipulating the concentration of cellular cultures to facilitate more streamlined experimentation.
- Such a method is imperative when working with specimens, be they in liquid or solid form, that possess high concentrations of microorganisms. For instance, from suspensions of E. coli in a nutrient broth to solid samples like soil or hamburger meat, the microorganism counts can be so elevated that a direct quantification becomes impractical. Through serial dilution, these high counts are brought down to quantifiable levels, making the analysis more efficient and precise.
- The primary goal behind employing this technique can range from enumerating bacterial, fungal, or even viral counts. Though the protocol predominantly caters to bacterial counts, represented as colony-forming units (CFUs), with minor modifications, it can also be employed for fungi (also quantified as CFUs) and viruses (quantified as plaque-forming units or PFUs).
- Historically, Robert Koch, a renowned bacteriologist, is accredited with pioneering a method for bacterial enumeration. This method, initially employed for assessing water quality, was documented in his 1883 publication, “About Detection Methods for Microorganisms in Water”. The standard plate count, emanating from his work, stands as a reliable tool for quantifying both bacteria and fungi.
- The methodology encompasses the creation of a series of dilutions, wherein a segment of each dilution is incorporated into a molten agar medium, subsequently poured into a petri dish. Upon solidification, the bacterial cells become entrapped within the agar matrix.
- Over time, these cells multiply and form colonies, which might emerge on the agar’s surface, within its body, or even at the interface between the agar and the dish’s base. Such an agar platform provides an optimal medium for precise microbial counting, owing to the homogenous distribution throughout the agar.
- It is worth noting that achieving an accurate count in a fluid medium remains challenging due to the inability to verify specimen purity and the inherent difficulties in counting cells in a liquid milieu.
- In summation, serial dilution serves as an indispensable tool in microbiological research, bridging the gap between high concentrations and quantifiable levels, and ensuring that scientific investigations are both accurate and replicable.
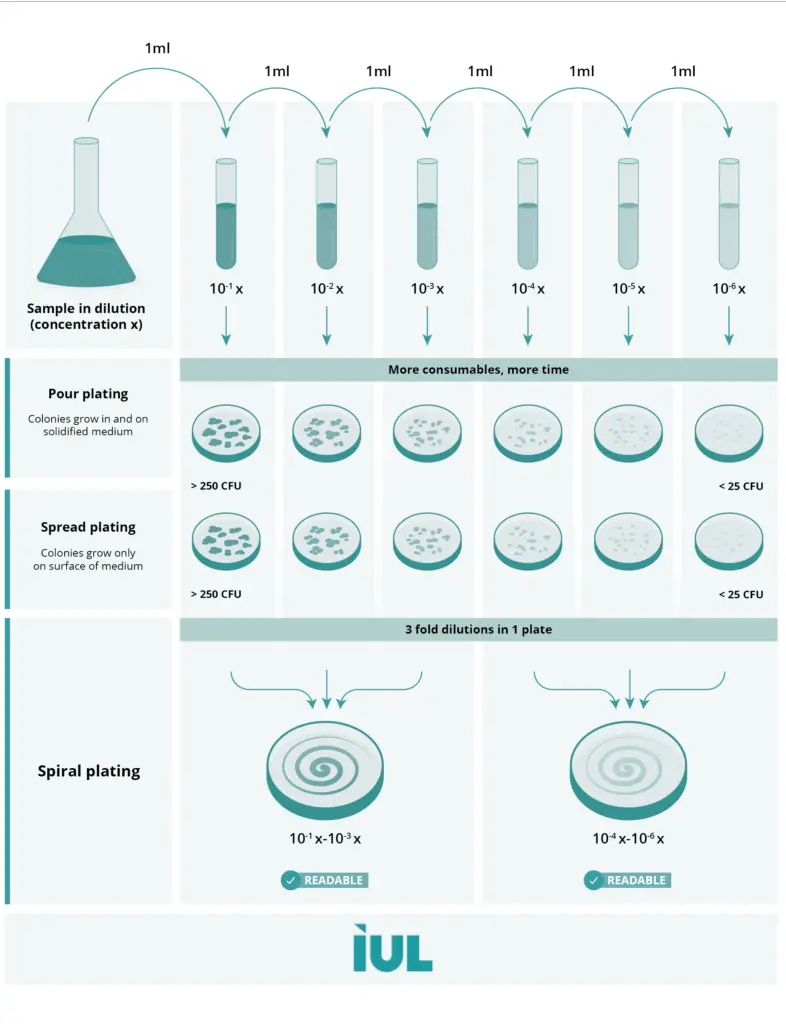
Serial dilution definition
Serial dilution is a methodical process in which a solution is diluted sequentially to produce a series of progressively reduced concentrations.
What is the purpose of serial dilution? – Serial Dilution Objectives
Serial dilution serves as a foundational procedure in numerous scientific disciplines, especially microbiology. The primary objectives of this method are outlined as follows:
- Estimation of Concentration: The pivotal aim of the serial dilution technique is to ascertain the concentration of organisms in an unidentified sample. This encompasses bacteria, viruses, or other microorganisms. Through the enumeration of colonies that stem from the serial dilutions of the sample, an estimate of the sample’s concentration is derived.
- Facilitation of Concentration Calculation: By systematically reducing the density of cells at every dilution step, the method simplifies the computation of the cell concentration present in the primal solution. This is achieved by aggregating the dilution factor across the entire series of dilutions.
- Avoidance of Minimal Volume Pipetting: A pragmatic advantage of serial dilutions is circumventing the necessity to pipette minute volumes, typically ranging between 1-10 µl. Such tiny volumes pose challenges in precision and handling, especially when aiming to achieve a specific dilution.
- Achievement of Countable Colony Numbers: One of the defining goals of serial dilution is to yield culture plates, post-incubation, with a quantifiable number of colonies. Ideally, the number of colonies should range between 30 to 100, rendering them easily countable. By doing so, researchers can accurately determine the quantity of microorganisms present within the original sample.
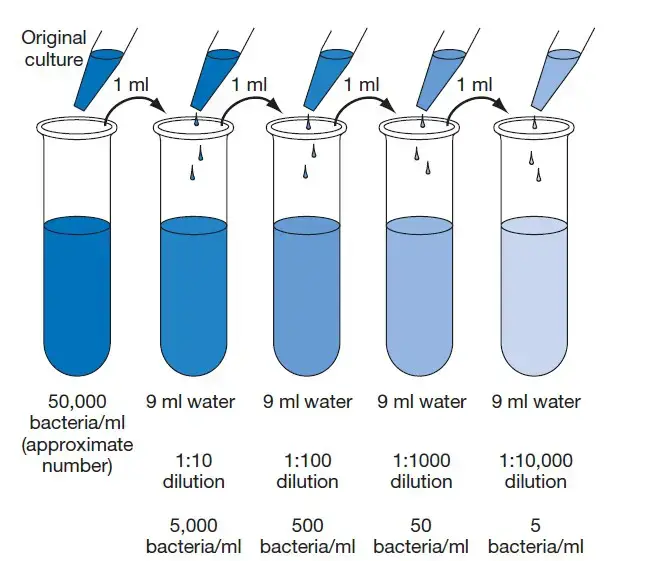
Online Serial dilution calculator
The practice of serial dilution is fundamental in various scientific disciplines, primarily in the realms of chemistry and biology. With the advancement of digital tools, numerous online platforms have been developed to assist researchers in executing these dilutions with precision and ease. These online serial dilution calculators have become indispensable for simplifying the complex calculations involved. Here’s a brief overview of some notable platforms:
- AAT Bioquest, Inc.:
- Website: AAT Bioquest
- A renowned platform that provides a user-friendly interface for serial dilution computations.
- Merck:
- Website: Sigma-Aldrich by Merck
- A trusted source in the scientific community, Merck offers a comprehensive dilution calculator tailored for laboratory needs.
- Omni Calculator:
- Website: Omni Calculator
- This versatile platform delivers a diverse range of calculators, including one dedicated to serial dilutions.
- Endmemo:
- Website: Endmemo
- Provides a straightforward interface for rapid dilution calculations.
- Handymath:
- Website: Handymath
- As the name suggests, this platform offers handy mathematical tools, including a serial dilution calculator.
- Tocris Bioscience:
- Website: Tocris Bioscience
- Catering primarily to biosciences, Tocris provides a dedicated tool for dilution calculations.
- Physiology Web:
- Website: Physiology Web
- This platform, rooted in physiology, offers a range of calculators including one for dilutions.
- Selleck Chemicals:
- Website: Selleck Chemicals
- With a focus on chemical computations, this platform offers a robust dilution calculator.
- ApexBio Technology:
- Website: ApexBio Technology
- Specializing in biotechnological tools, ApexBio’s calculator is tailor-made for biological applications.
- CiteAb:
- Website: CiteAb
- With an emphasis on research citations, CiteAb offers a dilution calculator to assist researchers.
- Fluffy Frog:
- Website: Fluffy Frog
- A simple platform providing an efficient dilution calculation tool.
- Functional Biosciences:
- Website: Functional Biosciences
- This platform, focused on biosciences, offers a range of calculators, including a serial dilution calculator.
- CUSABIO:
- Website: CUSABIO
- Catering to bio-research needs, CUSABIO provides an efficient online dilution calculator.
Serial Dilution Formula and Calculations – Serial Dilution Calculation
Serial dilution, a pivotal procedure in scientific research, entails the meticulous process of diluting a given sample through systematic addition to a sequence of standardized diluent volumes. Typically, the chosen diluent could be distilled water or a 0.9% saline solution. Upon dilution, specific, quantified volumes from each dilution step are further employed to generate an array of pour or spread plates.
The depth of dilution is contingent upon the projected concentration of cells or organisms present within a sample. As an illustration, a water specimen sourced from a heavily polluted milieu necessitates an augmented dilution factor. Conversely, samples with marginal contamination may only require minimal dilution.
In laboratory settings, serial dilutions, specifically two-fold and ten-fold, are habitually executed for tasks such as antibody titration or the preparation of diluted analytes.
Determining the dilution factor in serial dilutions can be approached in two ways:
- For individual test tubes within the series.
- As a cumulative dilution factor spanning the entire series.
For individual tubes, the formula for the dilution factor is:

Dilution factor=volume of sample/volume of sample + volume of diluent
As an exemplar, in a ten-fold dilution wherein 1 ml of the sample is introduced into 9 ml of diluent, the derived dilution factor for that specific test tube becomes:

Dilution factor = 1 ml/1 ml + 9 ml=10−1
It’s pivotal to recognize that each subsequent tube is essentially a dilution of the preceding one in the series.
To compute the overarching dilution factor, one can employ the following relationship:
Total dilution factor for nth tube = dilution of (n-1)th tube × dilution of nth tube
To elucidate, given a first tube with a dilution factor of 10−1 and a second tube also with a dilution factor of 10−1, the cumulative dilution factor for the two tubes becomes:
Total dilution factor=10−1×10−1=10−2
In essence, the serial dilution formula and its subsequent calculations stand fundamental to ascertaining the precise concentration of organisms in varied samples, thereby ensuring accurate and reproducible results in scientific investigations.
Equipment
Scientific research, particularly in microbiology and biochemistry, necessitates the employment of specific equipment to ensure precision, accuracy, and reproducibility. Here’s a comprehensive overview of the essential equipment required for intricate experimental procedures:
- Petri Dishes:
- Typically made of glass or plastic, these shallow cylindrical dishes are crucial for culturing microorganisms. They should be at least 15 x 90 mm in dimension to provide adequate space for microbial growth and observation.
- Pipets and Pipettors:
- These precision tools are essential for transferring specific volumes of liquids. They come in various sizes like 1 ml, 5 ml, and 10 ml, and are graduated in 0.1 ml units for accurate measurements.
- Erlenmeyer Flask:
- A conical flask with a flat base and cylindrical neck, it’s primarily used for mixing and heating solutions.
- Dilution Bottles:
- Specifically designed bottles to perform serial dilutions and to ensure uniform mixing of samples.
- Protection Containers:
- Containers designed for safeguarding pipets and petri dishes, providing protection against contaminants and external factors.
- Circulating Water Bath:
- This equipment ensures uniform temperature distribution and is vital for specific reactions that require controlled heating.
- Incubator:
- An essential device that provides a controlled environment for microbial growth, maintaining optimal temperature, humidity, and other conditions.
- Colony Counter:
- A device designed for the enumeration of microbial colonies, providing an accurate count of colony-forming units.
- Tally Register:
- A manual counting tool to keep track of enumerated colonies or other repetitive counting tasks.
- Dilution Blanks:
- These are sterile solutions used to dilute a sample, ensuring that the dilution does not introduce any contaminants.
- Plate Count Agar (PCA):
- A microbiological growth medium that is employed to determine the number of viable microorganisms in a sample.
- Refrigerator:
- Essential for preserving samples, cultures, and reagents, maintaining their viability and preventing degradation.
- Test Tubes:
- Cylindrical glass or plastic tubes used for holding, mixing, or heating small quantities of liquid or solid chemical samples.
- Vortex:
- A device designed to mix small vials of liquid rapidly, ensuring homogeneity.
Procedure of Serial Dilution
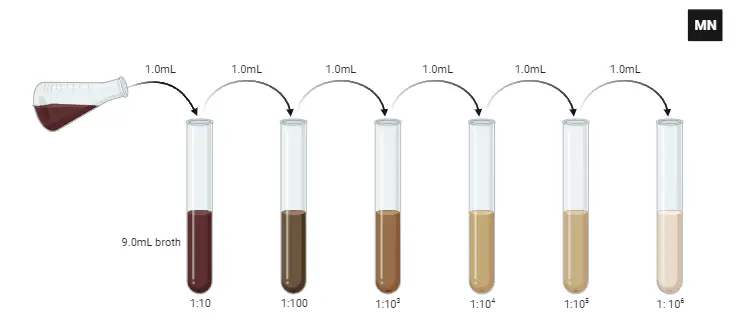
Serial dilution is a methodical approach used in various scientific disciplines to reduce the concentration of a sample systematically. Here’s a detailed step-by-step procedure for achieving a ten-fold dilution to a dilution factor of 10⁻⁶:
- Preparation:
- Begin by obtaining the sample or culture intended for dilution.
- Arrange six sterile test tubes, each prefilled with 9 ml of a sterile diluent. The diluent can be either distilled water or a 0.9% saline solution.
- Sample Collection:
- Utilize a sterile pipette for this procedure.
- Carefully draw 1 ml of the thoroughly mixed sample or culture into the pipette.
- Initial Dilution:
- Transfer the 1 ml sample into the first test tube, achieving a total volume of 10 ml.
- This action results in the initial dilution of the sample, represented by a dilution factor of 10⁻¹.
- Mixing:
- Assure homogeneity of the solution by mixing the contents rigorously. This can be achieved by aspirating and dispensing the mixture with the pipette multiple times, ensuring thorough blending.
- Progressive Dilution:
- After mixing, discard the pipette tip in an appropriate waste container, ensuring no cross-contamination.
- Attach a new sterile pipette tip to the pipette.
- Draw 1 ml from the test tube with the 10⁻¹ dilution.
- Transfer this 1 ml aliquot to the second test tube, resulting in a cumulative dilution factor of 10⁻² for this tube.
- It’s imperative to mix the contents thoroughly, as done in the previous step.
- Continuation of Dilution Process:
- Proceed by repeating the dilution process for each subsequent test tube. At each stage, 1 ml is transferred from the preceding test tube and introduced into the next one, which contains 9 ml of the diluent.
- Ensure rigorous mixing after each addition to maintain a uniform solution.
- Final Dilution:
- By the time the sixth test tube is reached, and the aforementioned process is executed, the sample will achieve a dilution factor of 10⁻⁶, implying a dilution of 1 in 1,000,000.
What is Ten-fold serial dilution?
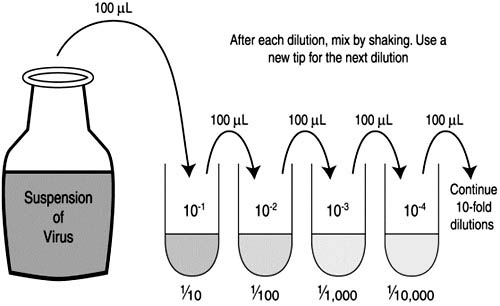
A ten-fold serial dilution is a standardized technique used extensively in scientific experiments, primarily in microbiology and virology. This method systematically reduces the concentration of a substance in a solution by a factor of ten.
Concept of Ten-fold Dilution: When a sample is diluted to one-tenth of its original concentration, it undergoes a ten-fold dilution. This process is repeated in a series, leading to sequential dilutions, each of which is one-tenth the concentration of the preceding one.
Applications: One primary application of ten-fold serial dilutions is in the titration of virus suspensions, like the Newcastle disease virus, to ascertain the quantity of infectious agents in a sample. The process aids in ensuring accurate and consistent results in the presence of high concentrations.
Procedure of Ten-fold Serial Dilution:
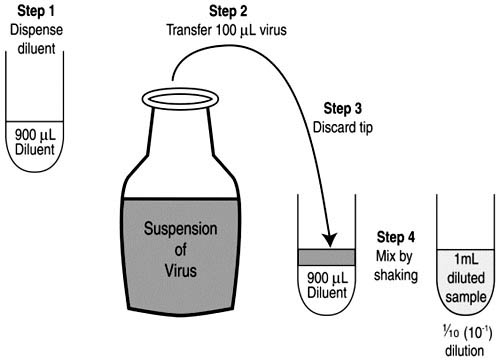
- Preparation:
- Begin with sterilized glass test tubes arranged on a rack. Clearly label each tube to represent the final dilution it will contain after the entire dilution process.
- Initial Dilution:
- Using a micropipette, dispense approximately 900mL of diluent into the first tube.
- Pipette 100mL of the sample into this tube. This results in the initial ten-fold dilution, producing a total volume of 1000mL.
- Mix the contents either manually by shaking or using a vortex mixer to ensure uniformity.
- Sequential Dilutions:
- For the subsequent dilutions, use a new, sterilized micropipette tip.
- Transfer 100mL from the first diluted tube to the next tube containing 900mL of diluent. This creates the second ten-fold dilution.
- Continue this procedure, sequentially transferring 100mL from one tube to the next, until the desired dilution level is achieved in the final tube.
What is 2 fold serial dilution?
The two-fold serial dilution method is a systematic process used to decrease the concentration of a solution by a factor of two in each step. This halving of the concentration is prevalent in various laboratory applications, especially when quantifying the levels of test samples in assays.
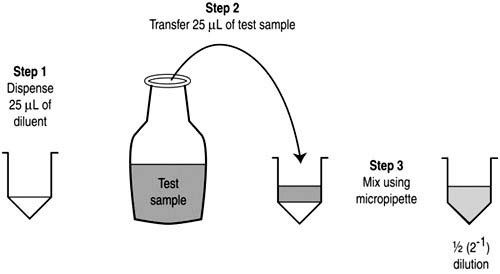
Concept of Two-fold Dilution: In a two-fold dilution, the concentration of a given solution is reduced by half, thereby producing a solution that is half the concentration of the original. When this process is repeated in a series, it is referred to as a two-fold serial dilution.
Applications: Two-fold serial dilutions are instrumental in assays such as haemagglutination and haemagglutination inhibition tests. These dilutions aid in determining the potency, concentration, or levels of a given sample, ensuring precision in results.
Procedure of Two-fold Serial Dilution:
- Initial Setup:
- Using a micropipette, dispense 25mL of PBS (phosphate-buffered saline) diluting fluid into the first well of a microwell plate.
- First Dilution:
- Pipette 25mL of the test solution into the same well.
- To ensure thorough mixing, draw up and expel the contents of the well using the micropipette, repeating this action twice. As a result, the initial well will have a solution that is half the concentration of the original test solution, given the total volume of 50mL.
- Sequential Dilutions:
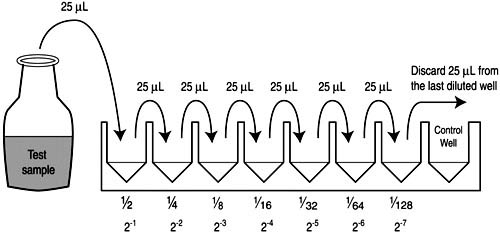
- Begin by dispensing 25mL of PBS diluting solution into each of the subsequent wells in the microwell plate row.
- Using the same micropipette tip, transfer 25mL from the first diluted well to the next well, followed by thorough mixing. This process results in the second two-fold dilution.
- Continue this sequential dilution pattern until all wells on the microwell plate have been processed, with each subsequent well containing a solution that is half the concentration of the preceding one.
- Control Well:
- The last well in the sequence usually serves as a control during assays like haemagglutination and haemagglutination inhibition tests, providing a baseline for comparison.
Limitation of serial dilution technique
Serial dilution, while a fundamental and widely used technique in laboratory practices, is not without its challenges. The technique possesses inherent limitations that can influence the accuracy and reliability of the results. Here’s an exploration of these limitations:
- Transfer Inaccuracies:
- During the dilution process, errors might occur in transferring the sample. These inaccuracies can lead to imprecise measurements, especially in the higher dilutions, thereby compromising the reliability of the results.
- Time-Consuming:
- The stepwise nature of serial dilution can be time-intensive, hindering the efficiency of the method. This prolonged duration might not be suitable for time-sensitive experiments.
- Lack of Separation Capability:
- While serial dilution facilitates the reduction in concentration of bacteria or cells, it does not offer the capability to separate different types of bacteria or cells, a feature available in techniques like flow cytometry.
- Expertise Requirement:
- The technique demands individuals adept in aseptic methods and well-versed in microbiological procedures. This requirement for specialized skills can pose challenges in settings lacking trained professionals.
- Labor-Intensive Process:
- Serial dilution, being manual in nature, is labor-intensive and susceptible to human errors. This has led to the emergence of automated dilution equipment to enhance precision and reduce human intervention.
- Dependence on Homogenous Dispersion:
- The reliability of serial dilution hinges on the even distribution of organisms across each dilution. Imperfections in pipetting or mixing can lead to inconsistent results. Ensuring consistent outcomes necessitates rigorous training in pipetting and thorough mixing techniques.
- Incomprehensive Representation:
- Serial dilution primarily provides a viable count of bacteria. However, this count might not encapsulate the entire living bacterial population. It excludes organisms that might have perished before plating and those unable to thrive on the selected medium. For instance, certain bacteria like Clostridium perfringens, Campylobacter, and Vibrio parahemolyticus cannot grow on standard agar mediums, hence may be overlooked in the results.
Advantages of Serial Dilution
Serial dilution is a systematic technique frequently employed in scientific studies, offering a plethora of advantages:
- Achieving Usable Concentrations:
- Serial dilution adeptly reduces the concentration of viable cells to levels that are more manageable and usable for experimental purposes. This ensures that the sample is suitable for further procedures or analyses without being overwhelmingly dense.
- Systematic Reduction of Bacterial Load:
- Each step of the serial dilution method results in a substantial reduction in the number of viable cells or bacteria. This stepwise decrease ensures that from a dense culture, a significantly less concentrated sample is obtained, allowing for more accurate evaluations.
- Estimation of Unknown Concentrations:
- One of the primary merits of serial dilution lies in its ability to aid in quantifying the concentration of an unidentified sample. By cultivating colonies from serially diluted specimens, researchers can enumerate the number of colonies that develop. This enumeration can then be used to infer the concentration in the original, undiluted sample. The method provides a structured way to trace back from the measured count to the initial, unknown concentration, ensuring precise determinations.
Serial dilution examples
Serial dilution is a systematic approach to reduce the concentration of a sample by diluting it in a series. This method finds applications in various spheres, from daily life to specialized scientific research. Here are some illustrative examples:
- Beverage Dilution:
- A common example observed in day-to-day life is the preparation of beverages like tea or coffee. For instance, when making cold press coffee, a concentrated extract is initially prepared. To achieve the desired strength and taste, water is added to this concentrate, effectively diluting the coffee to a preferred concentration.
- Chemistry Labs:
- In laboratory settings, particularly in chemistry, acids and bases often need to be brought to a specific concentration for experiments. Serial dilution provides a methodical way to achieve the desired concentration from a concentrated stock solution. By adding a precise volume of solvent to a given volume of the concentrated solution, researchers can achieve the required molarity or normality for their experiments.
- Microbiology:
- One of the pivotal applications of serial dilution is in the field of microbiology. Here, researchers might have a dense culture of bacteria, which needs to be diluted for accurate counting or further experimentation. Through serial dilution, a dense bacterial culture is diluted in steps to a point where individual bacteria can be isolated and counted. Using plating techniques, this diluted sample is spread on agar plates, allowing individual bacteria to grow as distinct colonies. Counting these colonies then gives an estimate of the bacterial concentration in the original sample.
Serial Dilution Problem Solution
Serial dilution is a fundamental technique in microbiology and biotechnology to ascertain the concentration of microorganisms within a sample. This process involves systematically diluting a sample to a point where one can effectively count and measure the concentration of the microorganisms.
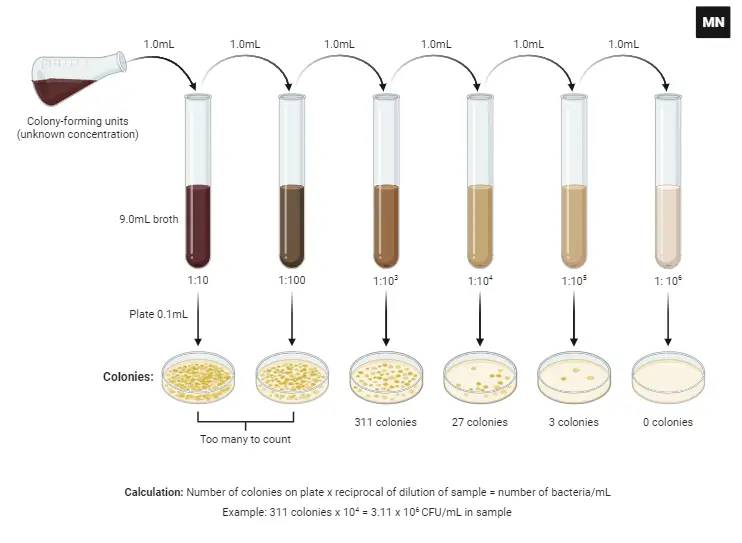
Concept: Microorganisms’ concentrations within samples are typically too high to be directly counted. Hence, diluting the sample systematically allows for an easily countable representation. The colonies formed on agar plates are presumed to originate from individual microorganisms. Counting these colonies, termed Colony Forming Units (CFUs), gives an estimation of the viable microorganisms in the sample.
Procedure for Solving Serial Dilution Problems:
- Selecting Countable Plate:
- The ideal agar plate should contain between 30 to 300 colonies. A plate with too many colonies is termed as “Too Many To Count” (TNTC), while one with very few (less than 30) may not give a statistically significant result.
- Sample Dilution Factor (SDF):
- Often samples undergo an initial dilution before further dilutions. This primary dilution is referred to as the Sample Dilution Factor. If no dilution is performed on the original sample, SDF is considered 1/1.
- Individual Tube Dilution Factor (ITDF):
- This is the factor by which the sample is diluted in each individual step. It’s calculated as the volume of the sample divided by the total volume after the addition of the sample.
- Total Series Dilution Factor (TSDF):
- This represents the cumulative dilution across all the steps leading up to the countable plate. It is the product of all relevant Individual Tube Dilution Factors up to that point.
- Plating Dilution Factor (PDF):
- During plating, the volume transferred to the agar plate is often not a full milliliter. Hence, to determine CFU/ml, we calculate PDF by dividing the plated volume by one milliliter.
- Final Dilution Factor (FDF):
- This factor combines all dilutions from the original sample to the countable plate. It’s the product of SDF, TSDF, and PDF.
- Determining CFU/ml in Original Sample:
- By multiplying the number of CFUs on the countable plate with the inverse of the FDF, one can determine the CFU/ml of the original sample.
Example: In the given context, the countable plate had 200 CFUs, and with a Final Dilution Factor of 1/4000, the original sample would have a concentration of 800,000 CFU/ml or 8 x 10^5 CFU/ml.
Serial Dilutions and Plating Procedure
A. Set-up
Every scientific experiment starts with meticulous planning and organization. Maintaining an updated lab notebook with a detailed flowchart ensures the method, materials, and waste disposal processes are documented.
- Work Environment:
- Cleanliness: Ensure the workstation is thoroughly sanitized using a suitable disinfectant, such as 70% ethanol, to minimize contamination.
- Safety First: Wear the appropriate lab attire, including lab coats, latex or nitrile gloves, goggles, respirators, and closed-toe shoes, to safeguard against potential hazards and further reduce contamination risks.
- Aseptic Technique: A primary requirement for microbiological experiments is to maintain aseptic conditions to prevent unwanted microbial contamination. This ensures the accuracy of results and safety of the environment.
- Preparation of 0.45% Saline Solution:
- Materials: Sterile water, clean graduated cylinder, Erlenmeyer flask, and sodium chloride (NaCl).
- Procedure:
- Using the graduated cylinder, measure and pour 90 mL of sterile water into the designated Erlenmeyer flask labeled as 0.45% saline.
- Weigh out 405 grams of sodium chloride.
- Gradually add the sodium chloride to the flask containing sterile water.
- Agitate the flask repeatedly until the sodium chloride is completely dissolved, ensuring a clear solution with no visible particulate matter.
- Plating and Dilution: This step will usually involve transferring specific volumes of the sample to petri dishes, diluting, and spreading the sample to ensure even distribution of microorganisms for accurate counting.
- Disposal and Cleanup:
- Materials & Waste: Ensure that all used materials like organisms, diluent stocks, petri dishes, and disposable inoculating loops are discarded properly.
- Safety Protocols: Adhere to the Occupational Safety and Health Administration (OSHA) guidelines for sterilizing all surfaces post-experiment and managing biohazards.
- Personal Hygiene: Before leaving the lab, remove all protective attire and wash hands thoroughly to minimize the risk of contamination outside the lab environment.
B. Media Preparation
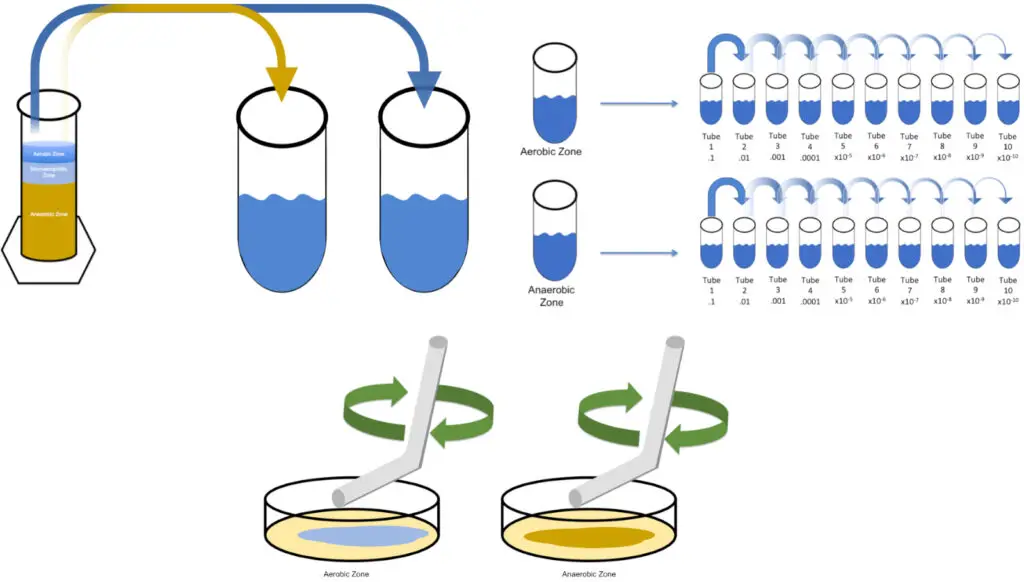
- Media Selection: Choosing the appropriate media is paramount to successfully cultivate the desired organisms. For many experiments, a simple broth can facilitate adequate bacterial growth. In specific studies, such as the Winogradsky column experiment, a mixture of calcium carbonate, sulfur, cellulose, and mud is used and remains undisturbed for a week, leading to the formation of distinct aerobic, microaerophilic, and anaerobic zones.
- Plating Medium Selection: The medium’s solidification typically employs microbiology-grade agar, which is added to the liquid medium. For collecting samples from the aerobic and anaerobic zones of the Winogradsky column, LB medium/agar proves satisfactory. Notably, the microaerophilic samples are ideally cultivated in candle jars, which generate a low-oxygen environment by lighting a candle inside a closed chamber, fostering microaerophilic growth.
- Media Measurement and Preparation:
- Begin with Erlenmeyer flasks that can hold double the intended volume, preventing boil-over during autoclaving. For a 250 mL preparation, a 500 mL or larger flask is suitable. Label the flasks accordingly: one as “Broth” and the other as “Agar.”
- Compute the required media quantity based on the manufacturer’s recommended concentrations. For instance, to prepare LB Agar, mix 25g/L of LB Agar with ultrapure water. For a 250 mL solution, this translates to a mix of 6.25g of LB Agar and 250 mL water. The LB Broth is prepared similarly, without any solidifying agent, ensuring it remains liquid post-cooling.
- Accurately weigh the media and follow manufacturer’s instructions when mixing with water. For this, add 6.25g each of LB Agar and LB Broth to the flasks labeled “Agar” and “Broth.” Subsequently, pour 250 mL of ultrapure water into each.
- Sterilization: Securely cover each flask using aluminum foil and sterilize the medium in an autoclave at 121°C and 15 psi for at least 15 minutes.
- Post-Sterilization Steps:
- Upon completing the autoclave cycle, using heat-resistant gloves, transfer the flasks to a water bath set between 40-50°C.
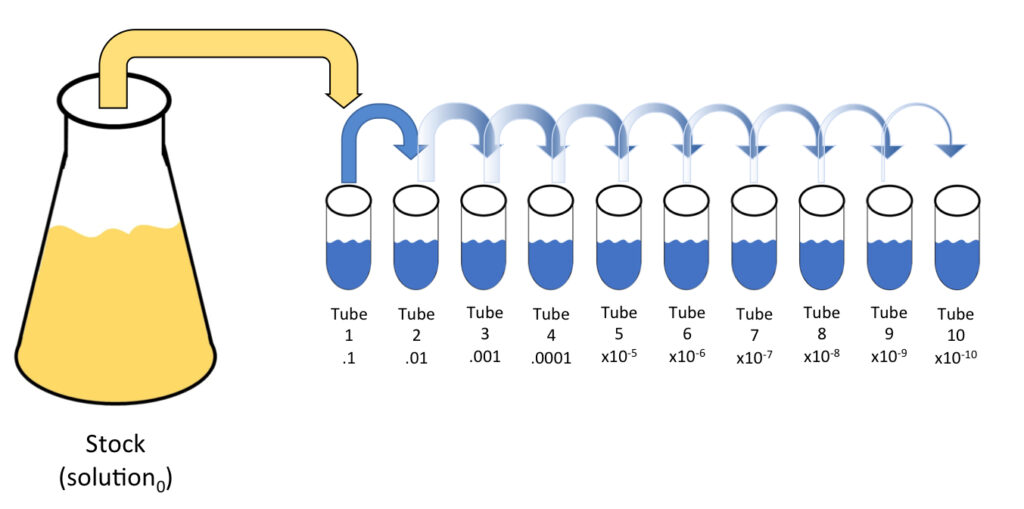
- Once the desired temperature is achieved, pour the “Broth” flask’s contents into a clean 250 mL Erlenmeyer or round-bottom flask, labeling it as “solution0.”
- Plating:
- Acquire 10 sterile petri dishes, size 100mm x 15mm. Label them with essential details: the date, researcher’s name, media type, and the specific Winogradsky column zone intended for organism extraction.
- Once the “Agar” flask reaches the necessary temperature, evenly distribute its contents into the 10 petri dishes, ensuring each plate receives no more than 15 mL. For enhanced accuracy, using a pipettor and a 25 mL serological pipette is recommended. Any air bubbles that form can be removed using a sterile pipette tip. Subsequently, cover the dishes with their respective lids, leaving them to solidify overnight.
C. Diluent Preparation
- Test Tube Arrangement: Commence by organizing ten test tubes, each with a minimum capacity of 20 mL, on a test tube rack. Clearly label these tubes sequentially from T1 through T10. Each tube label signifies its respective dilution factor. For instance, the tube labeled T4 pertains to a dilution factor of 1×10^-4, which translates to 0.0001 or 1/10,000th of the original stock concentration.
- Saline Addition: Using a precise pipette, dispense nine milliliters of 0.45% saline solution into every test tube. This saline solution serves as a diluent, ensuring that samples achieve the necessary dilution levels during experimental procedures.
- Sterilization Process: For sterilization, it is imperative to seal the test tubes to prevent contamination. Use aluminum foil to securely cover each of the ten tubes. Once covered, transfer them to a rack suitable for autoclaving. The sterilization step is crucial, employing an autoclave set at 121°C and 15 psi for a minimum duration of 15 minutes.
- Cooling and Storage: After completing the autoclaving process, employ heat-resistant gloves to carefully extract the saline blanks, ensuring no abrupt temperature shifts. Allow the tubes to cool naturally until they attain room temperature. It is vital to ensure that the tubes are cool to touch prior to their subsequent use. For optimal storage and to maintain sterility, place the covered tubes in a refrigerated environment at 4°C. This ensures their readiness for future applications.
D. Cultivation of Target Organism
- Initial Inoculation: Commence by introducing the organism to the “solution0”. This is achieved by transferring a singular colony procured from a previously streaked agar plate or by adding 50 µL from a preserved frozen stock. This singular colony or sample is the starting point for amplifying the desired organism.
- Cultivation Conditions: To foster growth, relocate the inoculated “solution0” to an incubator set at a temperature of 37°C. Maintain this environment overnight. If the specific organism in cultivation requires agitation for optimal growth, ensure periodic shaking. It is essential to note that the flask containing the solution should be appropriately sealed to prevent unintended contamination. In scenarios where the target organism necessitates aerobic conditions, seal the flask with sterile gauze and cotton plugs, which permit air exchange while blocking contaminants.
- Winogradsky Column Cultivation: If the investigation pertains to the Winogradsky column, a different approach is needed. Harvest 1 gram of sample from the relevant sections of the column. For the context of this method, samples will be procured from both the aerobic and anaerobic zones. Subsequent to harvesting, these samples are resuspended in the diluent in tube T1, rendering them ready for the ensuing procedures, starting from step 5.3.
E. Serial Dilution
- Initial Preparation: Retrieve the “Nutrient broth” flask from the incubator and agitate it rigorously to ensure uniformity of the microbial suspension.
- Initiating the Dilution: Using a pipette, transfer 1 mL from the “solution0” into the test tube designated as T1. If the study pertains to Winogradsky column samples, incorporate 1 gram of the sample from the specific zone into T1. Subsequent to addition, vortex T1 to ensure the contents are thoroughly mixed.
- Serial Transfer: Commence the iterative dilution by transferring 1 mL from tube T1 to T2, followed by vortexing T2 for an even distribution of microbes. Continue this process, where 1 mL from tube T2 is moved to T3, followed by vortexing, and then from T3 to T4, and so forth. This pattern is maintained up to tube T10.
- The Logic Behind the Procedure: The serial dilution method described above is a systematic way of decreasing the concentration of microbes in a stepwise manner. With each transfer, the microbial concentration is diminished, rendering it feasible to obtain a countable number of colonies when the diluted sample is cultured on agar plates. This methodology ensures precision and repeatability in microbiological quantifications.
F. Spread Plating
- Introduction: Spread plating is an established microbiological method used to distribute a liquid sample uniformly over the surface of a solid culture medium.
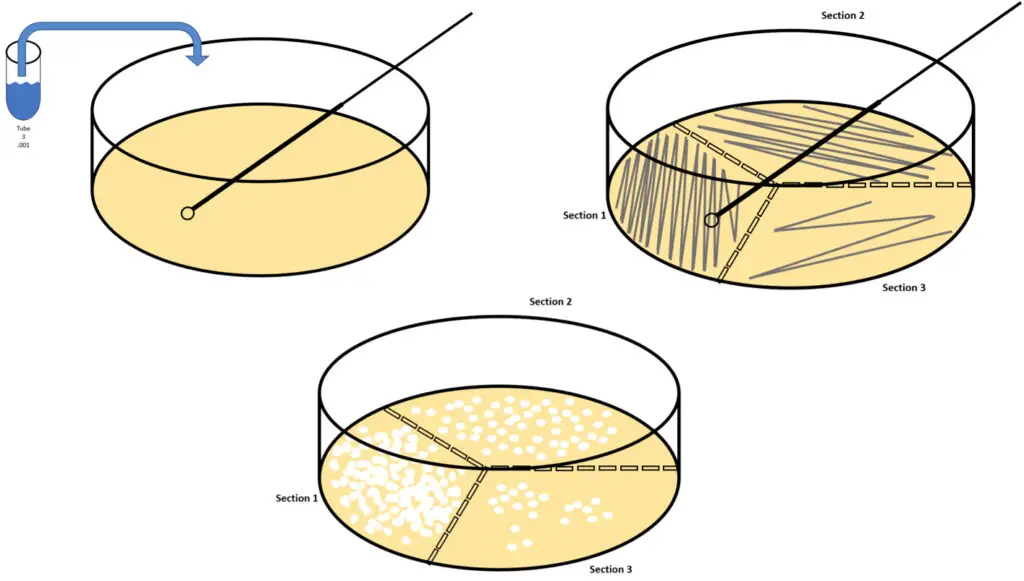
- Sample Application: From the diluted specimen in T1, transfer 100 µL onto the center of a petri dish using a calibrated pipette. Depending on the experimental requirements, you can also use samples from other tubes in the serial dilution series.
- Sample Spreading: For effective spreading, use a sterile spreading tool. If opting for a glass spreader, ensure it is sterilized using flame before use. Gently glide the flat edge of the spreader across the agar surface in a systematic swirling motion, either clockwise or counter-clockwise. This ensures the sample is uniformly spread across the entirety of the petri dish, maximizing the surface area for microbial growth.
- Repeat for Varied Samples: For studies involving different microbial habitats or conditions, like those in various zones of a Winogradsky column, it’s crucial to repeat the spread plating procedure for each zone to ensure a comprehensive analysis.
- Incubation: Place the spread plates inside an incubator set at 37°C and allow them to incubate for 24 hours. For cultivating anaerobic organisms, an anaerobic chamber or environment is essential, as these microorganisms require conditions devoid of oxygen for growth.
- Outcome: After incubation, microbial colonies will appear on the agar surface. The spread plating technique ensures these colonies are well-separated and countable, facilitating accurate quantification and analysis.
G. Streaking
- Introduction: Streaking is a microbiological method employed to isolate pure colonies from a mixed population of bacteria. This technique enables a dilution of the sample across the surface of an agar plate.
- Selection of Dilution: Start by choosing an appropriate dilution of the target microorganism. Dilutions such as 1/1,000 (from T3/Solution3), 1/1,000,000 (from T6/Solution6), and 1/1,000,000,000 (from T9/Solution9) are generally used to effectively isolate individual colonies.
- Inoculating Loop Preparation: Using either a sterile disposable plastic loop or a metal loop previously flamed for sterilization, immerse the loop into the chosen diluted microbial solution. Calibrated loops ideally transfer about 0.01 mL of the solution. If using a metal loop, ensure it is cooled post-flaming before introducing it to the microbial sample.
- Initial Streaking: Lift the petri dish lid slightly, and gently streak the loop across the agar surface in a zigzag motion without penetrating the medium.
- Sterilization of Loop: If using a reusable metal loop, re-flame for sterilization, or if using a disposable loop, discard appropriately and obtain a new one.
- Subsequent Streaking: Turn the petri dish approximately 118° and repeat the streaking, ensuring a reduction in the overlap of the zigzag pattern to allow for effective dilution of the microbial sample.
- Final Streaking: After sterilizing the loop once again, perform the final streak, reducing the frequency of the zigzag motion. This will further dilute the microorganisms across the agar surface.
- Repetition for Different Dilutions: Repeat the entire streaking procedure for different dilutions to ensure isolation of pure colonies from varying microbial concentrations. Ensure a fresh loop is used or the reusable loop is sterilized between dilutions.
- Incubation: Once streaked, transfer the petri dishes to a 37°C incubator for aerobic organisms. If cultivating anaerobes, place the plates in an anaerobic chamber. Allow the plates to incubate overnight.
- Outcome: Post incubation, individual colonies should appear across the streaked areas, representing pure isolates which can be further used for microbial analyses.
H. Data Analysis and Results
- Introduction: The study focused on extracting bacterial cultures from two distinct regions within a Winogradsky column, specifically the oxic and anoxic zones. These zones are notably favorable for heterotrophic bacteria and iron-oxidizing anaerobes, respectively.
- Methodology: Samples retrieved from the Winogradsky column underwent successive dilutions prior to their application on LB Agar plates, either through streaking or spreading.
- Observations: The streak plate method demonstrated a diverse bacterial population originating from each of the examined zones in the Winogradsky column. The spread plate method corroborated these findings, presenting similar mixed populations.
- Quantitative Analysis: To quantify the bacterial load in the samples, Colony Forming Units (CFU) were calculated. The approach adopted involved taking an average of the colony counts from three distinct plates. This average, when multiplied by the dilution factor and subsequently divided by the volume of the sample aliquot, provided the CFU/mL or CFU/g. For instance, considering an average colony count of 65 from plates inoculated with 0.1 mL of the T6 solution, the calculated bacterial load would be 650,000,000 CFU/mL.
- Results: Such quantitative analysis offers a clear perspective on the bacterial concentration in the sampled regions of the Winogradsky column. It was observed that the diverse microbial communities from both oxic and anoxic zones, as evidenced by the mixed populations on the plates, had significantly high bacterial loads.
- Implications for Further Studies: Post-quantification, individual colonies from these plates can be meticulously selected and isolated. These isolated colonies serve as prime candidates for subsequent studies, such as species identification and understanding their specific roles within the microbial community of the Winogradsky column.
FAQ
Q1. What is Log Dilutions?
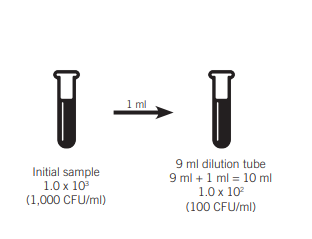
The term “log dilution” refers to a 10-fold one which means that the concentration decreases by a multiplier of 10. For a tenfold dilution to be complete the ratio should be 1:10. The one represents the quantity of sample that is added. The 10 is the amount of the finished sample. For instance an amount of 1 milliliter is then added to 9 ml of diluent , to make 10 milliliters.
Example: 1:10 dilute If the concentration is 1,000 CFU One log dilution would reduce it by 100 CFU.
Q2. Decimal Numbers vs Scientific Notation
Decimal numbers may be transformed into scientific notations by shifting the decimal number by the same amount as the exponential number.

Q3. What is Multiple Dilutions?
Multiple dilutions are necessary to reduce the concentration of the sample in multiple ways. In the case of a concentration that is greater than three times that of 35,000 CFU/ml (104) with 35 CFU/ml being the desired concentration, the subsequent serial dilutions are possible.

Q4. What is Larger Dilutions?
The reduction in concentration by using less dilutions is achievable by using large-volume diluting. This is done by using the 1:100 dilution instead 1:10

Quiz Practice
FAQ
What is the purpose of serial dilution?
The purpose of serial dilution is to reduce the concentration of a substance in a series of steps. This is often done to measure the concentration of a sample, prepare solutions with a known concentration, and obtain precise measurements of bacterial or other microorganism populations in a sample.
How is serial dilution performed?
Serial dilution is typically performed by adding a known volume of the original sample to an equal volume of diluent, such as water or buffer, in a series of steps. This is done in a repeating manner, resulting in a series of increasingly dilute solutions.
What is the difference between serial dilution and parallel dilution?
Serial dilution is a method of diluting a sample in a series of steps, while parallel dilution is a method of diluting a sample into multiple tubes or wells at the same time.
What is the formula for serial dilution?
The formula for serial dilution is: C1V1 = C2V2, where C1 is the original concentration of the sample, V1 is the original volume of the sample, C2 is the final concentration of the diluted sample, and V2 is the final volume of the diluted sample.
What is the difference between serial dilution and simple dilution?
Serial dilution is a method of diluting a sample in a series of steps, while simple dilution is a method of diluting a sample into a single tube or well.
What are the advantages of using serial dilution?
Serial dilution allows for precise measurement of the concentration of a sample, preparation of solutions with a known concentration, and isolation of pure cultures of microorganisms from mixed populations.
What are the limitations of using serial dilution?
Serial dilution can be time-consuming, and errors can occur if the volumes and concentrations are not measured accurately. Additionally, the technique may not be suitable for certain types of samples, such as viscous liquids or samples with particulate matter.
How is the final dilution factor calculated in serial dilution?
The final dilution factor is calculated by multiplying the dilution factor of each step in the series. For example, if the first step is a 1:10 dilution, the second step is a 1:100 dilution, the final dilution factor is 1:1000.
How is the number of bacteria or other microorganisms calculated using serial dilution?
The number of bacteria or other microorganisms in a sample can be calculated by performing serial dilution, plating aliquots of the diluted samples on nutrient agar or other suitable media, and counting the number of colonies that form.
What is the purpose of plating serial dilutions?
Plating serial dilutions is a method used to determine the concentration of bacteria or other microorganisms in a sample. By plating aliquots of the diluted samples on nutrient agar or other suitable media, and counting the number of colonies that form, it is possible to accurately determine the number of microorganisms present in the original sample.
Can serial dilution be automated?
Yes, serial dilution can be automated using liquid handling systems or automated pipettes. This method reduces human error and increases the efficiency of the process.
Can serial dilution be used for any type of sample?
Serial dilution is mostly used for liquid samples, but it can also be used for samples in the form of suspensions or solutions. However, it may not be suitable for samples that are highly viscous or have particulate matter.
Can serial dilution be used for any type of microorganism?
Serial dilution is widely used for bacteria, viruses and fungi, but it can also be used for other types of microorganisms such as yeasts and parasites.
What is the difference between serial dilution and serial logarithmic dilution?
Serial dilution is a method of diluting a sample in a series of steps, while serial logarithmic dilution is a method of diluting a sample in a series of steps using logarithmic increments. This allows for a more precise measurement of the concentration of a sample.
Is it necessary to sterilize the equipment and solutions used in serial dilution?
Yes, it is important to sterilize the equipment and solutions used in serial dilution to avoid contamination of the samples. This can be done by autoclaving or treating with a suitable sterilizing solution.
- Text Highlighting: Select any text in the post content to highlight it
- Text Annotation: Select text and add comments with annotations
- Comment Management: Edit or delete your own comments
- Highlight Management: Remove your own highlights
How to use: Simply select any text in the post content above, and you'll see annotation options. Login here or create an account to get started.