This reflects the seemingly marvelous developments that have occurred from the history of microbiology to the present day. Advances in technology and subsequent research in the field over the years have meant that once we learned how to study these tiny creatures, we only grew in appreciation for these vital little agents. But in 1590, the course of the study of microbiology changed for the better.
Two Dutch eyeglass makers invented something incredible that made the world we know today possible. Zaccharias Janssen and his father, Hans, learned how to build the first compound microscope. By playing with two lenses and applying them to a tube-like structure, they realized that something very close up appeared larger, with added depth, compared to the depth of the tube. This was not an invention in the strict sense, but rather a stepping stone to curiosity and later scientific achievement. An amateur microbiologist influenced this perspective.
Antony van Leeuwenhoek was among the first to see these tiny creatures, making the first simple microscope with a double-convex glass lens between two silver plates. He developed an early method of microscopy that would magnify the world in microbiology and the study of these organisms through sight. The evolution of the discipline of microbiology and the microscope comes from discovery; the more cells and organisms can be seen and magnified, the more familiar we become with their cellular structure and function.
The more technology allows for accessible views, the greater the potential for exploration in the field of microbiology. Microbiology is only a leap from simple scientific experiments to understanding the possibilities of a basic microscope to where we are today. The ability to simply see something that was once intangible brings a whole new world of understanding to our new microscopic existence. The light microscope. The light microscope was developed by Anton van Leeuwenhoek, the father of microbiology. During the 1600s, for a challenge to create a microscope, Dutch scientists invented simple single-lens microscopes to study microbes and small specimens.
Over the next few centuries, better lenses were added to create compound microscopes with multiple lenses to allow for better focusing and magnification. Finally, in the 1870s, German scientist Ernst Abbe developed the practical compound optical microscope. The optical microscope is now a common laboratory instrument used in an infinite number of scientific disciplines, from biology and medicine to materials science.
What is a light microscope?
The optical microscope is a biological laboratory equipment that uses visible light to visualize, magnify, and enlarge very small things. The application of lenses focuses the light on a sample for magnification and projection as an image. In other words, the sample under consideration is placed near the eyepiece of the microscope lens. Different types of microscopes have different types of lenses and different lens configurations that enable magnification.
For example, two types of microscopes based on the lens configuration are the simple optical microscope (lower magnification because it contains only one lens) and the compound optical microscope (higher magnification than the simple microscope because it contains at least two sets of lenses, an objective, and an eyepiece). The precise angles of the lenses are arranged in such a way that they bend the light at a certain angle required to obtain the final magnified image.
A light microscope generates an image via a light beam that enters a small transparent object. The image is observed and magnified through an eyepiece (monocular or binocular). Transparency is essential for rapid penetration, meaning the objects examined are typically tiny, including germs, bacteria, human cells and other microscopic organisms.
Principle of a light microscope (optical microscope) – How does a light microscope work?
What was seen earlier is how microscopes magnify is because the lens of a microscope refracts light and focuses it on a sample to create an image. In the case of an optical microscope, the image is created by a glass lens. Light refracts when light rays travel through one medium, then pass through another medium and bend at the point of contact between the two. Whether light bends around an object is related to the index of refraction, or how much a medium slows down the speed of light. Therefore, it is the refractive indices of the two media at the point of contact that determine how much and at what angle the light will bend as it passes through the intersection.
In general, when light enters a medium with a higher index of refraction (from air to glass, for example), its speed will generally decrease as it enters and it will bend toward the normal (the line perpendicular to the surface). When it enters a medium with a lower refractive index (e.g. glass into air), it generally increases the speed of light as it enters and causes the light to bend relative to the normal. So if something like a prism exists between the two media (in water and air), then the prism will give an angle to the refraction of light. It will be refracted at an angle because there is the potential for such action via the microscopic lenses. The light rays entering through the convex lens converge at a point, the focal point (F-point). The focal length of a lens is measured in millimeters from the optical center of a lens to its focal point.
A microscope has predetermined magnification levels because it uses specific lenses with specific amounts of magnification. These amounts are predetermined based on the focal length – shorter focal lengths result in higher magnification levels than longer focal lengths. Resolution is of the essence in microscopy. Resolution refers to the ability of a lens to distinguish two closely opposed features. The resolution of an optical microscope depends on the wavelength of light used; it is related to the numerical aperture of the lens system.
The numerical aperture is the classification of the wavelengths of light produced when viewing the specimen. There is a limit (d) of perceived resolution where two objects are rendered so similar in space and distance that they merge into one based on the frequency of visual stimulation, measurable by an Abbe formula relating the wavelength of light to view the object (Lambda, λ) and the numerical aperture (NA, n sin Ɵ), i.e. d = 0.5 λ/n sin Ɵ. Therefore, the distance at which the naked eye can distinguish one object from two is determined based on the projection of light through the specimen.
The Science of Light Microscopes: Understanding Refraction and Magnification
Historically, much research has been conducted using a light microscope, and the ability to visualize what would otherwise be unknown has always been a great advantage. The light microscope works based on two scientific principles: refraction and the bending of light through lenses.
What is Refraction?
Refraction is the bending of light when it passes through two media having varying refractive indices. The direction and magnitude of this bending are determined by the indices of refraction of the two media forming the contact.
Refractive Index
The refractive index quantifies how much a substance retards the speed of light. The larger a medium’s refractive index, the more it slows down light and the more the light’s bending.
How to use a light microscope?
- Before viewing, turn on the light microscope by plugging it into the power outlet. If you are using a mirror illuminator, go to a well-lit room instead.
- Rotate the objective holder to position the lower objective in place.
- Insert the slide onto the stage. Make sure that a coverslip is on top of the specimen to allow for stable insertion.
- Use the metal clips on the stage to secure the slide, adjusting its position until the specimen is in the center, directly in line with the lower objective.
- Now, in step five, look at your specimen through the eyepiece and focus using the coarse adjustment knob. There should be no contact between the slide and the glass.
- Adjust the condenser to adjust the light. You may also need to attenuate the intensity a little using the diaphragm under the stage.
- Now you can focus using the fine adjustment knob.
- Now in this step, look at your samples. After looking at low power, switch to medium power and refocus using the fine adjustment knob.
- Then switch to high power after focusing at medium power.
Role of Refraction in Light Microscopes
A light microscope increases magnification by bending light, as it relies on the refractive index of the glass lens. Therefore, when light is bent, it allows the lens to render the magnified image of the sample. In a light microscope, magnification is achieved by bending the light projected through the lens onto the sample. Ultimately, light microscopes would not exist. After learning the physics of refraction and the magnification tricks that go with it, it is only natural to appreciate such a scientific advancement to observe what would normally go unnoticed. As long as the human eye can extend its vision beyond what was once thought possible, the light microscope is an important instrument used in all fields.
Types of light microscopes (optical microscope)
The world of microbiology may be complicated, but the methods of observing different specimens are not. Most microscopes used to observe microbiological specimens are basic light microscopes and compound light microscopes, both of which are lens-dependent and linked. A simple light microscope has one lens from which observation is made (observation and magnification are done through a single lens), but the compound microscope has two or more lenses from which observation is made and magnification occurs; in essence, a compound series of lenses is aligned so that the one closest to the eye is magnified more than the others in the series.
The following are some examples of modern types of light microscopes:
- Bright field Light Microscope
- Phase Contrast Light Microscope
- Dark-Field Light Microscope
- Fluorescence Light Microscope
- Confocal light microscope
- Ultraviolet Microscope
What is Brightfield Light Microscope or Compound light microscope?
This is the typical optical microscope found in microbiology laboratories. It produces a bright field and a dark image. It is a binocular microscope. It is a typical way to observe the organelles of plant and animal cells; even some parasites are visible, such as Paramecium, but it requires the use of simple stains. This is accomplished with a high-resolution image projection; however, this is relative to the time spent using the microscope. It requires proper lighting to pay directed attention to the image, and without the directed image, it cannot be resolved into a clear image.
Light Microscope Labeled Diagram
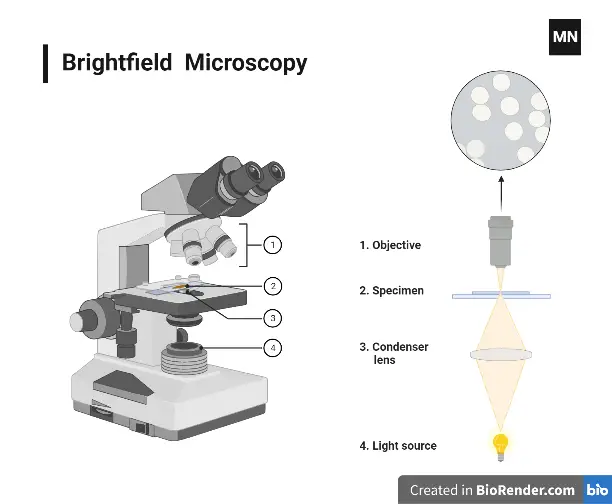
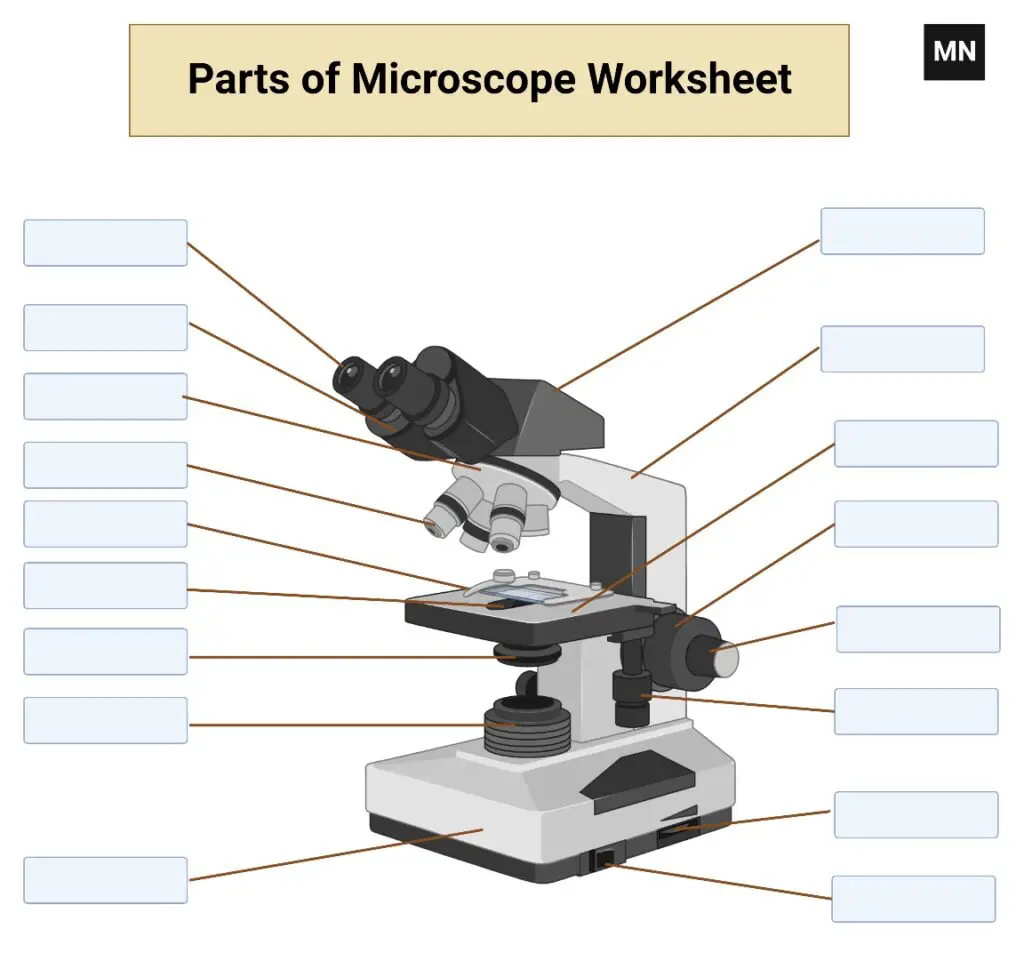
Parts of a bright-field microscope or Compound light microscope
- Eyepiece (ocular lens) – the part you look through to see the magnified specimen.
- Objective lenses – multiple lenses on a rotating turret that provide different levels of magnification.
- Stage – the flat platform where the specimen slide is placed for viewing.
- Stage clips – metal clips that hold the slide in place on the stage.
- Light source – a built-in light or mirror that illuminates the specimen from below.
- Condenser – focuses light onto the specimen for clearer visibility.
- Iris diaphragm – adjusts the amount of light reaching the specimen.
- Coarse adjustment knob – large knob for initial focusing by moving the stage up or down.
- Fine adjustment knob – smaller knob for precise focusing after coarse adjustment.
- Arm – the curved part connecting the base to the upper components; used to carry the microscope.
- Base – the bottom part that supports the microscope’s weight.
- Revolving nosepiece – the rotating part that holds the objective lenses.
- Slide adjustment knobs – controls that move the stage left/right or forward/backward to position the slide.
- Body tube – the hollow tube connecting the eyepiece to the objective lenses.
- Power switch (if electric) – turns the light source on or off.
How do you calculate magnification on a light microscope?
When you look at the microscope and switch to the other objective, it does not defocus because the objective is parfocal. The objective forms an image on the condenser and then in the microscope a large, sharp image is formed and then magnified by the eyepiece. A virtual image is what you see when you look at a specimen under the microscope, and it is a magnified, sharp representation of the specimen. The total magnification is determined by the magnification of the eyepiece multiplied by the objective. These are usually 40X, 100X, not too high or too low relative to the intensity of the objective.
Calculating total magnification = eyepiece magnification / objective magnification. The objective is about increasing the magnification relative to the quality – resolution – of the finished product. As Prescott notes, “a lens can separate or differentiate” small parts that are “very close together” when they are located so close together. The eyepiece is simply like a mirror of a larger image, and while it provides a tiny increase in magnitude (8X-12X, usually 10X), it pales in comparison to the objective lens which can increase the power and resolution of the microscope to 40X-100X.
Applications of the Bright Field Light Microscope or Compound light microscope
- Examine plant or animal cells under a microscope in biology class to understand the basics of cells, nuclei, and cell walls.
- Examine blood under a microscope in the emergency room to detect infections, malaria parasites, and abnormal blood cells.
- Examine bacteria under a microscope in microbiology for pathogen identification and antibiotic sensitivity.
- Examine tissue sections on slides under a microscope in pathology for cancer diagnosis and second opinion diagnosis.
- Examine microorganisms under a microscope in pond water for an environmental study.
- Examine fibers under a microscope in textiles, paper, and food for quality control.
- Demonstrate in class what insect wings look like or what an onion cell looks like.
- Examine stained slides of chromosomes or organelles for your genetics or biology class.
- Diagnose dermatophytes from skin scrapings viewed under a microscope.
- Examine pollen or cross sections of plants for botany/agriculture.
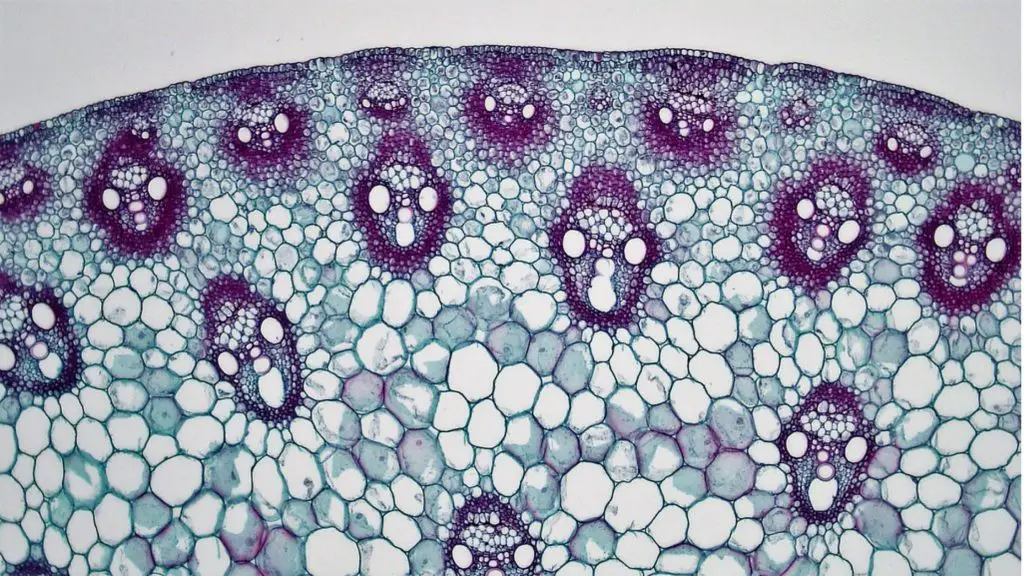
What is Phase Contrast Microscope?
Yet an opaque specimen is required when employing this optical microscope, but in turn, the reverse happens. The light does not get obscured as it passes through the opaque specimen; instead, it creates phase shifts—subtle differences in the light. The image is generated in relation to the phase shifts, which means that as the light passes through the opaque specimen, the subsequent phase shifts create an increased intensity, producing a more prominent image against the backdrop. So, it’s an opaque specimen because the phase shifts create increased intensity of an unstained image. The type of images created through a phase-contrast microscope with a transparent slide are similarly quite detailed. For instance, these are images of microbiological cultures, extremely detailed cross-sections of histological samples, histology of cells, or even tiny sub-cellular components. The phase-contrast microscope operates through an optical shifting phenomenon that takes a transparent slide and converts it into an amplitude image that is seen by the eye in the ocular of the microscope. From there, the viewer sees this image. A PCM therefore allows for the observation of unstained cells, known as phase objects; the morphology of the cells is intact, and one sees the cells as they are, just with added contrast and definition. This is not the case with a brightfield light microscope, which makes everything appear stained and fixed since the majority of cells are lost to the preparations as they are destroyed in the procedure. The image is said to be in contrast because of the wavelengths that shift during exposure to light, which are subsequently translated to shifts in amplitude. Those—and the variables that dim the contrast (i.e., fluorescence)—make an image more precise and detailed.

Principle of the Phase Contrast microscope
The light that is absorbed at a specific wavelength is the combination of two sources: dispersed (Deflected) light and undiffracted light that reaches the specimen. Amplitude changes are the result of the contrast between the scattered light and the absorbed light. These amplitude differences are visible to the naked eye and can be captured by imaging instruments like the Phase Contrast Microscope.
The phase-contrast microscope’s condenser consists of a transparent ring that creates a cone of light and an opaque disc, or annular ring, that focuses the light onto the specimen. An image is formed at the objective lens as a result of the bending of some of the incident light at the specimen due to differences in light density. The image is formed when one set of photons collides with the phase ring on the phase plate while the other set of photons passes directly through the phase plate without colliding with it.
When used in conjunction with contrast-enhancing techniques like fluorescence, the Phase-Contrast Microscope’s objective lenses are capable of a wide range of applications. In order to provide a wide spectrum for contrasting the specimen and establishing a strong contrast in the background, the objective lenses are positioned in an internal phase plate with variation in the light absorption and phase displacement, i.e. undiffraction.
Parts of the Phase Contrast Microscope
- Eyepiece (ocular lens) – the part you look through to see the magnified image.
- Phase contrast objective lenses – special lenses with built-in phase plates to enhance contrast in transparent samples.
- Phase condenser – a component below the stage that directs light through a ring-shaped aperture.
- Annulus (phase ring) – a ring-shaped filter in the condenser that creates a hollow cone of light.
- Phase plates – thin rings inside the objective lenses that align with the annulus to improve sample visibility.
- Turret (revolving nosepiece) – holds the objective lenses and lets you switch between magnifications.
- Stage – the flat platform where the specimen slide is placed.
- Stage clips – small clips to secure the slide in place.
- Coarse adjustment knob – large knob for rough focusing by moving the stage up or down.
- Fine adjustment knob – smaller knob for precise focusing after using the coarse knob.
- Light source – usually a built-in bulb or LED to illuminate the sample from below.
- Alignment telescope (or centering telescope) – a tool to adjust the alignment of the annulus and phase plate.
- Base – the heavy bottom part that stabilizes the microscope.
- Arm – the curved handle connecting the base to the upper parts for carrying.
- Green filter (optional) – some models include this to improve image clarity by filtering light wavelengths.
Applications of Phase-Contrast Microscope
- Observes living cells without the need for staining.
- Examines bacteria, protozoa, and other small organisms.
- Monitors live tissue growth in real-time studies.
- Studies processes like mitosis and meiosis.
- Assists in diagnosing diseases at the cellular level.
- Views organelles such as nuclei and mitochondria.
- Tracks embryonic development stages in biology.
- Teaches cell biology in educational settings.
- Inspects transparent materials like glass or polymers.
- Analyzes fine fibers or particles in industries.

What is Dark-Field Light Microscope?
The notion of darkfield microscopy originated in the late nineteenth century. For instance, in the 1880s, German scientist Adolf Fick wrote about the process in his work Die Mikroskopie des Lebenden Auges. Fick attempted to construct his own microscope and equipped it with a condenser lens to render a lateral illumination of his subjects and, therefore, a dark field behind his subject. Subsequent decades saw improvements and developments associated with darkfield microscopy; it became commonplace in biological studies. In the 1930s, an American, Calvin S. Snyder, invented a specific darkfield condenser to be used with the microscope and patented it to facilitate the application for other researchers. Today, darkfield microscopy is beneficial in various scientific fields and nonscientific pursuits, from biological applications to medical uses to micrometrology and material applications. It’s an effective technique for observing transparent samples, low-contrast materials, or otherwise invisible substances.
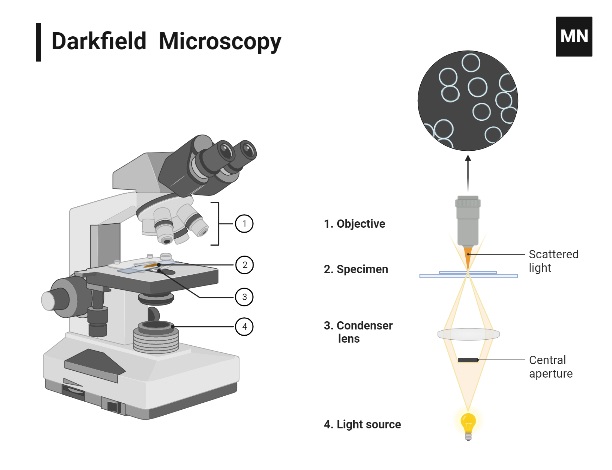
Principle of Dark-Field Light Microscope
Darkfield microscopy uses a conventional optical microscope (either an opaque disk under the condenser lens or a specialized condenser with a black center) that blocks light from the light source from entering the objective lens directly. So, in both cases, the light is directed to enter from the side, following the edges of the condenser in a wide feathered style to strike the specimen at an angle. However, the objective lens only sees the light that has been diffracted by the specimen. Thus, only the light that has been seen from the specimen is visible. Additionally, since light that is not from the specimen is rendered invisible, it passes through the specimen and obscures it, making the specimen visible against a dark background but under illumination.
Applications of the Dark Field Microscope
- Detects live bacteria and motile microorganisms.
- Observes unstained cells and tissues clearly.
- Identifies spirochetes in medical studies.
- Examines blood cells in hematology.
- Studies thin and transparent biological samples.
- Enhances contrast in low-light specimens.
- Analyzes aquatic organisms like plankton.
- Inspects crystals and fine particles.
- Detects defects in industrial materials.
- Supports research in microbiology and cytology.

What is Fluorescent Microscope?
Fluorescence spectrophotometry evaluates the intensity of light at a specific wavelength emitted by a compound after it has been excited by another wavelength and entered a temporary excited state. This technology is used to explore the properties of molecules and understand the presence or absence of compounds in a sample.
Fluorescence spectrophotometry technology was created in the 1900s with the study of fluorescence. In the 1920s and 1930s, George Van Nevel and Robert Boyle studied the fluorescence of their compounds and established a method for studying fluorescence intensity, which relates to the science of fluorescence spectrophotometry. Fluorescence spectrophotometry is an analytical instrument used in many disciplines. For example, researchers in chemistry and biology use it to evaluate molecular properties or determine unknown identities. This instrument is also used in biological protein structure assessments and medical research, where researchers assess the presence of antigens or examine drug/biological interconnectivity. Researchers assess quality control in industries, forensics, and environmental fields where scientists assess water quality, determine food safety/quality, and implement fluorescence spectrophotometry for quality issues. Ultimately, the fact that researchers can assess molecular properties qualitatively and quantitatively, and that scientists can distinguish particular compounds with such sensitivity and specificity, makes fluorescence spectrophotometry an amazing tool for any professional.
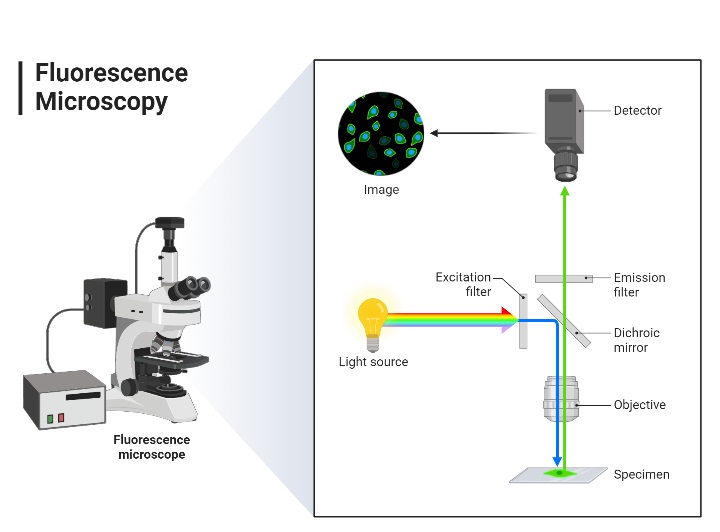
Principle of fluorescence spectroscopy
The fluorescence microscope works by using a sample that emits light. How does it work? A dye molecule is applied to the sample. This dye molecule is usually a fluorochrome. It is “excited,” meaning that it absorbs light energy and releases the absorbed energy by emitting light. The energy released by the excited dye molecule is of a different wavelength (longer) than the exciting (stimulating) light at which it is excited. Thus, it appears to have been colored by a fluorochrome because of the light emitted. The dye molecule is a fluorochrome, and it is the dye molecule that fluoresces. So the logic behind how this microscope works is that the fluorescence microscope shines ultraviolet or blue light onto the slide and returns an image of the slide created in fluorescent light. The fluorescence microscope has a mercury vapor arc lamp that creates a fast, focused beam of light that passes through an exciter filter. The exciter filter allows a very specific wavelength to pass through the fluorochrome stained sample, creating the activated fluorochrome image at the objective. Then, beyond the objective, is a barrier filter that exists primarily to filter out ultraviolet rays that could damage the operator’s eyesight and thus improve the contrast of the image.
Parts of fluorescence spectroscopy
- Light source (like a xenon lamp or LED) – emits light to excite the sample.
- Excitation monochromator/filter – selects the specific wavelength of light for excitation.
- Sample holder – holds the liquid or solid sample being analyzed.
- Emission monochromator/filter – isolates the fluorescent light emitted by the sample.
- Detector (photomultiplier tube or CCD) – measures the intensity of emitted light.
- Cuvette or sample cell – a transparent container for holding liquid samples.
- Data display/software – shows and analyzes the fluorescence signal.
- Wavelength selector controls – adjusts excitation and emission wavelengths.
- Power supply – provides energy to the light source and electronics.
- Slits – narrow openings to control light intensity and resolution.
- Reference channel – some systems include this to calibrate measurements.
- Cooling system – reduces detector noise in sensitive setups.
- Signal amplifier – boosts weak fluorescent signals for detection.
- Housing unit – the outer frame holding all components together.
Applications of the Fluorescent Microscope
- Identifies specific proteins and molecules in cells.
- Detects pathogens in microbiology and medical studies.
- Examines DNA and RNA in genetic research.
- Studies cell structures using fluorescent dyes.
- Tracks live cells in real-time experiments.
- Analyzes antibody-antigen interactions in immunology.
- Observes neuronal activity in brain research.
- Detects cancer cells in histopathology.
- Visualizes subcellular organelles like mitochondria.
- Supports advanced imaging in biotechnology.
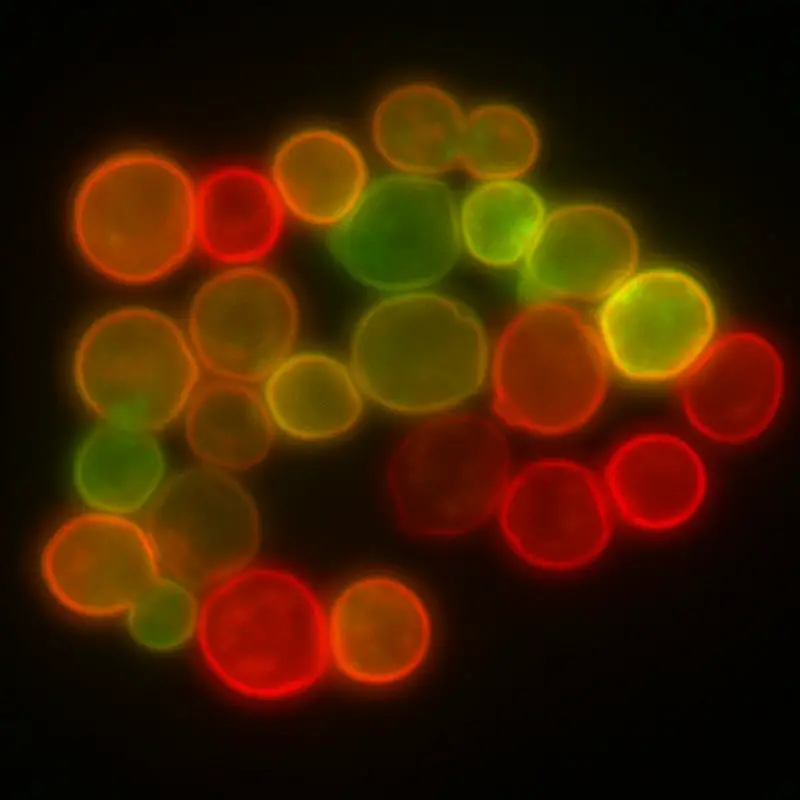
What is Confocal light microscope?
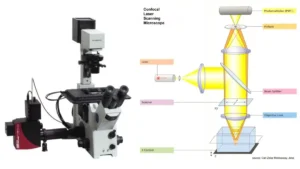
The advantages of confocal microscopy over optical microscopy include shallow depth of field, reduced out-of-focus light scatter, and the ability to acquire various optical sections through larger samples. One of the most fascinating uses of confocal microscopy in the biomedical sciences is imaging cells and tissues, typically with some form of fluorescent labeling, either with fixed samples or in vivo.
Currently, the laser scanning confocal microscope (LSCM) is the most widely used confocal microscope in medical research. This review focuses on the LSCM specifically because it is the most standard configuration that beginners will encounter. However, there are other configurations for specific nuanced applications in certain biological imaging. Much of the sample preparation can be performed in a comparable manner (although variations exist) for all types of confocal microscopes as well as other methods for obtaining optical sections, such as deconvolution techniques and multiphoton microscopes.
Principle of Confocal Microscope
In general, a confocal microscope addresses some of the shortcomings of a standard (wide-field) microscope. A standard (wide-field) microscope takes advantage of the different wavelengths produced by an emitted light source to view and illuminate large fields of view of a sample; as a result, images are blurry, out of focus, and cluttered because they try to take pictures of cell samples from all directions instead of focusing on just one. However, a confocal microscope solves this problem.
Yet, both wide-field and fluorescence microscopes work with the phenomena of excitation and illumination, meaning that the entire sample is excited and the light filters down to the microscope’s photodetector. But with confocal microscopy, it works with the concept of point illumination. Observing a fluorochromatic sample. Point illumination at any point on a fluorochromatic sample creates the point illumination observed through the objective on a plane above the objectives.
There is a stop above the objective at the aperture plane that exists solely to prevent any scattered light from reaching the sample. This illuminating source or point source, 0.25 to 0.08 microns in size and 0.5 to 1.5 microns in depth at its furthest penetration, is created by the numerical aperture of the objective. Essentially, what is being viewed is an optical/focus section itself, that is, the plane of focus between where the camera lens is and where the focus ends. What is being viewed is either a scan of the beam across the object plane (laser scan) or a scan of the stage where the stage itself is moved.
Then a detector captures the light and an image of this optical slice emerges. The slices that are viewable as optical sections become data for the computer for a later rendered 3D image. It is reproducible. In addition, the aperture above the objective, which eliminates stray light, contributes to this precision. Whether your sample is thick or thin, the confocal microscope restores a clear image and resolution. The image of a thick sample is obtained in 3D, but the grouped cells are visualized in high resolution, with a specific view of the morphology of the cells. The wonder of the confocal microscope is that it records only what it sees in focus; however, everything else, blurry, appears dark.
A microscope scanner uses two high-speed oscillating mirrors to oscillate a focused beam over a defined area to restore the image of the sample. These are controlled by galvanometer motors. The first mirror oscillates the beam on the X axis (from one side to the other) and the second mirror on the Y axis. After the scanner has made one pass in the X direction, it returns the beam to the starting position with a rapid, asymmetrical movement that completes the scan; This is called flyback. The laser scanner activates the hot spot during this flyback motion because no information is being collected at that time.
Parts of the Confocal Microscope
The Confocal Laser Scanning Microscope is made up of a few components:
- Objective lens
- Out-of-focus plane
- In-focus plane
- Beam splitters
- Detector
- Confocal pinhole (aperture)
- Laser
- Oscillator Mirrors
Applications of the Confocal Microscope
- Creates detailed 3D images of cells and tissues.
- Studies cellular processes in live samples.
- Analyzes protein interactions in molecular biology.
- Examines detailed structures of neurons.
- Visualizes complex tissue structures in pathology.
- Tracks fluorescent markers in biological research.
- Observes cancer cells for diagnostic purposes.
- Maps structures in developmental biology.
- Investigates material surfaces in nanotechnology.
- Enhances imaging in drug development studies.
Light Microscope Worksheet Download
FAQ
Which was the first cell viewed by the light microscope?
Before the 18th century, a scientist by the name of Antonie Van Leeuwenhoek examined the first living cells of organisms using light microscopy.
Although the first cell was spotted by Robert Hooke when he viewed the dead cells of a tree’s bark, Leeuwenhoek’s light microscope enabled him to observe living cells from pond life, as well as observe the bark of an oak tree. The oak bark observed by Antonie van Leeuwenhoek is therefore considered the first cell.
Why is a specimen smaller than 200 nm not visible with a light microscope?
Les subatomic particles smaller than 200 nm cannot interact with visible light. It is far too simple to lose on stage. Visible light is only effective below 390 nanometers.
Why is it difficult to observe individual chromosomes with a light microscope during interphase?
Because chromosomes are uncoiled to form long, thin strands, that’s why it is difficult to observe individual chromosomes with a light microscope during interphase.
How is the beam focus in a light microscope?
A condenser lens focuses the light onto the sample, resulting in a point of light on the surface of the specimen. As white light interacts with the sample, it is transformed by the sample’s molecules, which absorb or reflect only specific wavelengths of light.
What part of the microscope controls the amount of light?
The condenser part of Microscope is used to control the amount of light. The condenser is equipped with an iris diaphragm, which is a lever-operated shutter used to control the quantity of light entering the lens system. The body tube is located above the stage and connects to the arm of the microscope.
What structure does light pass through after leaving the condenser in a compound light microscope? a) ocular lensb) objective lensc) specimend) iluminator
c) specimen
Which microscope uses visible light?
Light optical microscopy. The optical microscope, often known as the “light optical microscope,” is a type of microscope that magnifies images of small materials using visible light and a set of lenses.
Who invented the light microscope?
Zacharias Janssen, a Dutch spectacle maker born in 1585, is credited with creating one of the earliest compound microscopes (ones with two lenses) in 1600.
What is the maximum magnification of a compound light microscope?
By combining the effects of two sets of lenses, the ocular lens (in the eyepiece) and the objective lenses, a compound microscope is typically utilised for seeing samples at high magnification (40 – 1000x) (close to the sample).
How does the lens of a light microscope work?
Using a convex lens with outwardly curved sides, a simple light microscope manipulates the way in which light enters the eye. When light reflects from an object under a microscope and passes through the lens, it bends toward the eye. This makes the object appear larger than it is.
Which type of microscope does not use light in forming the specimen image?
Electron microscopes are distinct from light microscopes in that they create a picture of a specimen using an electron beam rather than a light beam.
Which microscope structure concentrates light onto the specimen?
In microscope, the condenser lens concentrates light onto the specimen
Why can’t viruses be seen with a light microscope?
Using conventional visible light microscopy, unlabeled virus particles are too tiny to be seen. Typically, electron microscopy or atomic force microscopy are used to characterise virus particles because of their superior resolution.
What part of the microscope regulates the amount of light?
The condenser is equipped with an iris diaphragm, which is a lever-operated shutter used to control the quantity of light entering the lens system. The body tube is located above the stage and connects to the arm of the microscope.
Why is the light microscope called a compound microscope?
The compound light microscope is a device with two magnifying lenses and a number of knobs for moving and focusing the specimen. Since it employs many lenses, it is frequently referred to as a compound microscope in addition to a light microscope.
What is the function of light source in microscope?
The typical optical microscope’s illumination system is designed to transfer light through translucent objects for viewing. It consists of a light source, such as an electric lamp or light-emitting diode, and a lens system comprising the condenser in a contemporary microscope.
Which microscope did Anton van Leeuwenhoek use to observe single-celled organisms?
Anton van Leeuwenhoek use the simple microscope to observe single-celled organisms.
