What is a Compound Microscope?
- A compound microscope (often called light / optical microscope) is instrument in which at least two lenses are used to magnify a small specimen.
- The specimen is illuminated and first magnified by an objective lens, then that image is magnified by an eyepiece (ocular).
- The final image is usually inverted and enlarged relative to original small sample.
- It is widely used in biology / medicine / research, in labs, classrooms etc.
- Very thin slices of specimen are required so light can pass through them.
- Contrast is often improved by stains, dyes, or special illumination method (like bright-field, phase contrast etc).
- Magnification typically ranges from about 40× up to 1000× (or more in advanced).
- Resolution (ability to distinguish close points) is limited by wavelength of light and lens quality.
- It allows observation of cells, micro-organisms, tissue structure — things invisible to naked eye.
- Many discoveries in cell biology, pathology, microbiology were made because of compound microscope.
- Diagnosis of diseases, study of genetic / cellular processes, material science etc are empowered by its use.
- It is fundamental tool in education / research; without it many micro-world phenomena would remain unknown.
- Around 1590 Zacharias Janssen and his father Hans (Dutch spectacle makers) are credited with invention of first compound microscope (two convex lenses).
- Early microscopes had poor lens quality, severe chromatic / spherical aberrations, low magnification.
- Robert Hooke in 1665 published Micrographia, with detailed drawings from his compound microscope, and coined “cell” for cork pores.
- In the 1830s Joseph Jackson Lister along with instrument makers corrected lens aberrations (spherical & chromatic) thereby improving image quality drastically.
- Later 19th / 20th century refinements (oil immersion lenses, better glass, illumination techniques) pushed performance further
3D Model of Compound Microscope
3D Model Loading…
Scroll to view
Working Principle of Compound Microscope
- In a compound microscope, the working principle based on the optical magnification by two lenses – the objective and eyepiece (ocular).
- The specimen is placed on the stage, it’s illuminated by light source from below, sometimes mirror is used for reflection of light.
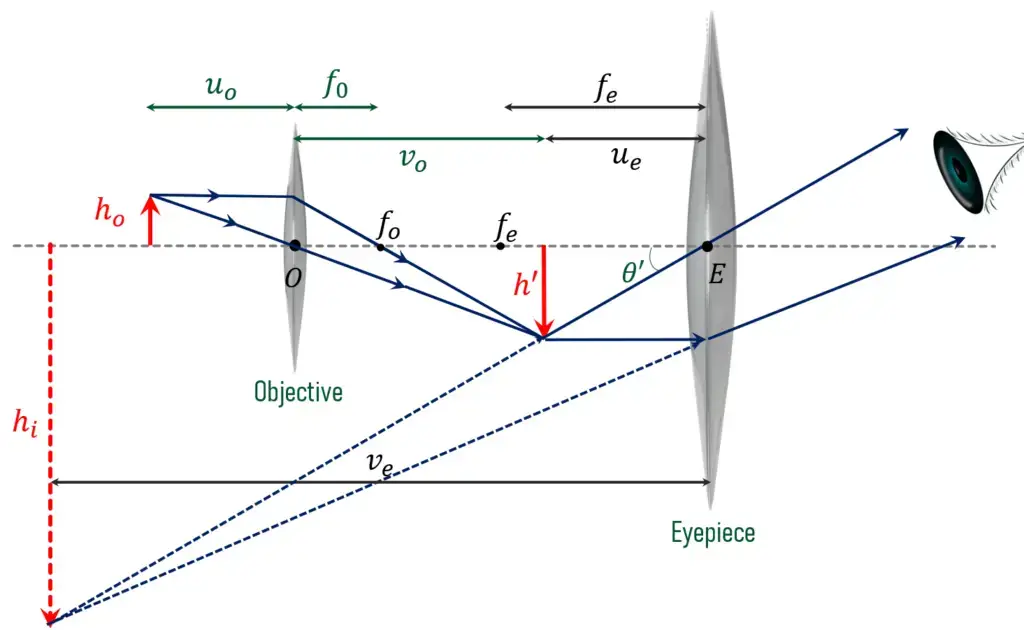
- Light rays from specimen are collected and focused by objective lens, which produce a real, inverted and enlarged image of the specimen.
- This real image then acts as an object for the eyepiece, which again magnify it to produce final virtual image that’s seen by eye.
- The magnification occurs in two stages – first by objective lens (primary magnification) and second by eyepiece (secondary magnification).
- The total magnification is obtained by multiplying magnifying power of both lenses (M = Mo × Me).
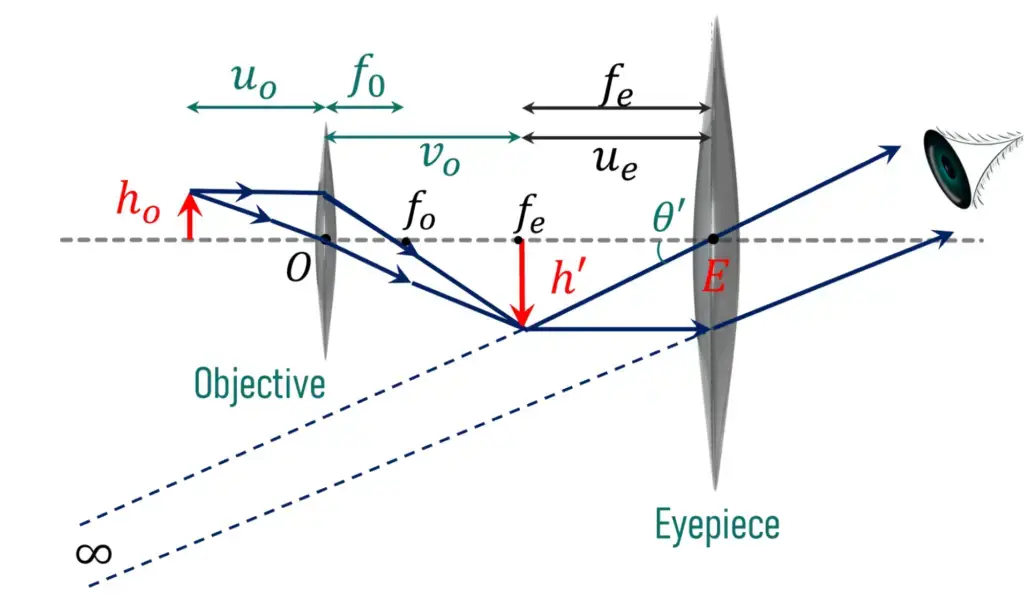
- In the system, objective lens with short focal length forms an image at its focal plane or near it, and eyepiece acts as a simple magnifier to enlarge that image.
- The final image produced is virtual, inverted and highly magnified, appears at least distance of distinct vision (about 25 cm).
- Working is depend on principle of refraction of light, where light bends when passes through lenses of different curvature and refractive index.
- Resolution of microscope is improved by using shorter wavelength of light and lenses of high numerical aperture (N.A).
- It’s important to note that the magnification without resolution improvement doesn’t provide clarity, so both must be considered together.
- Sometimes, an adjustment by coarse and fine focusing knobs is required to bring the image into sharp view, it’s done manually by observer.
- In brief, the microscope works on refraction and magnification of light rays by convex lenses to produce a detailed enlarged image of small specimen, which can’t seen by naked eye.
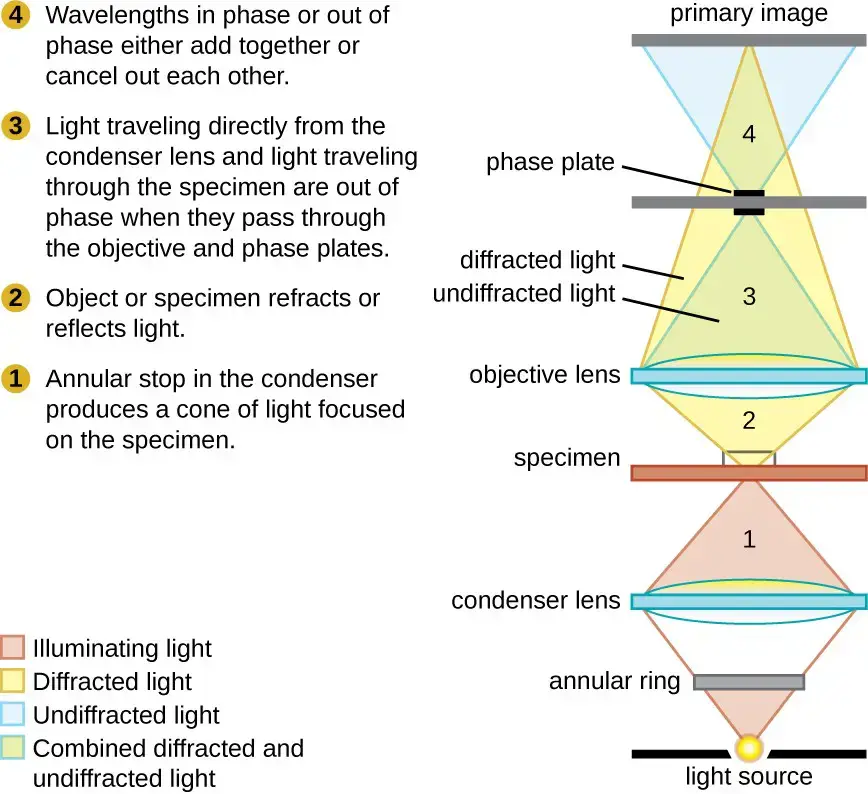
Magnification Power of Compound Microscope
The magnification power of compound microscope refers to ratio of size of final image to size of object seen by naked eye.
It is obtained by multiplying magnification of objective lens and magnification of eyepiece (ocular).
So Total Magnification = Mo × Me (where Mo = magnification by objective, Me = by eyepiece).
The objective often gives high magnification, for example 4×, 10×, 40×, 100× are common values.
The eyepiece usually gives moderate magnification like 10× (sometimes 5×, 15×) in many microscopes.
For instance, if objective is 40× and eyepiece is 10× then total magnification is 400×.
In many classroom microscopes, magnification range 40× to 1000× is used.
But magnification more than about 1000× often yields fuzzy image / no extra detail, so practical limit is around 1000× or slightly above.
The magnification contributed by objective is linear/transverse magnification (Mo = – xi / fo ) when real image distance xi and focal length fo are considered.
The eyepiece magnification is angular magnification (Me = 1 + do / fe ) if final image is at near point (do = near point, fe = focal length of eyepiece).
If final image is formed at infinity, formula is slightly simpler for eyepiece (Me = do / fe ) in ideal case.
Negative sign in Mo indicates image inversion (image is inverted relative to object).
Tube length (distance between objective and eyepiece focal planes) often standardized (e.g. 160 mm) plays role in magnification formula.
Magnification alone is not enough; resolution must be sufficient to see details. Without resolution, high magnification just magnify blur.
So magnification power is useful measure but it must be supported by optical quality, lens design, numerical aperture etc.
Parts of Compound Microscope
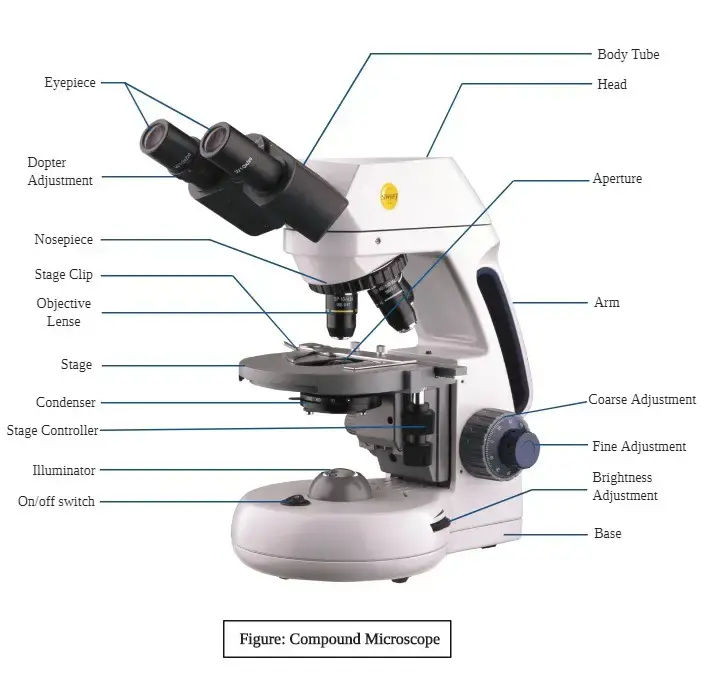
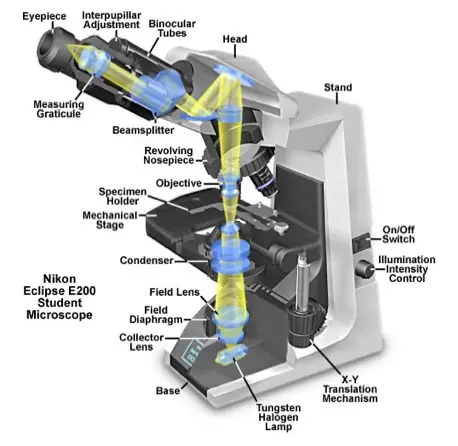
- Eyepiece (Ocular Lens) – It is placed at the top part of microscope and through this lens, specimen is viewed. Usually it has magnification power 10x or 15x depending on type. Sometimes dust may settled on it, which blur the image.
- Body Tube / Head – It connects eyepiece to the objective lenses. Alignment of optical path is maintained by this tube, though in some modern microscope this part is movable slightly for adjustment purpose.
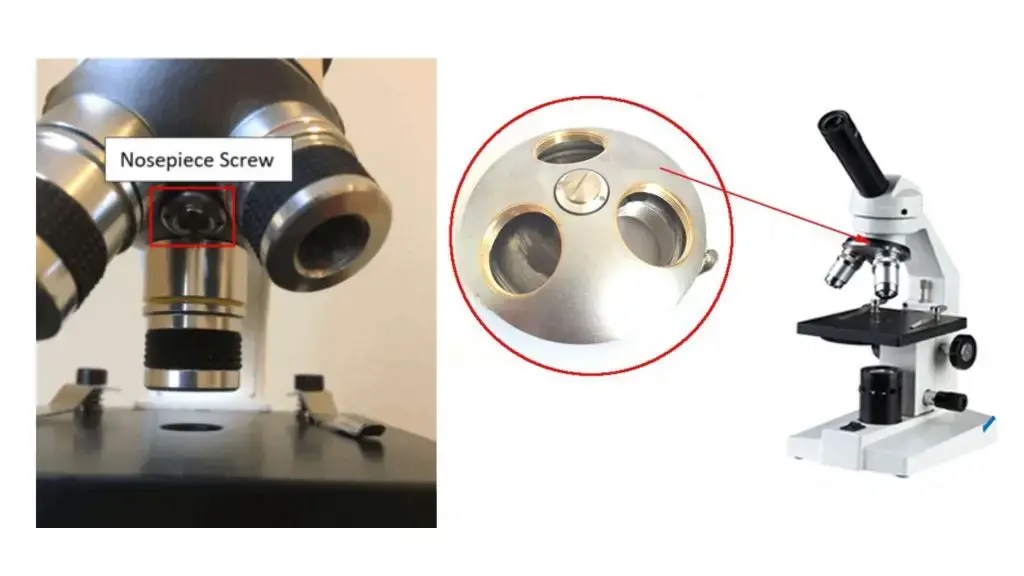
- Nosepiece (Revolving Turret) – This circular rotating part holds multiple objective lenses together, by rotating nosepiece, desired objective lens can be positioned over specimen. Sometimes users rotate it too fast, which may misalign the lens.
- Objective Lenses – It is considered as most important optical component. Generally 3 or 4 lenses are mounted (4x, 10x, 40x, 100x). The magnification of microscope is obtained by combination of ocular and objective magnifications. High power objective (100x) is usually used with immersion oil for clearer image.
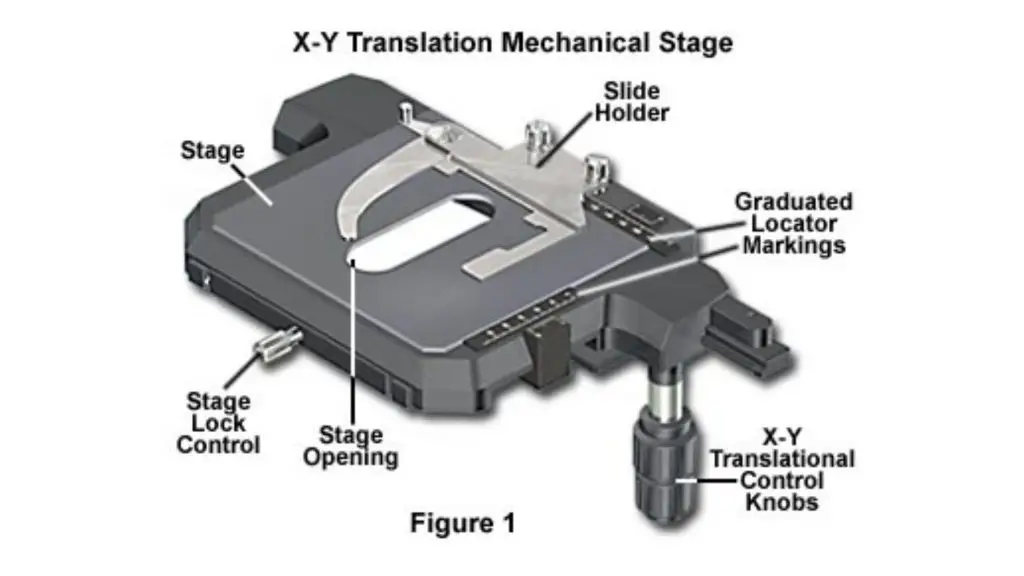
- Stage – It is the flat platform where slide is placed. Stage usually has clips for holding slides, in mechanical stage it is moved by knobs to adjust specimen position (x/y axis movement).
- Stage Clips / Mechanical Stage – They keep slide steady on stage, avoiding drift while observing. In some microscope, vernier scales are attached for precise movement.
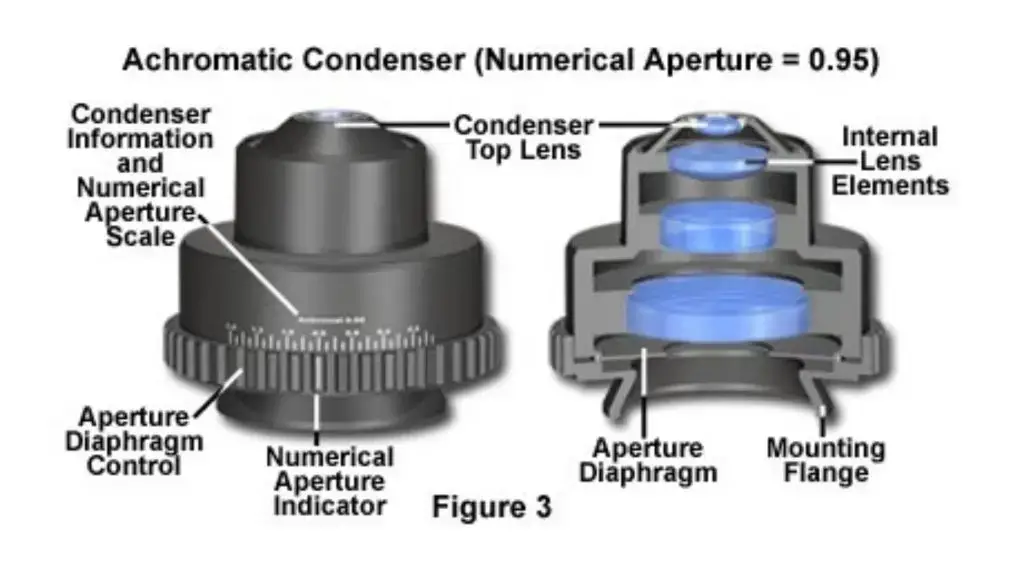
- Diaphragm / Iris Diaphragm – It controls amount of light that reach the specimen. By adjusting diaphragm, contrast and clarity can be improved. It is found below stage attached with condenser.
- Condenser – It is located below stage, its function is to concentrate light onto specimen. Proper adjustment of condenser height and aperture is necessary for good illumination.
- Mirror or Illuminator (Light Source) – In old model mirror is used to reflect external light (like sunlight or lamp) into condenser, while in modern microscope built-in LED or halogen light source is present for steady illumination.
- Arm – It supports upper parts (optical body) and used for carrying microscope safely by holding arm and base. It connects base to head part.
- Base – It is the bottom supporting structure of microscope, it holds all parts together firmly and gives stability. Heavy and wide base help to reduce vibration.
- Coarse Adjustment Knob – It is large knob used for focusing specimen roughly by moving stage up and down. It should not be used with high power objective to prevail slide damage.
- Fine Adjustment Knob – This smaller knob used for sharp focusing after coarse adjustment, allows fine movement of stage in micrometer range, giving clear detailed image.
- Condenser Adjustment Knob – It raise or lower the condenser for focusing light beam properly on specimen plane, often ignored by beginners but essential for quality imaging.
- Dust Cover / Power Switch / Rheostat (in electric microscope) – Dust cover used for protection when not in use. Power switch and rheostat used to control illumination intensity etc.
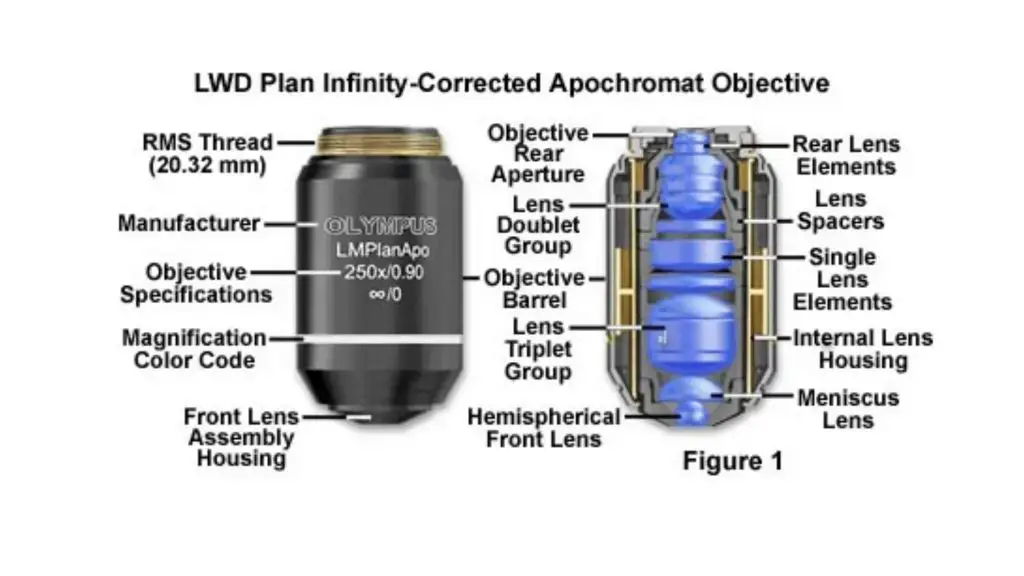
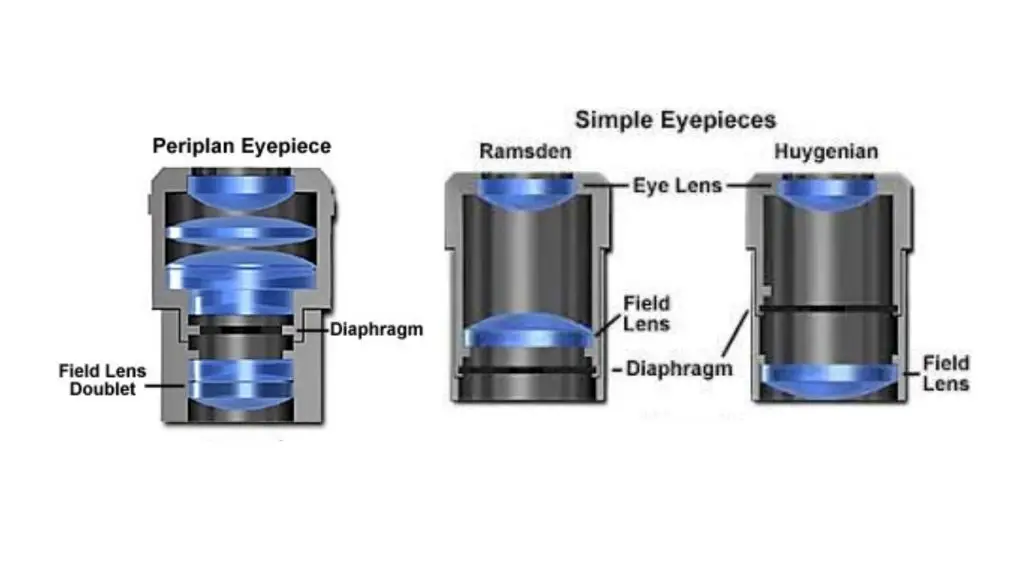
Factors play an important role in magnification
- The focal length of objective and eyepiece lenses is a primary factor — shorter focal length gives larger magnification.
- Tube length (optical tube length) is important; magnification is proportional to tube length (if other things kept constant).
- The distance of distinct vision (D) influences eyepiece magnification when final image is at near point (often assumed 25 cm).
- The power (magnifying power) of objective and eyepiece used directly affect total magnification (they are multiplied).
- Mis-match in tube length and designed tube length of lenses causes change in magnification (and possible aberrations) ; using objective in wrong tube gives altered magnification.
- The intermediate image distance xi (distance at which image formed by objective) also influence magnification formula of objective (Mo = – xi / fo).
- If final image is formed at infinity vs at near point, formulas change so magnification factor is altered.
- The quality of lenses / aberration can reduce effective magnification (optical imperfections reduce usable magnification)
- The numerical aperture (N.A) and light bending ability sets limit beyond which magnification becomes “empty” (no extra detail)
- Wavelength of light also plays indirect role (shorter wavelength better detail, making magnification more useful)
- Illumination and contrast also matter; poor light or contrast makes high magnification useless
Operating Procedure of Compound Microscope
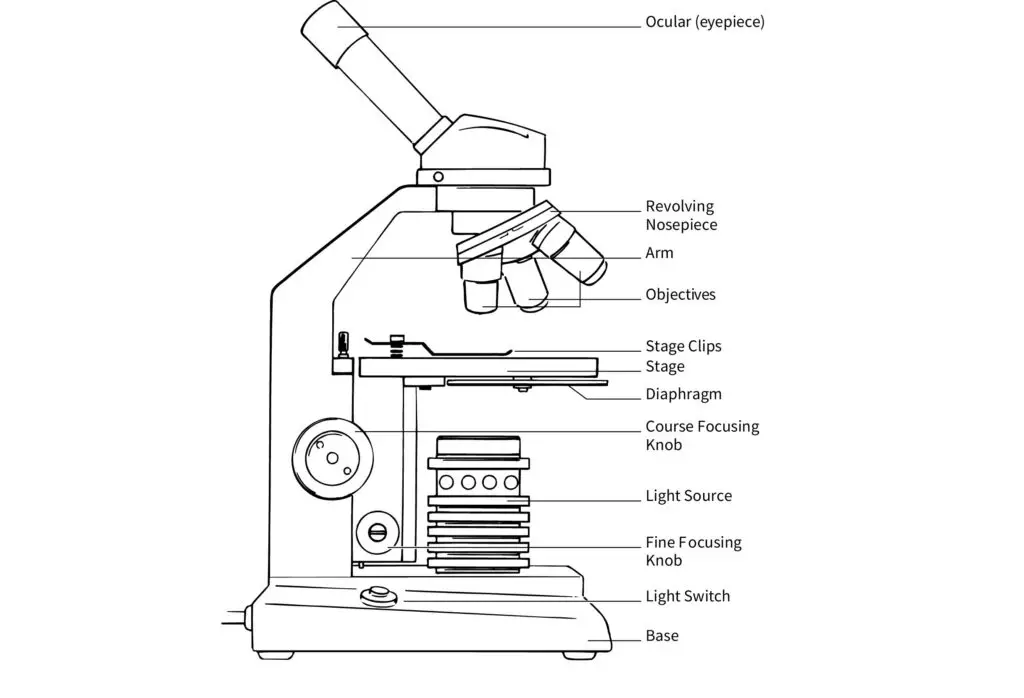
- The microscope is placed on a stable bench, and it’s carried using both hands (one on arm, one under base).
- The dust cover is removed, cord unwrapped and it is plugged in / turned on (if electric) (or mirror is adjusted if mirror-type).
- All glass surfaces (eyepiece, objectives, stage window) are cleaned gently with lens paper.
- The lowest power objective (e.g. 4×) is rotated into position on nosepiece.
- The specimen slide is placed on stage and held by stage clips / mechanical stage.
- The specimen is centered under objective by moving stage / slide.
- The coarse adjustment knob is turned (slowly) to raise the stage until objective is close to slide but not touching.
- The fine adjustment knob is used to bring image into sharper focus (looking through eyepiece).
- The diaphragm / condenser is adjusted to regulate light intensity through specimen.
- Once focused at low power, the next higher objective is rotated into place (without altering coarse focus).
- Only fine adjustment is used to refine focus under higher objective.
- Light intensity / condenser aperture is often adjusted when magnification is increased.
- If oil-immersion objective is to be used (e.g. 100×), a drop of immersion oil is placed on slide before rotating that objective into place.
- When finished, the stage is lowered, the lowest objective is returned into position, specimen is removed, lenses cleaned, light turned off and cord wrapped.
Compound Microscope Resolution Power (Resolving power)
The resolving power (or resolution) refers to ability to distinguish two very close points as separate, it is not same as magnification.
It is measured by the minimum distance (d_min) between two points at which they still are seen distinctly.
The resolution is limited by wavelength of light (λ) used for illumination. Shorter λ gives better resolution.
The resolution also depends on numerical aperture (NA) of objective lens (and condenser) which involves refractive index and sine of half-angle of light cone.
According to Abbe’s criterion:
- d_min = λ / (2 n sin θ)
- Resolving power = 1 / d_min = (2 n sin θ) / λ
Use of immersion oil increases refractive index n between specimen and objective, thus NA increases and resolution improves.
Even with perfect lenses, there is a diffraction barrier which prevents resolution beyond about ~ 200-250 nm (0.2-0.25 µm) in light microscope.
Lateral (horizontal) resolution is better than axial (depth) resolution; axial resolution is usually worse (larger d) along optical axis.
Aberrations, lens imperfections, contrast, illumination coherence also degrade resolution from theoretical limit.
Thus resolution power is a more critical measure than magnification: high magnification without resolution is just magnified blur.
Applications of Compound microscope
- In pathology labs blood / tissue smears are examined under microscope for disease diagnosis (cancer, infections etc).
- In microbiology / bacteriology / virology microscopic organisms (bacteria, protozoa etc) are studied which cannot seen by naked eye.
- In education / teaching / academic labs, students are provided microscope for experiments, observation of plant / animal cells etc.
- In forensic science, cells / fibres / hair / trace evidences are inspected to help crime solving.
- In metallurgy / materials science, cross sections of metals / alloys / microstructure are inspected (with reflected light mode)
- In mineralogy / geology, thin sections of rocks / minerals are studied (to detect mineral presence / internal structure)
- In histology, tissue sections are examined to correlate structure & function or disease states
- In research / life sciences, cell organelles / intracellular details are visualized for science investigations
- In quality control / industrial inspection, small defects in manufactured parts / devices sometimes are examined microscopically (for surface / micro defects)
Advantages of Compound Microscopes
- High magnification is provided, so very small objects (cells, bacteria) can be seen which otherwise can’t seen by naked eye.
- Better resolution is achieved compared to simple microscope, so fine details are resolved more clearly.
- Use of multiple lenses helps to magnify in stages (objective + eyepiece) which gives flexibility and more power.
- It is relatively easy to handle / use (user-friendly) especially in teaching labs etc.
- Compact / small size makes it easier to store and transport, not bulky like huge instruments.
- Own illumination / built-in light source is often provided, so external light dependency is reduced.
- Affordable (relatively) for basic models, so accessible for students / smaller labs, compared to more advanced microscopes.
- Adaptability is allowed (can be enhanced) by adding attachments / techniques (phase contrast, fluorescence etc) so its use is extended.
- Real-time / live specimen observation is allowed (for transparent / thin samples), movements and changes can be studied.
Limitations Compound Microscope
- The magnification is limited: only to a certain extent — beyond which further magnification gives no additional detail (just magnified blur).
- Resolution is limited by diffraction / light wavelength, so structures closer than ~200 nm cannot be resolved.
- Thick or opaque specimens cannot be studied well, because light cannot pass through, so only thin, transparent slices are usable.
- Contrast is often poor for unstained specimens, so staining / dyes are required which may distort or kill the specimen.
- Depth of field is shallow (very little thickness is simultaneously in focus), so 3D structures are hard to see in entirety.
- Aberrations, lens imperfections, and optical aberrations reduce image clarity (chromatic, spherical aberrations) in real microscope more than ideal.
- Only light-based imaging is possible, so molecules, atoms, ultrastructure beyond light’s resolving limit cannot be visualized.
- Preparation of specimen is demanding (sectioning, staining, mounting) which may introduce artifacts and is time consuming.
- The field of view is small, so only small area of specimen is seen at higher magnifications.
- Maintenance and calibration are required frequently (cleaning, alignment), and cost of sophisticated models is higher.
Stereomicroscope vs Compound microscope
- A stereomicroscope (also called dissecting microscope) is used for low magnification, while a compound microscope is used for high magnification and fine details.
- In stereomicroscope, two optical paths (one for each eye) are provided so a 3D (stereoscopic) image is seen, whereas in compound microscope a single optical path is shared and image is 2D / flat.
- The working distance in stereomicroscope is large (objects can be manipulated while observing) but in compound microscope the working distance is small and specimen must be thin / flat.
- Illumination in stereomicroscope mostly uses reflected light / incident illumination (light falls on surface) so opaque objects are observed, while compound microscope uses transmitted light (light passes through specimen) so specimen must be transparent / thin.
- Magnification of stereomicroscope is lower (typically up to ~ 50× or 100×) but magnification of compound microscope is much higher (40× to 1000× or more).
- Depth perception / relief is good in stereomicroscope so surface structures / external features are easily studied, whereas internal fine structures / organelles are better seen by compound microscope.
- Specimen preparation is minimal in stereomicroscope (large / thick objects can be placed directly) but in compound microscope specimen must be sectioned / mounted / stained etc.
- The field of view in stereomicroscope is relatively large; in compound microscope field of view narrows at high magnification.
- Stereo is suited for inspection, dissection, quality control, entomology etc; compound is suited for microbiology, cell biology, pathology etc.
Here is a comparison table of Stereomicroscope vs Compound Microscope:
| Feature | Stereomicroscope | Compound Microscope |
|---|---|---|
| Magnification / Power | Low magnification (often ~ 6× to 50× or up to ~100× in special cases) | High magnification (typical 40× up to 1000× or more) |
| Optical paths / Image | Two separate optical paths (one for each eye) giving a 3D / stereoscopic view | Single optical path (even if binocular) giving a 2D / flat image |
| Working distance | Large working distance; objects can be manipulated under microscope | Short working distance; specimen must be thin / close to lens |
| Type of illumination / Specimen type | Usually uses reflected (incident) light so opaque / solid objects are observed; sometimes both reflected + transmitted | Uses transmitted light (light passes through specimen) so specimen must be transparent / thin section |
| Depth perception / 3D effect | Good depth perception and relief; 3D appearance of specimen | Limited depth; image is generally flat, internal details are focused |
| Specimen preparation | Minimal preparation needed; larger / thick / opaque objects can be placed directly | Specimens must be sliced, mounted, stained etc to be thin enough for light passage |
| Field of view & usable area | Wider / larger field of view at lower magnification | Narrower field of view especially at high magnification |
| Applications / use cases | Dissection, industrial inspection, entomology, surface structure, manipulation under view | Cell biology, microbiology, histology, internal fine structures, tissues etc |
| Resolution limit / detail | Lower resolution; fine internal details often cannot be resolved | Higher resolution; internal structures, organelles, fine detail can be resolved |
What is difference between compound and simple microscope?
- A simple microscope uses a single lens for magnification, while a compound microscope uses two or more lenses (objective + eyepiece) to magnify.
- In a simple microscope the magnification is modest (often up to about 300×), but in compound microscope much higher magnifications (hundreds to thousands ×) are possible.
- The image in a simple microscope is virtual and erect (upright), but in a compound microscope final image is virtual, inverted relative to object.
- Simple microscope is easy to design / simpler optical system, low cost, low complexity. Compound microscope is more complex in optical system, more costly, many parts.
- In simple microscope illumination usually natural light or ambient light is enough, while in compound microscope internal illuminator, condenser etc are often required for good image.
- The field of view in simple microscope is larger, depth of field is larger; in compound microscope field of view is smaller especially at high magnification, and depth of field is shallow.
- Simple microscope is used for coarse observation, reading small print, inspecting enlargements etc; compound microscope is used in biology labs, research for cellular / microbial, finer internal structures.
Here is a comparison in table form showing Difference between Simple and Compound Microscope:
| Feature | Simple Microscope | Compound Microscope |
|---|---|---|
| Number of Lenses | Uses a single lens (one convex lens) | Uses more than one lens (objective + eyepiece etc) |
| Magnification Power | Moderate / limited magnification (often up to ~ 300×) | High magnification (many hundreds to 1000× or more) |
| Image Nature | Virtual & erect (upright) image | Final image is virtual and inverted (upside down) |
| Optical System Complexity | Simple optical system, low complexity | More complex optical system with multiple lenses and parts |
| Illumination / Light Source | Often natural light or ambient light is used | Built-in illuminator / condenser, needed for good light control |
| Field & Depth of View | Larger field of view, deeper depth of field | Narrower field of view at high mag, shallow depth of field |
| Specimen Requirements | Thick / larger objects can sometimes be used | Specimen must be thin, transparent, properly prepared / stained |
| Cost & Use | Low cost, easy to build / use | More expensive, used in labs / scientific work |
| Suitability / Applications | For coarse, everyday magnification (reading, simple inspection) | For detailed observation of cells, microbes, tissue etc |
FAQ
What is compound microscope?
A compound microscope allows users to magnify objects up to 100x magnification. This is great for research work, especially biology. With a microscope, you can view cells, bacteria, viruses, fungi, proteins, DNA, etc.
Who invented compound microscope?
Hans Christian Ørsted was the first person to invent the compound microscope. He used his invention for studying the structure of crystals. His invention helped him win a competition at age 13. After he finished school, he worked at the Royal Observatory in Copenhagen where he got interested in astronomy and optics. Then, he moved to England to work for Thomas Young who was working on diffraction patterns. When Young died, Ørsted took over his position and began using his new invention in 1789. A year later, he published his findings. The microscope became widely popular and changed science forever.
Compound microscope has how many lenses?
A compound microscope has two lenses attached one above the other, which allows users to magnify objects up to 1000 times their actual size. The magnification depends on the distance between the two lenses.
What are zooming microscopes?
A zooming microscope is a microscope that has a continuously variable magnification, typically over a range of about 4x to 50x or more. This is achieved by moving the objective lenses closer to or further away from the sample being observed. Zooming microscopes are also known as varifocal microscopes. They are useful because they allow the user to easily adjust the magnification of the microscope without having to change the objective lenses, which can be time-consuming and inconvenient. They are often used in educational settings, where students may need to observe a variety of samples at different magnifications. They are also used in research and industrial settings where the ability to quickly adjust the magnification can be useful.
What structure does light pass through after leaving the condenser in a compound light microscope?
In a compound light microscope, light passes through the condenser and is focused onto the specimen being observed. The light then passes through the specimen and is focused by the objective lens, which magnifies the image. The magnified image is then passed through the eyepiece, which further magnifies the image and presents it to the viewer.
So, in summary, after leaving the condenser, light passes through the specimen and the objective lens before reaching the eyepiece. The eyepiece is typically located at the top of the microscope, and is the part that the viewer looks through to observe the specimen.
What are fixed power microscopes?
Fixed power microscopes, also known as monocular microscopes or low-power microscopes, are microscopes that have a single, fixed magnification. They are called “low-power” because they typically have a magnification of 10x or less. Fixed power microscopes are simple and inexpensive instruments that are often used in educational settings, such as schools and colleges, to introduce students to microscopy. They are also used in a variety of other settings, including industrial and research laboratories, to perform routine tasks that do not require high magnification.
Fixed power microscopes are typically very easy to use, as they do not have any moving parts or adjustable objective lenses. The user simply places the specimen on the stage and looks through the eyepiece to view the image. Because they have a fixed magnification, fixed power microscopes are not able to produce images at different magnifications. Instead, they are used to observe relatively large specimens, such as insects, plant cells, and other biological specimens, at a low magnification.
What is the field of view of a microscope?
The field of view of a microscope is the area of the specimen that is visible through the eyepiece when looking through the microscope. It is typically measured in millimeters (mm) and represents the width of the viewable area at a particular magnification. The field of view can be adjusted by changing the objective lens or the eyepiece, or by moving the stage up or down.
In general, the higher the magnification of the microscope, the smaller the field of view will be. This is because the objective lens is able to magnify a smaller area of the specimen at higher magnifications. Conversely, at lower magnifications, the field of view will be larger because the objective lens is magnifying a larger area of the specimen. The field of view is an important factor to consider when using a microscope, as it determines how much of the specimen can be seen at any given time.
What is the depth of field of a microscope?
The depth of field of a microscope is the distance between the nearest and farthest points in the specimen that are in focus at a particular magnification. It is typically measured in micrometers (µm) and represents the thickness of the specimen that is in focus. The depth of field can be adjusted by changing the objective lens or the focus knob, or by moving the stage up or down.
In general, the higher the magnification of the microscope, the smaller the depth of field will be. This is because the objective lens is able to focus on a smaller area of the specimen at higher magnifications, and therefore only a thin layer of the specimen will be in focus. Conversely, at lower magnifications, the depth of field will be larger because the objective lens is focusing on a larger area of the specimen and more of the specimen will be in focus. The depth of field is an important factor to consider when using a microscope, as it determines how much of the specimen is in focus at any given time.
What is the focal distance of a microscope?
The focal distance of a microscope is the distance between the objective lens and the point at which it is focused. It is typically measured in millimeters (mm) and is an important factor in determining the magnification of the microscope. The focal distance can be adjusted by changing the objective lens or by moving the stage up or down.
In general, the shorter the focal distance, the higher the magnification of the microscope will be. This is because a shorter focal distance allows the objective lens to focus on a smaller area of the specimen, resulting in a larger magnification. Conversely, a longer focal distance will result in a lower magnification because the objective lens is able to focus on a larger area of the specimen. The focal distance is an important factor to consider when using a microscope, as it determines the magnification of the image that is being observed.
Why is it called compound microscope?
A compound microscope is called a compound microscope because it is made up of multiple lenses, or “compounds,” that work together to produce a magnified image of the specimen being observed. The lenses in a compound microscope include the objective lenses, which are located below the stage and are responsible for magnifying the image, and the eyepieces, which are located above the stage and are responsible for further magnifying the image and presenting it to the viewer.
The term “compound” refers to the fact that the microscope uses multiple lenses to produce the image, rather than just a single lens. This allows for a greater magnification and a clearer, more detailed image than can be achieved with a simple microscope that uses only a single lens. Compound microscopes are the most common type of microscope and are widely used in a variety of settings, including educational, industrial, and research settings.
- Magnus Opto Systems. (n.d.). Understanding different types of microscopes and their applications. Magnusopto. https://www.magnusopto.com/blog/post/understanding-different-types-of-microscopes-and-their-applications.html?srsltid=AfmBOoqoTYvBG07yGblcF541cD4MRhE2vOynIxjTRg16pA7EetqabiwH
- America, M. (2025, February 6). Best compound microscopes for professionals. Motic Microscopes. https://moticmicroscopes.com/blogs/articles/best-compound-microscopes-for-professionals?srsltid=AfmBOopEWoaaDT3I5ANBUtT37kjkD6GqRVgXL1PbyMtbWJJrJ5bpR-Lv
- Allen. (2025, February 28). Compound Microscope. https://allen.in/science/compound-microscope
- Richter optica. (n.d.). https://www.microscopeworld.com/p-3470-what-is-a-compound-microscope.aspx
- Shannon, R, R., Ford, & J, B. (2025, September 25). Microscope | Types, parts, History, diagram, & Facts. Encyclopedia Britannica. https://www.britannica.com/technology/microscope/The-compound-microscope
- GeeksforGeeks. (2025, July 23). Parts of compound microscope. GeeksforGeeks. https://www.geeksforgeeks.org/biology/parts-compound-microscope/
- News-Medical. (2018, August 23). Limitations of optical microscopy. https://www.news-medical.net/life-sciences/Limitations-of-Optical-Microscopy.aspx
- What is a Compound Microscope? (n.d.). https://www.bestscope.net/solution/what-is-a-compound-microscope/
- Admin. (2024, July 2). Compound Microscope. BYJUS. https://byjus.com/physics/compound-microscope/
- https://www.microscopeworld.com/p-3470-what-is-a-compound-microscope.aspx
- https://www.microscopemaster.com/parts-of-a-compound-microscope.html
- http://www.madsci.org/posts/archives/1999-01/915771165.Gb.r.html
- https://sciencestruck.com/compound-microscope-basics-uses
- https://www.slideshare.net/shrutidhamdhere1/compound-microscope-basic
- https://en.wikipedia.org/wiki/Optical_microscope
- https://www.microscopemaster.com/compound-light-microscope.html
- http://www.funscience.in/study-zone/Physics/OpticalInstruments/CompoundMicroscope.php
- https://www.biologydiscussion.com/microscope/compound-microscope-structure-and-working-principles/5822
- Text Highlighting: Select any text in the post content to highlight it
- Text Annotation: Select text and add comments with annotations
- Comment Management: Edit or delete your own comments
- Highlight Management: Remove your own highlights
How to use: Simply select any text in the post content above, and you'll see annotation options. Login here or create an account to get started.