What is a Bunsen Burner?
- Bunsen Burner is a common laboratory equipment which used for heating, sterilization and combustion of substances.
- It can define as a gas burner that produce a single open flame, mostly by mixing gas (like methane, LPG etc.) with air before ignition.
- The apparatus was developed by Robert Bunsen (a German chemist), and they has been used widely in labs, school, and research work.
- It consist of a metallic base, a gas inlet, a barrel/tube, and an air hole with adjustable collar to control air supply.
- In operation, the gas flow and air opening are adjusted to obtain different types of flames – luminous (yellow) and non-luminous (blue) flame, depending upon the air mixture ratio.
- The principle of working based on the combustion of gas with controlled air mixture which allow complete or incomplete burning, producing different flame temperatures (about 1200°C–1500°C).
- When more air is allowed, the flame become hotter and blue, because complete combustion occurs; if air hole is closed, incomplete combustion take place and yellow flame is seen that produce soot.
- Bunsen burner are used for heating of chemicals, sterilizing inoculating loops, and also for testing of flame color in qualitative analysis.
- The flame has two regions– inner (cooler, luminous) and outer (hot, non-luminous) zone; temperature variation occur within this zones.
- It’s operation seem simple but must be handled carefully; gas leakage, loose tube, or improper air adjustment may cause flame instability or accidents etc.
- In modern laboratories, variations of Bunsen burner like Tirrell and Teclu burner are also used, they works on similar principle but have modified air control systems.
- Therefore, a Bunsen burner remains one of most essential and traditional laboratory heating device even till today because of its sturdy and reliable design.
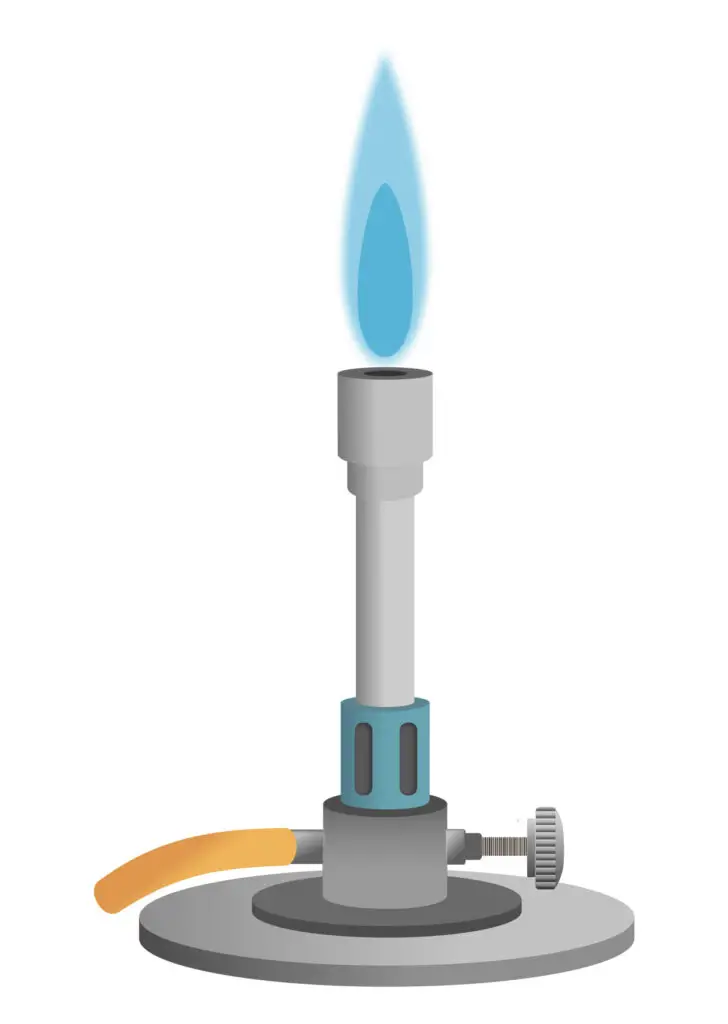
Definition of Bunsen Burner
A Bunsen burner is a laboratory gas burner that produces a controlled flame for scientific experiments and research purposes.
Principle of Bunsen burner
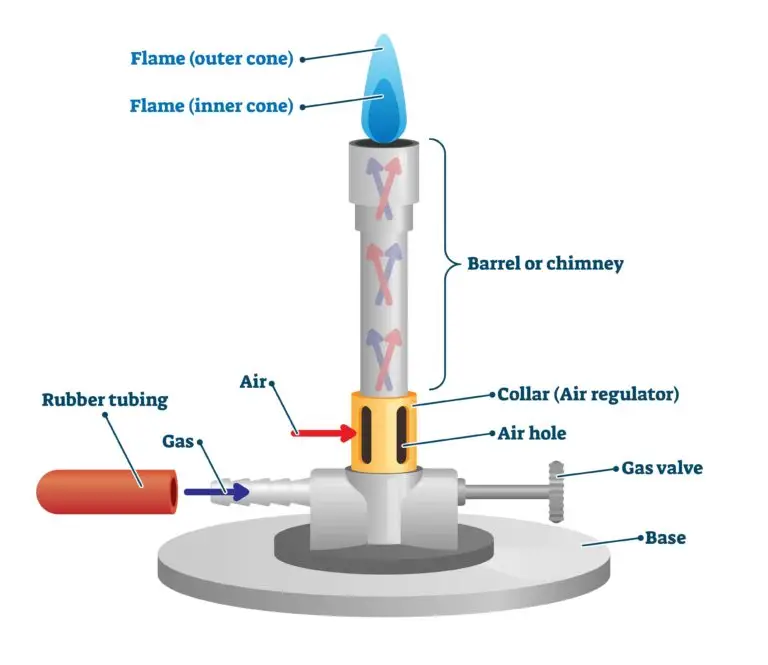
The principle of Bunsen burner based on the combustion of gas with air before ignition, which produce a safe and controllable flame for heating purpose.
In this device, gas (like methane, LPG, or coal gas) is allowed to mix with air in a specific ratio before burning, this mixing cause complete combustion and gives a blue non-luminous flame.
The air enters by air holes located at the bottom of barrel, it mix with the gas during its upward movement by the Venturi effect, where pressure difference draw the air inside.
The mixture of gas and air formed in correct proportion gives high temperature flame nearly about 1200°C–1500°C which used for sterilization, heating etc.
When air supply is less, incomplete combustion occur, resulting in luminous yellow flame, which is cooler and produce soot; when air supply is more, complete combustion take place with blue flame.
The principle can describe as – the flame temperature and nature depend upon the proportion of air and gas mixture before ignition, which is controlled by rotating collar that adjust air holes.
The process of air-gas mixing is continuous, so the flame remain steady and not blow off easily; however, improper adjustment can prevail correct burning and cause flickering.
Therefore, Bunsen burner work on the simple but efficient principle of controlled mixing of fuel gas and air before combustion, to achieve different flame characteristics for laboratory uses.
Types of Bunsen burners
Each of these burner types works on same basic principle of controlled air–gas mixing before combustion, but their design and flame characteristics differ based on usage, safety, and flame intensity requirement etc.
1. Standard Bunsen Burner– It’s the most common type used in laboratories for heating / sterilizing / combustion. It consist of a simple barrel with air holes and adjustable collar for controlling air–gas mixture.
2. Tirrell Burner– This type has a broader base and a screw adjustment that allows more precise control of the air and gas flow. The flame stability is better and safer, specially when used under low gas pressure.
3. Teclu Burner – It designed with a longer air inlet and conical tube which allow more efficient air mixing with gas, producing a hotter and more intense blue flame. The air supply can be finely regulated by rotating the collar or needle valve.
4. Meker Burner– It produce a large, wider flame compared to standard Bunsen burner, by using a metal grid at the top of barrel. It’s used when a strong uniform heating required, like for large flasks or crucibles.
5. Fish Tail Burner– It has a flattened opening at the top which create a fan-shaped flame. This flame spread wider and used for gentle heating or for demonstrations where visible flame area is required.
6. Micro Bunsen Burner – It’s smaller in size, mostly used for micro scale laboratory work or for delicate heating operations where fine flame control needed.
Fuel Sources for Bunsen Burner
In all these fuels, the main principle remain same – the gas mixed with air before combustion to form an adjustable and controllable flame suitable for heating, sterilizing, or combustion works etc.
1. Natural Gas– It mainly contain methane (CH₄) and sometimes small amounts of ethane or propane. It’s the most common and clean-burning fuel used in laboratories because it gives a hot blue non-luminous flame.
2. Liquefied Petroleum Gas (LPG)– A mixture of propane and butane gases, which used when natural gas not available. It burns efficiently but with slightly higher temperature (around 1500°C) and easy to store in cylinders.
3. Coal Gas – Earlier, coal gas was widely used as fuel for Bunsen burner, it produced by destructive distillation of coal. It contain hydrogen, methane, carbon monoxide, and gives moderately hot flame, though less clean than natural gas.
4. Biogas– Generated by anaerobic decomposition of organic waste materials. It contains mainly methane (50–70%), CO₂, and traces of H₂S. It can also used as alternative fuel where laboratory connected to local production unit.
5. Butane Gas– It’s often used in portable or field burners; it provide steady flame and easy ignition. However, its use limited for small-scale or temporary laboratory setups.
6. Propane Gas– Propane produce slightly hotter flame than methane, often used when higher temperature required. It is available in pressurized tanks, and its flame stability is quite reliable during experiments.
Bunsen burner Parts With their functions
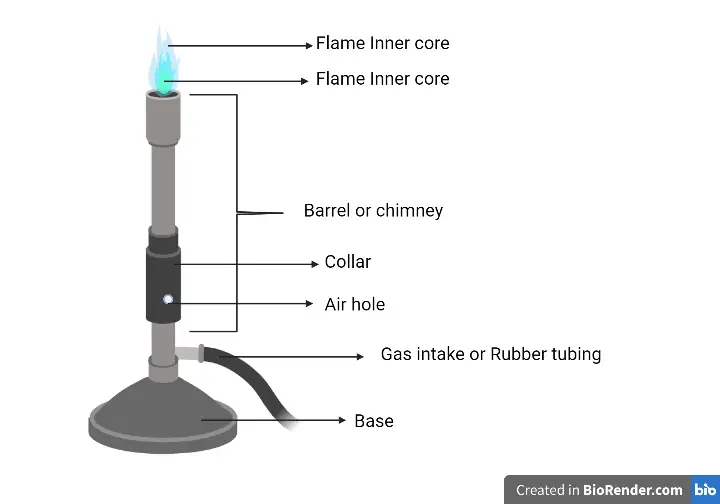
Each part of Bunsen burner has been designed in coordination, they work together to provide a controllable, uniform and safe flame for heating, sterilization, or combustion experiments etc.
1. Base– It is a broad, heavy metallic part which provides support and stability to the burner during use. It prevent tipping over when connected with gas tubing. Sometimes called foot of burner, it keep the device sturdy and hardy.
2. Gas Inlet– The tube (usually at the side of base) by which the gas enter into the burner. It connect to the rubber tube coming from gas supply, and its function to deliver steady gas flow inside the barrel.
3. Barrel /Tube– The vertical metal tube through which the gas-air mixture rise up to the top where combustion occur. It’s usually made of brass or steel and allows partial mixing of gas and air before ignition.
4. Collar– The movable ring fitted at the lower part of barrel, containing small holes for air entry. By rotating the collar, air holes can be opened or closed, thereby controlling the air-gas ratio and thus the type of flame (luminous or non-luminous).
5. Air Holes– These are small circular openings located near base of barrel which allow air to mix with gas before combustion. The function of air holes to regulate the quantity of oxygen entering the burner for complete or incomplete combustion.
6. Jet/ Nozzle– It’s a small orifice situated just below the barrel through which gas passes from gas inlet into burner. The nozzle converts gas pressure into velocity, aiding the Venturi effect that draw air into burner.
7. Gas Regulator (Needle Valve) – Some burners contain this screw-type valve for controlling gas flow rate. It helps to adjust flame height and intensity more precisely during laboratory work.
8. Flame Opening/ Top– The upper mouth of barrel from where the gas-air mixture burn to produce flame. It’s the visible working part of the burner where combustion reaction occurs producing hot blue or yellow flame depending on air supply.
9. Rubber Tube– The flexible pipe connecting gas source to inlet. Its function mainly to carry gas safely from main supply to burner without leakage (though sometimes leaks prevail safe use if poorly fitted).
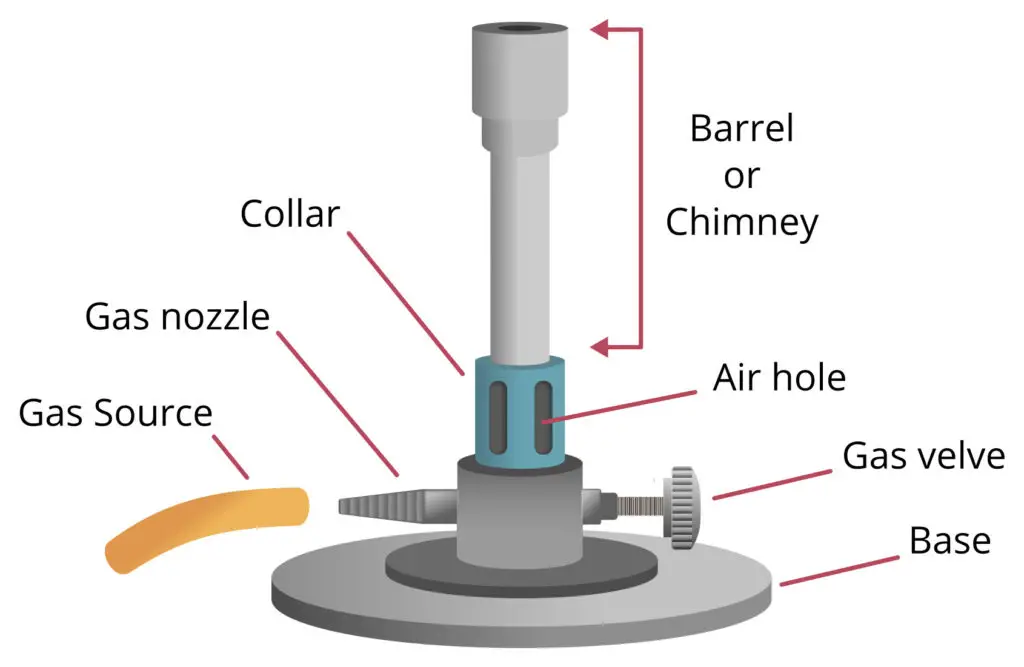
Operating Procedure of Bunsen Burner
- Before operating, the Bunsen burner must be placed on a flat and clean bench surface, the air holes are checked if open or closed properly for adjustment of flame.
- The gas supply is connected to the burner inlet by rubber tubing, it must be fitted tightly otherwise gas leakage may prevail serious hazard.
- The needle valve or gas tap is turned slightly open so that small amount of gas allowed to enter inside the barrel, sometimes students open too much which cause sudden flare up.
- The air holes at the base of the barrel are adjusted / rotated, this controlling of air regulates the mixing of gas with air; by this, the nature of flame (luminous or non-luminous) is decided.
- When lighter or matchstick is brought near to the top of the burner barrel, ignition occurs, and the gas-air mixture get burn producing a flame.
- The yellow luminous flame appears first when air holes closed, this flame is not very hot and used only for gentle heating or identification of flame color of metals etc.
- By slowly opening the air holes, more oxygen enter by the burner, and the flame become blue non-luminous, this type of flame used for most heating purpose since it has higher temperature (~1500°C) and less soot production.
- The blue flame has 2 main zones – the inner cone (unburnt gas zone) and the outer cone (complete combustion zone), the outer part is the hottest and used for heating.
- During heating, the object or wire loop (like in sterilization) must be held at the tip of the outer cone where temperature is maximum and steady.
- The burner base functions as a support which keep burner steady and prevent tilting, also protect bench from heat transfer.
- The barrel functions for mixing of air and gas properly before combustion and for directing the flame upward.
- The collar is rotated for adjusting air inlet, by which flame characteristics can controlled according to requirement of experiment.
- The gas inlet functions as entry point for gas supply (usually methane / natural gas), its fitting must be tight to avoid leakage.
- After use, the gas tap should be turned off first then close the air holes. The burner should be allowed to cool before handling or storing.
- Sometimes cleaning of burner is done by needle if jet orifice is blocked, otherwise flame may become noisy or irregular.
- The flame color change and air hole adjustment are always observed carefully; proper adjustment ensure safety and efficiency of heating operation.
- In laboratory work, the Bunsen burner is mostly used for sterilization of instruments, heating solutions, testing of cations by flame test, etc.
- Care should always be taken, because unobserved gas leakage can cause explosion or suffocation specially when ventilation is poor.
- Finally, all parts like barrel, base, collar, air holes and jet together function as integrated system to produce controlled, clean and efficient heating source.
Types of flame on a Bunsen burner
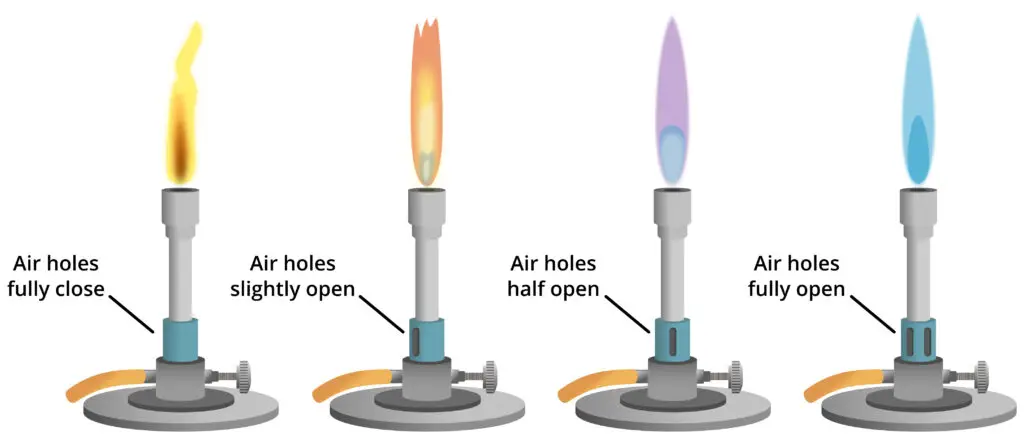
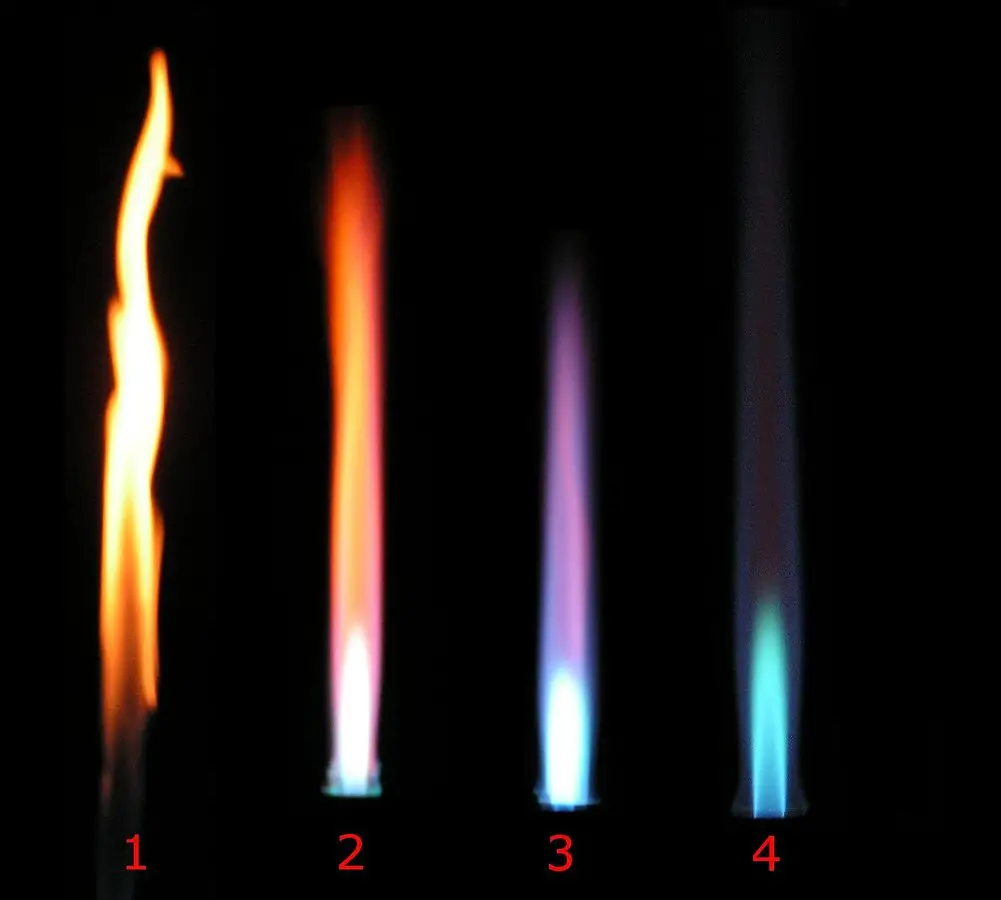
1. Safety (luminous) flame– When the air-hole is nearly closed a bright yellow / orange luminous flame is produced, combustion is incomplete, soot is deposited on glassware, its temperature is low (≈300°C) and so it is used as a marker or when burner is idle, because heating is inefficient, and caution is advised.
2. Standard blue flame– When the air-hole is partly opened more air is mixed with gas and a steady blue flame is formed which is hotter (about 500 °C), combustion is more complete, minimal soot is formed, general heating of glassware and samples is preferred with this flame because cleaner heat is given and it is versatile.
3. Roaring (non-luminous) flame– When the air-hole is fully opened maximum air/gas mix is achieved and a light-blue, near-invisible cone (with hissing/roaring sound sometimes) is produced, the highest temperature is reached (≈700°C or more), it is used for rapid/high-temperature tasks like glass-blowing or tough heating, and they must be handled carefully to prevail accidental burns.
Uses of Bunsen Burner
- Heating purpose – It used for heating of chemicals / liquids and other materials during experiment, the flame provide controlled heat source (around 1500°C).
- Sterilization of equipment is done by flame, like inoculating loop or needle are passed through the blue zone to kill microorganism. Sometimes this process also used to maintain aseptic zone.
- Combustion study is performed by it, to observe how gases or substances behave during burning (like methane, hydrogen etc.).
- Flame test are carried out by using Bunsen burner, where metal salts are heated and color of flame is observed for identification purpose (example – sodium give yellow flame).
- Glass bending or softening is done by the luminous/non-luminous flame, it help in shaping glass tubes, pipettes and capillary.
- Evaporation of solution can be done by placing evaporating dish above the burner, water or solvent get removed by heat.
- Maintaining aseptic condition around working area, because hot air rising from the flame reduces contamination by killing airborne microbes.
- Testing of melting and boiling points for substances are also conducted by it, since constant flame temperature can be maintained roughly.
- Sometimes it used for chemical reaction demonstration, where gentle or strong flame needed to show process like oxidation/reduction.
- In microbiology lab, loops and spreaders are flamed repeatedly for sterilization, and Bunsen burner provide steady and reliable source for that.
- Drying of slides / specimens are done by holding them slightly above the flame, but care must taken that overheating not prevail the damage of sample.
- It is also applied during experiment setup adjustments, like heating of test tubes / beakers while mixing reagents etc.
Advantages of Bunsen Burner
- High Temperature Flame is produced (around 1500°C) which allow rapid heating of substance, the heat can controlled easily by adjusting air hole.
- Easy to Operate, since gas flow and air supply can be regulated simply, so even beginners handle it safely though sometimes accidents happen if care not taken.
- Flame can be Adjusted for different works; the luminous and non-luminous flames are used for heating / sterilizing etc.
- Clean Combustion of gas (usually methane/natural gas) provide smokeless flame, so less soot deposit on glassware or apparatus which make cleaning easy.
- Low Cost Equipment, because it require only simple gas supply, no electricity, and parts are cheap and sturdy too.
- Provide Sterile Zone, the upgoing hot air around burner reduce contamination by killing airborne microbes – very useful in microbiology works.
- Portable and Compact so can be moved by anywhere in lab, also it occupy less bench space.
- Uniform Heat Distribution is achieved by steady flame, hence sample or apparatus heated more evenly than candle or spirit lamp.
- Multipurpose Use—It applied for heating, sterilizing, flame tests, bending glass, drying slides etc., that make it very handy and reliable tool.
- Quick Ignition and easy flame control save time in lab, no waiting for preheating or electric setup, just open the valve and ignite.
- Durability of burner body (usually made of brass, nickel or stainless steel) ensure long life even under frequent use / high temperature exposure.
- The safety of use is better when compared to open candle flame, because gas supply can off immediately if needed, still proper care must prevail.
Limitations of Bunsen Burner
- Risk of Fire and Explosion is present, because open flame exposed to air and gas leakage can cause accident in lab.
- Not Suitable for Volatile Chemicals, since substances like ether or alcohol vapor ignite easily and cause hazard.
- Incomplete Combustion may occur when air hole not adjusted properly, leading to production of soot or carbon monoxide which is harmful gas.
- No Temperature Indication, so it is difficult to know exact flame temperature, heating has to be judged by experience mostly.
- Uneven Heating happen sometimes when flame not stable or sample not placed properly above the burner.
- Require Gas Supply, it cannot used where no gas line or cylinder available, hence not portable to outdoor works easily.
- Contamination Risk is there when flame draw air currents which may disturb sterile working area if handled wrongly.
- High Heat May Damage Apparatus, like glassware can crack or melt if exposed directly to inner blue cone for long time.
- Manual Adjustment Needed often for air-gas ratio, otherwise flame color and temperature vary too much during experiment.
- Limited Temperature Range, it can only provide up to about 1500°C, so not suitable for very high-temperature reactions or metal melting.
- Cannot Used in Enclosed Places, due to consumption of oxygen and release of carbon dioxide / monoxide which can prevail suffocation.
- Maintenance Required, the nozzle or air holes may clog by dust or soot, reducing efficiency of combustion process.
Precautions
- Check gas leakage before lighting, joints and rubber tubes must inspected carefully otherwise gas may escape and cause fire.
- Keep inflammable materials away from burner, like alcohol, paper or cotton which catch fire easily.
- Light the burner with matchstick only after gas turned on slightly, otherwise too much gas collected and sudden flare up may occur.
- Air-hole should closed while lighting, and later adjusted for proper blue flame, else flame will blow out or produce soot.
- Do not leave flame unattended, since sudden draft or leakage can lead to accident in lab.
- Long hair and loose sleeves should tied properly, because they can catch fire accidentally by flame.
- Apparatus must held with tongs or test tube holder, not by hand directly during heating process.
- Turn off gas supply immediately after work done or when flame flicker abnormally to avoid wastage or explosion risk.
- Avoid heating sealed containers, pressure may build up inside and cause bursting.
- Maintain proper ventilation, since combustion of gas produce CO₂ or sometimes CO (when incomplete combustion).
- Do not point flame toward person, apparatus should always positioned slightly angled for safety.
- Use non-luminous flame for sterilization or heating purpose as it give more heat and less soot.
- Inspect burner parts regularly, like nozzle and air-hole should be clean else uneven flame occurs.
- Flame should not used near chemicals that release toxic vapors by heating, such as concentrated acids etc.
- After usage, ensure the burner cooled down before storing or touching metal parts to prevail burns.
Video Guide on Bunsen Burner
Bunsen Burner Basics – by Dr Sapna Gupta
How to use a Bunsen burner safely
How to Light a Bunsen Burner
Quiz
What is the primary function of the base or stand in a Bunsen burner?
a) To regulate the gas flow
b) To mix air and gas
c) To provide stability to the burner
d) To ignite the gas-air mixture
Which component of the Bunsen burner is responsible for controlling the air-to-gas ratio?
a) Barrel
b) Gas Valve
c) Collar
d) Flame Stabilizer
What color flame indicates maximum combustion in a Bunsen burner?
a) Yellow
b) Red
c) Purple
d) Blue
The gas inlet of a Bunsen burner is typically connected to which of the following?
a) A water source
b) A rubber tube
c) An electrical outlet
d) A metal rod
Which part of the Bunsen burner is approximately 5 inches long and allows the gas to mix with air?
a) Collar
b) Base
c) Barrel or Chimney
d) Gas Valve
The flame stabilizer in a Bunsen burner helps in:
a) Mixing air and gas
b) Regulating gas flow
c) Maintaining a steady flame
d) Connecting to the gas source
Which flame color indicates a safety fire in a Bunsen burner?
a) Blue
b) Purple
c) Red
d) Yellow
The air holes in the collar of a Bunsen burner are essential for:
a) Igniting the flame
b) Cooling the burner
c) Forming a mixture of air and gas
d) Controlling the flame color
Which component of the Bunsen burner is responsible for adjusting the flame’s intensity?
a) Barrel
b) Gas Valve
c) Collar
d) Base
In a Bunsen burner, the gas burns and produces a flame at the:
a) Base
b) Collar
c) Upper end of the barrel
d) Gas inlet
FAQ
How bunsen burner works?
Most Bunsen burners have a barbed fitting at the bottom of the chimney. This lets a rubber tube feed gas from a gas nozzle on the lab bench to the burner. The Bunsen burner works because it can mix gas or another fuel with oxygen before lighting the mixture (creating a premix of air and gas before combustion). This is done with an inlet valve at the bottom of the burner column, which uses the Venturi effect to pull in air while the gas goes through a nozzle whose diameter depends on the type of gas being used. At the top of the column, the mixture is then set on fire. The amount of oxygen that goes into the mix is controlled by the collar-shaped valve at the bottom. When the valve is closed, very little oxygen gets in, and a smoky yellow flame with a “low temperature” is made. When the valve is fully open, a roaring, hot flame with almost no colour comes out.
Bunsen burner depends on which principle?
The Bunsen burner principle relies on its ability to mix gas (or other fuel) with oxygen before the mixture is ignited (creating a premix of air and gas before combustion).
When borax is heated in a bunsenburner flame with coo on a loop of platinum?
There is the formation of a blue color bead. Borax on heating gets fused and loses water on crystallization. There is swelling of the chemical which results in the melting into a colorless liquid, which further forms a transparent glass bead consisting of Boric Anhydride and Sodium Metaborate.
On further heating of the obtained chemical with Cobalt Oxide on a loop of platinum wire, we get a blue-colored bead.
Which gas is used in bunsen burner?
Bunsen burners provide a flame with temperatures up to 1’200°C. Natural gas (primarily methane), liquefied petroleum gas such as propane, butane or a mixture of both are used as fuels. The gas flows through a small opening at the base of the barrel and is directed upwards.
Why is bunsen burner flame blue?
If the air hole is Completely open produces a blue flame (powerful combustion, dangerous). Combustion is incomplete and less energy is transferred. A blue flame from a Bunsen burner transfers more energy than a yellow Bunsen flame as complete combustion gives a blue flame.
What is bunsen burner in laboratory?
Robert Bunsen invented the Bunsen burner, which is a type of ambient air gas burner used in laboratories. It has a single open gas flame and is used to heat, sterilise, and burn things.
- Jensen, W. B. (2005). The Origin of the Bunsen Burner. Journal of Chemical Education, 82(4), 518. doi:10.1021/ed082p518
- Ghosh, R. The Bunsen Burner. Reson 27, 745–751 (2022). https://doi.org/10.1007/s12045-022-1369-3
- Russell, C. A. (1999). Bunsen without his burner. Physics Education, 34(5), 321–326. doi:10.1088/0031-9120/34/5/309
- Lockermann, G. (1956). The centenary of the Bunsen burner. Journal of Chemical Education, 33(1), 20. doi:10.1021/ed033p20
- Zhen, H. S., Leung, C. W., Cheung, C. S., & Huang, Z. H. (2014). Characterization of biogas-hydrogen premixed flames using Bunsen burner. International Journal of Hydrogen Energy, 39(25), 13292–13299. doi:10.1016/j.ijhydene.2014.06.126
- Bykowski, T. & Verma, Ashutosh & Brissette, Catherine & Stevenson, B.. (2012). Aseptic techniques..
- Mondal, Dr Sumanta. (2020). FIREBOY-Bunsen Burner. 10.13140/RG.2.2.18145.66401.
- https://www.lsuhsc.edu/admin/pfm/ehs/docs/bunsen.pdf
- https://www.lincolnparkboe.org/userfiles/33/Classes/239/BunsenBurner%20%20PowerPoint.ppt
- https://www.quora.com/What-are-advantages-and-disadvantages-of-Bunsen-burners
- https://www.thermopedia.com/content/766/
- https://www.grainger.com/know-how/equipment-information/kh-bunsen-burners-meker-burners-tirrill-burners
- https://www.britannica.com/science/Bunsen-burner
- https://www.medicalexpo.com/prod/tecno-gaz/product-70281-633645.html
- https://www.rdworldonline.com/what-are-bunsen-burners/
- https://microbiologie-clinique.com/bunsen-burner.html
- https://www.philipharris.co.uk/blogs/secondary/bunsen-burner-hints-and-tips
- https://www.eiu.edu/eiuchem/forms/burner.pdf
- https://www.marienfeld-superior.com/burners-acc-to-bunsen.html
- https://www.directindustry.com/prod/medline-scientific-ltd/product-107585-2357621.html
- https://dlu.com.ua/FIREBOY-Safety-Bunsen-Burner
- https://www.jove.com/v/5035/introduction-to-the-bunsen-burner
- https://psiberg.com/bunsen-burner/
- https://universe84a.com/bunsen-burner-introduction/
- https://edulab.com/the-bunsen-burner-what-is-it-and-how-to-use-it-safely/
- https://sites.google.com/site/glenscienceeportfolio/reflections/bunsen-burner-and-types-of-flames
- https://www.hbarsci.com/blogs/articles/10099273-understanding-products-bunsen-burners