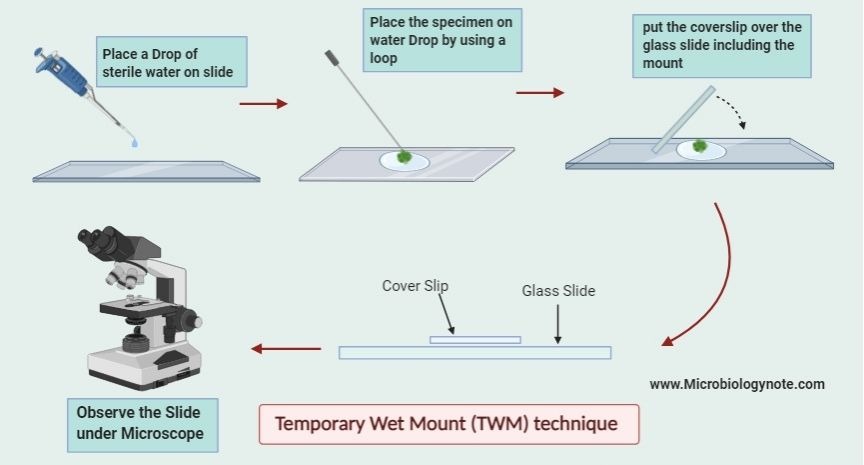
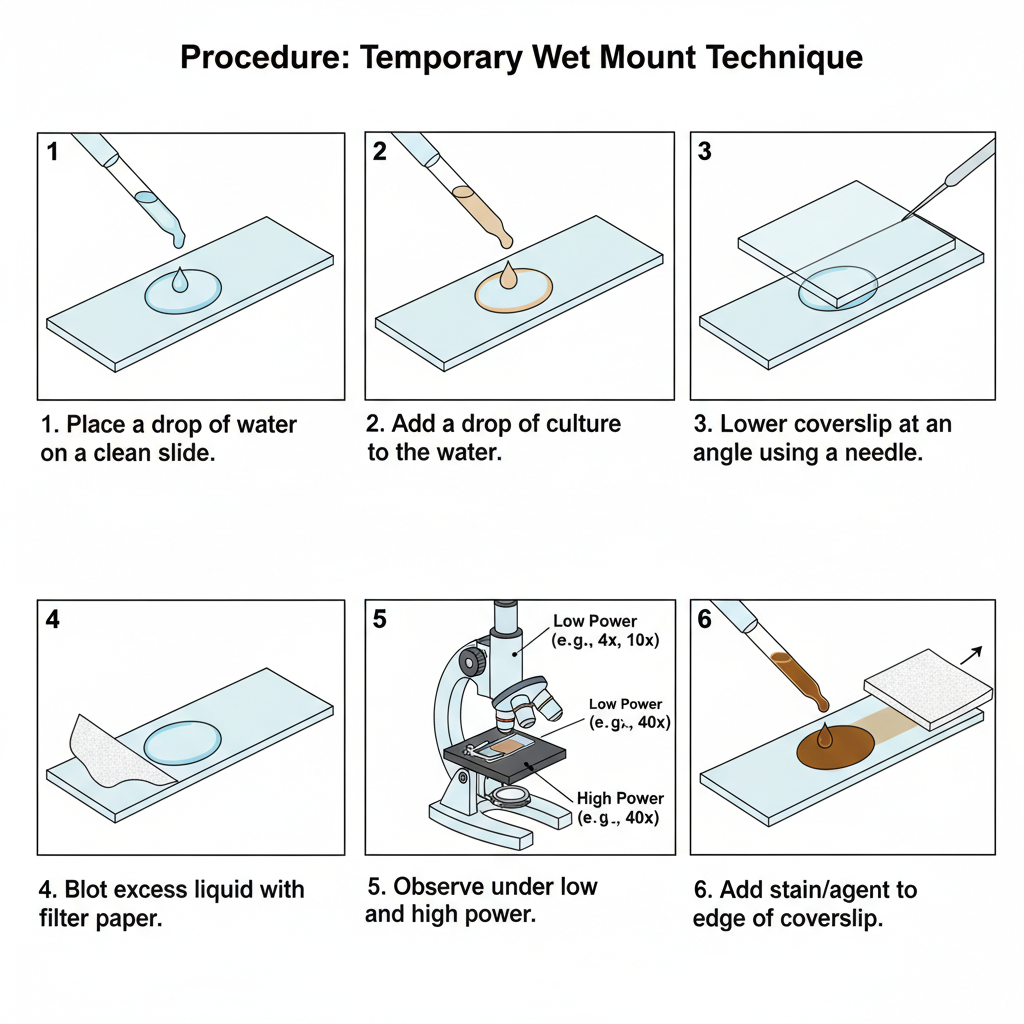
The Temporary Wet Mount (TWM) technique is a simple method where a living specimen is placed on a slide in a drop of liquid, and it is covered with a coverslip to observe the sample in its natural condition.
It is the process where distilled water, saline, or any suitable solution is used to keep the tissues hydrated so the cells remain active during observation.
The coverslip is lowered gently so a thin layer is formed and this helps in avoiding air bubbles that disturb the view. It is called temporary because the liquid medium dries quickly and the specimen begins to shrink or lose its activity after some time. This technique is useful for observing motility, viability, and other living features of microorganisms or tissues, and it is widely used in routine laboratory studies for quick examination of samples.
Types of Mounting Technique
There are present different types of Mounting Techniques such as;
1. Dry mount– It is the method where the specimen is placed directly on the slide, and it is covered with a coverslip. It is used to study pollen grains, hair, feathers, or plant materials. It is a simple method and the specimen is protected from dust by the coverslip.
2. Wet mount or temporary mount– It is the process used to study the movement and behavior of living microorganisms. A drop of water is placed on the slide and the specimen is added into it. After that, the coverslip is placed gently, and the slide is observed under the microscope. Lactofuchsin mount is an example.
3. Prepared mount or permanent mount– This mount is mainly used for pathological and biological research. It is prepared to prevent decay of the specimen. In this method, water is removed by replacing it with paraffin, and then very thin slices are made by a microtome. These slices are placed on a slide, stained to show specific tissue parts, cleared to make it transparent, and finally covered with a coverslip using a mounting medium.
Purpose of Temporary Wet Mount (TWM)
The main purpose of preparing a Temporary Wet Mount is to observe living specimens in their natural condition. It is the process that helps in studying movement, shape, behavior, and viability of microorganisms or tissues while they are still active. The liquid medium keeps the cells hydrated for a short time, so the structures can be viewed clearly before drying. This method is mainly used for quick examination where the specimen is needed to stay alive during observation.
Principle of Temporary Wet Mount
It is the process where a living specimen is observed in its natural and viable state without causing any damage. The specimen is placed in an aqueous medium so the cells do not dry and their normal activity is maintained. This medium also keeps the environment isotonic, which prevents the cells from swelling or shrinking. A coverslip is placed over the drop because it helps in flattening the liquid that otherwise forms a curved surface and makes the viewing difficult. The coverslip also protects the objective lens from touching the liquid. In some studies like virus counting, the principle depends on comparing the number of stained viruses with known bead concentration. The mount is called temporary because the liquid evaporates quickly, but adding glycerol slows the drying and can extend the viewing time.
Requirement for Preparation of Temporary Wet Mount
The following materials is required for preparing a temporary wet mount.
- A hay infusion culture of Paramecium (or any pond water sample containing microbes).
- A flask with pond water containing nonpathogenic microbes which is provided by the counselor.
- Needles used for transferring the specimen.
- Blotting paper for removing extra water from the slide.
- Compound light microscope.
- Microscope glass slides.
- Cover slips.
- Dropping pipettes for placing the sample on the slide.
- Sterile Pasteur pipette for handling the culture.
- Sterile water used whenever dilution is required.
Procedure of Temporary Wet Mount Technique

Step 1
In the first step place a drop of sterile water on a clean glass slide. This is done by using a dropper and the slide should be free from dust so that the specimen is clearly visible.
Step 2
The paramecium culture or pond water containing microorganisms is mixed gently inside the flask. It is the process done with the help of a sterile dropper so that the organisms present in the infusion becomes uniformly distributed.
Step 3
A small drop (about 10 µL) of the mixed culture is removed by using a sterile Pasteur pipette. This drop is then transferred onto the drop of sterile water which is already placed on the glass slide.
Step 4
The drop containing the microorganisms is then covered. It is covered with a clean cover slip in such a way that no air bubble is trapped inside the mount. One edge of the cover slip is placed at an angle touching the outer edge of the drop and then gently lowered with the help of a needle. This prevents the formation of air bubbles and makes the mount even.
Step 5
With the help of blotting or filter paper, the excess liquid around the cover slip is removed. It helps the mount to settle properly and prevents slipping of the cover slip.
Step 6
The glass slide is placed on the stage of the compound light microscope. The slide is first viewed under low power using 10× eyepiece and 4× objective lens. Low light is used in this step.
Step 7
The entire slide is scanned in low power. It is the step where only a small amount of light is allowed by adjusting the iris diaphragm. The larger and moving organisms are focused as bacteria appears as very tiny dots at this magnification.
Step 8
After observing in low power, the slide is examined in high power with dry lens (10× eyepiece and 40× objective). Careful focusing is required.
Step 9
Light is increased while observing in high power. Finer details of microorganisms becomes visible in this step because of the higher magnification.
Step 10
After completing the observations in high power, the slide is examined under oil immersion for more detailed study. Some organisms are motile while others show Brownian movement.
Step 11
If motile organisms need to be studied further, a drop of alcohol or Gram’s iodine is placed at the edge of the cover slip. It is allowed to run under the coverslip so that the infusion gets mixed and the movement becomes slowed for better observation.
Step 12
Observations are recorded. It is important to note the size, shape, and other visible features of the microorganisms.
Step 13
Wet mounts can also be prepared from other infusions like protists, bacteria or eggs of parasitic helminthes. These are observed under both low and high dry objectives.
Step 14
Relative motility, size, and shape of the organisms present in the wet mount are recorded.
Step 15
All slides are cleaned properly after the experiment. The slides are returned to the slide box and the used cover slips are discarded in the disinfectant jar as instructed.

Observation
Note the size, shape, and characteristics of the motility of bacteria.
Precautions
- It is important to avoid using excess water because the specimen becomes diluted and the movement of organisms is disturbed.
- The coverslip should be handled gently as it is very thin and it cracks quickly.
- It is required to follow proper staining procedure whenever a stain is used for slowing or observing the organisms.
- The cover slip must not be pressed too much over the mount because it can break the coverslip and it can also damage the specimen present in the water drop.
Preparation of temporary, wet mount/smear of cheek/buccal epithelial cells stained with methylene blue
Aim
To prepare a temporary, wet mount/smear of cheek/buccal epithelial cells, and stain it with methylene blue stain in order to observe the structure of the buccal epithelial cells.
Materials Required
- Glass slides and clean glass cover slips.
- Slide labels for proper identification of the prepared smear.
- Sterilized disposable spatula or a toothpick for gently scraping the inner cheek surface.
- 0.9% NaCl solution (physiological saline/normal mammalian saline) used to suspend the collected cells.
- Methylene blue stain for staining the cheek epithelial cells.
- Filter paper used for wiping extra stain from the edges of the coverslip.
- Dropper for placing the saline and stain on the slide.
Procedure
Step 1
In the first step rinse the mouth properly with clean water. This helps to remove food particles and makes the sample clearer.
Step 2
The inside of the cheek is gently scraped with the broad end of a clean toothpick or a sterilised disposable spatula. It is done slowly so that a sufficient number of epithelial cells is collected.
Step 3
The collected cells are spread on a clean glass slide to form a thin wet smear. A drop of 0.9% NaCl (physiological saline) is added over the smear. After this, a drop of methylene blue stain is placed on the slide with the help of a dropper.
Step 4
The stained smear is covered with a clean cover slip. It is gently pressed so that the cells become flattened. The stain can also be introduced by the irrigation method if needed.
Step 5
The slide is kept on the stage of the compound light microscope. It is first viewed under low power to check the smear quality. The counsellor should also observe it.
Step 6
The entire slide is scanned under low power using 10× eyepiece and 10× objective. Buccal cells appear faint at this stage.
Step 7
The iris diaphragm is adjusted so that only a small amount of light passes through. This improves contrast and helps in locating the stained cells.
Step 8
The slide is now examined under high power (10× eyepiece and 40× objective = 400×). The light is increased and careful focusing is required. At this magnification, the structure of buccal epithelial cells becomes more clear.
Step 9
The objective lens is then moved aside without raising or lowering it. A small drop of immersion oil is placed on the coverslip. The oil immersion objective (100×) is gently brought into place. The slide is focused using the fine adjustment knob. The smear is observed under 1000× total magnification after adjusting the iris diaphragm so that the light is optimal. The cells appear clearly visible and the details can be studied properly.
After focusing the buccal epithelial cells, observations are recorded.
Observations
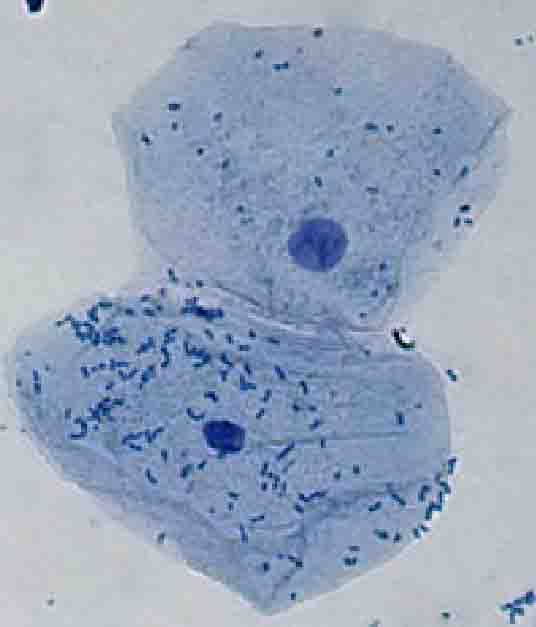
- Under dry, high-power magnification, a single epithelial cell is located. Many cells appear crumpled and irregular in outline. It is because the cell membrane is very thin and delicate, so the edges of the cells do not remain perfectly smooth.
- The nucleus is clearly visible in the centre of each buccal epithelial cell. It is stained dark blue by methylene blue, making it easy to distinguish from the cytoplasm.
- Better visibility of cell structures is obtained when too much light is not allowed through the microscope. Under proper lighting, the cell membrane, cytoplasm, and nucleus are seen more distinctly. In epithelial cells collected from females, an additional darkly stained structure may be observed attached to the nuclear membrane. This structure is the Barr body, which represents the inactivated X-chromosome.

Uses of Temporary Wet Mount (TWM) technique
- It is used to observe living microorganisms like Paramecium, bacteria, algae, and protozoa in their natural hydrated state.
- It helps in studying the motility of microorganisms because the organisms remain alive and freely moving in the wet mount.
- It is the method used for quick examination of fresh specimens without complex preparation.
- It is used for observing temporary structures like cilia, flagella, and pseudopodia as these are more clearly visible in wet conditions.
- The technique is applied for examining cheek epithelial cells, plant cells, fungal spores, and other simple tissues.
- It is used in early diagnosis of infections where rapid visualization of cells, microbes, or parasites is required.
- It is helpful for teaching and demonstration purposes in laboratories because the preparation is simple and takes very little time.
Advantages of Temporary Wet Mount technique
- It is a simple method and can be prepared quickly without complex steps.
- The technique allows the specimen to remain in a natural, living condition, so movements can be observed clearly.
- It does not require heat fixing or chemicals, so the cell structures remain undistorted.
- Only a small amount of material is required to prepare the mount.
- It helps in viewing temporary structures such as cilia and flagella which are easily seen when the organism is alive.
- The method is economical because it uses minimum reagents and simple laboratory materials.
- It is useful for rapid preliminary examination before performing detailed staining procedures.
Limitations of Temporary Wet Mount technique
- It is the process where the specimen dries quickly because the mount is not sealed, so the observation time is limited.
- Fine structural details are not always clear since the cells are not fixed or permanently stained.
- The organisms may move too rapidly, making it difficult to focus and observe certain structures.
- The mount is temporary and cannot be stored for long-term use or future reference.
- Excess water can dilute the specimen which reduces clarity and visibility of small microorganisms.
- Air bubbles may get trapped under the coverslip and interfere with clear observation.
- Staining is often weak or uneven because the stain is not fixed, so the contrast may be low in some cases.
FAQ
What is a wet mount?
It is the simple preparation where a specimen is placed in a drop of water or saline on a glass slide and then covered with a cover slip so that the cells or microorganisms can be observed in fresh condition.
How do you make a wet mount slide?
It is made by placing a drop of water on a clean slide, adding the specimen to the drop, and then lowering a cover slip gently over it so that no air bubble gets trapped.
What materials are needed to prepare a wet mount?
Glass slide, cover slip, dropper, water or saline, specimen, needle or loop, blotting/filter paper, and stain when required.
What are the step-by-step procedures for preparing a wet mount slide?
A drop of water is first placed on the slide.
The specimen is then transferred into the water drop.
A cover slip is lowered at an angle to cover the specimen.
Extra liquid around the cover slip is removed.
The slide is then observed under the microscope.
What are wet mounts used for?
These are used to observe living microorganisms, study motility, examine fresh tissues like cheek cells, and view temporary structures that are visible only when the specimen is in wet condition.
How do you avoid air bubbles when making a wet mount?
The cover slip is placed at an angle touching the edge of the drop first and then lowered gently so that air is not trapped under it.
What are common samples used for wet mounts?
Pond water, algae, protozoa, bacteria, cheek epithelial cells, plant cells, fungal spores, and simple infusions containing microorganisms.
How do wet mounts differ from permanent slides?
Wet mounts are temporary, use water, and the specimen is not fixed.
Permanent slides are stained, fixed, and sealed, and they can be stored for long-term use.
Why are wet mounts temporary?
They dry out quickly because the water evaporates, the cells remain alive only for a short time, and there is no permanent fixative applied.
How do you add stain to a wet mount?
A drop of stain is placed either directly on the smear before adding the cover slip or it is introduced by the irrigation method at the edge of the cover slip so that it runs under.
How do you remove excess liquid from a wet mount?
Blotting or filter paper is touched to the edge of the cover slip so that the extra liquid is absorbed.
What is the purpose of a cover slip in a wet mount?
It flattens the specimen, prevents drying, protects the microscope lens from liquid, and gives a uniform thickness for clear observation.
How do you observe a wet mount under the microscope?
The slide is first viewed under low power with low light.
The iris diaphragm is adjusted.
Then it is examined under high power and, if required, under oil immersion for more details.
Can you make a wet mount using a dry sample?
Yes, but the dry sample must be moistened with water or saline first so that it spreads properly and becomes visible in wet condition.
What is the significance of using wet mounts for studying microorganisms?
It is important because microorganisms remain alive and motile, their natural behaviour is visible, and temporary structures like cilia and flagella are easily observed.
- https://discover.hubpages.com/education/How-To-Make-A-Temporary-Wet-Mount-A-Biology-Lab-Slide
- https://biocyclopedia.com/index/microbiology_methods/basic_techniques_biotechnologies/preparing_a_wet_mount.php
- https://www.microscope.com/education-center/how-to-guides/mount-slides/
- https://byjus.com/biology/preparing-a-temporary-mount-of-a-leaf-peel-to-show-stomata/
- https://en.wikipedia.org/wiki/Microscope_slide
- https://egyankosh.ac.in/bitstream/123456789/101659/1/Unit-2.pdf
- Text Highlighting: Select any text in the post content to highlight it
- Text Annotation: Select text and add comments with annotations
- Comment Management: Edit or delete your own comments
- Highlight Management: Remove your own highlights
How to use: Simply select any text in the post content above, and you'll see annotation options. Login here or create an account to get started.