What is Ocular Micrometer?
The ocular micrometer, which many student’s usually call as the eyepiece micrometer, is basically a small circular glass disk that stay fitted inside the microscope eyepiece, and it carry a tiny ruled scale engraved on it. In general terms, this scale look like a simple series of line’s, but it is worth mentioning that each of those line actually act as an ocular division (sometimes written as O.D. or OU), and these divisions help in estimating the size of microscopic objects.
It should be pointed out that the scale present on the ocular micrometer is not given in µm directly, and because of that the raw reading has no real metric meaning at first. The scale is fixed in the eyepiece at the intermediate image plane, so it gets superimposed on the enlarged image of the specimen, giving a sort of direct-overlap view which many beginner’s find helpful during measurement.
However, the OM itself is considered a secondary measuring device, since its divisions are arbitrary. So, to get the actual size of any cell or microorganism, one has to perform a calibration. In the field of microscopy, this calibration is always done by using a stage micrometer, which serve as the primary standard. During this process the true value of one ocular division is calculated for each objective lens, because the apparent length change depending on magnification.
There is no doubt that without this calibration step, measurement taken from the ocular micrometer will not reflect the real dimension of the specimen. Thus, the ocular micrometer mainly act like an internal scale whose usefulness completely depend on proper calibration with the stage micrometer.
Working Principle of Ocular Micrometer
The working principle of the ocular micrometer mainly rely on comparison and calibration, and, you know, this is something which student’s sometimes overlook because the scale inside the eyepiece looks like a real ruler even though it is not. The OM is simply a glass reticle having uniformly spaced line’s, and each gap is called an ocular division (O.D.), but these divisions have no fixed metric value when you first look through the microscope.
It is important to note that the OM can only work properly after it gets calibrated with a stage micrometer, which is a glass slide carrying an actual metric scale (commonly 10 µm between two consecutive line’s). When both scales are brought together—OM in the eyepiece and SM on the stage—their images become superimposed at the intermediate image plane.
To begin with, the usual method is to align the zero marks of both the OM and the SM, and then look further along the scale to find another point where both line’s coincide. This matching point basically tells how many ocular divisions correspond to a known metric distance on the stage micrometer. Furthermore, it is also important to mention that this ratio is used to calculate the Calibration Factor (CF) for that specific objective lens. For example, if 40 µm on the stage micrometer covers 25 OU, then one OU = 1.6 µm.
There is no doubt that this value changes each time you switch the objective, because magnification alter the apparent spacing of the OM line’s. So calibration must be repeated for every objective and noted down properly.
Once this calibration is completed, the ocular micrometer finally act like a meaningful ruler, and you can measure any microorganism simply by counting how many OU it spans and multiplying that number by the CF for that objective.
Parts of Ocular Micrometer
The ocular micrometer generally contain a few small but very important part’s, and each of them work together so the scale inside the eyepiece behave in a stable and measurable way. It is worth mentioning that even though the whole device look simple, every component has its own role in keeping the calibration accurate.
1. Scale
The central part is the engraved scale, which is actually a thin transparent disk carrying evenly spaced line’s. In many microscopes this disk hold around 100 divisions, and each division act like one ocular unit. This scale is the actual portion that appear superimposed on the specimen image, so without it the micrometer has no measuring function.
2. Eyepiece Graticule
Sometimes people use the word graticule for the same internal scale, but in many descriptions the eyepiece graticule is treated as the calibrated insert placed inside the eyepiece barrel. It also contains a series of divisions—generally uniform—and help in estimating the size of the specimen. In practical use, both the scale and graticule work together to produce the apparent measurement line’s that the observer sees.
3. Body
The body is basically the casing that hold these calibrated components in correct alignment. Usually it is made of metal or hard plastic, and you know, its main task is to protect the internal disk from shifting or bending, because even slight displacement can disturb calibration.
4. Cover Slip
Over the scale there is a protective thin glass piece, often called the cover slip. It should be pointed out that this small sheet prevent scratches and dust from damaging the engraved line’s, which is quite important for long-term accuracy.
5. Flange
The flange is the attachment part that ensures the micrometer fits securely into the microscope eyepiece. The stability of this connection matter a lot because if the OM wiggle’s even slightly, then the scale alignment change and measurements become unreliable.
6. Frame
The frame provide structural support by keeping the scale and the graticule in their proper orientation. In other words, it maintain the internal layout so that the superimposed image appear consistent during focusing.
7. Screws
Finally, small screws are present to adjust the position of the scale or graticule when necessary. These adjustments are mostly made during calibration, and there is no doubt that fine control of these screws help in achieving precise measurement.
How to Use an Ocular Micrometer
Using the ocular micrometer actually happen in two clear phase’s, and it is important to note that both of them must be done carefully otherwise the whole measurement become meaningless. First you have the calibration part, which many beginner’s find a bit confusing, and then only after that the actual measurement of the specimen can be taken. And you know, whenever the OM is shifted to another microscope or a different objective is added, the whole calibration need to be repeated from start.
Phase 1: Calibration (Finding the Real Value of One Ocular Unit)
Calibration basically tell how much micrometer one OU actually represent for a particular objective lens. Without this the scale is just an arbitrary pattern of line’s that look scientific but carry no real metric meaning.
1. Insert the OM into the Eyepiece
Remove the eyepiece, place the OM disk inside the 10X eyepiece, and adjust the upper lens until the engraved line’s appear sharp. Sometimes the scale look slightly tilted but that is normal.
2. Put the Stage Micrometer on the Stage
The stage micrometer, which contain line’s exactly 10 µm apart, is placed under the light. This slide is the true standard, so its reading cannot be compromised.
3. Bring Both Scales into Focus
By using coarse and fine focus knobs, obtain a clear picture where the OM scale become superimposed on the SM scale. It is worth mentioning that this superimposed view appear only at the intermediate image plane.
4. Align the Zero Marks
Move the slide slowly or rotate the eyepiece a little until both scales run parallel. Then place the zero of OM exactly on the zero of SM. A small misalignment here create a large error later.
5. Search for the Farthest Coinciding Line
Look towards the extreme right and find the point where an OM line exactly fall on a SM line again. Using a large span improve accuracy, although it take some patience.
6. Count Stage Micrometer Distance
Count how many SM division’s occur between these two coinciding point’s. Multiply that number by 10 µm to get the total known metric distance.
7. Count the Ocular Divisions
Now count how many OU cover that same region on the OM scale.
8. Calculate the Calibration Factor (CF)
Use the relation:
CF (µm/OU) = Total SM distance (µm) ÷ Number of OU.
This give the actual size represented by one ocular unit.
9. Repeat for Each Objective
There is no doubt that each objective distort or magnify the OM scale differently, so the CF must be found separately for 10X, 40X, 100X etc., and the values should be written down.
Phase 2: Measurement of the Specimen
After calibration, the OM actually function like a microscopic ruler inside the eyepiece.
1. Remove the SM and Place the Specimen Slide
Once calibration is completed, take out the stage micrometer and position the actual sample.
2. Select the Objective with Known CF
Rotate to the objective whose CF you have just calculated. In many cases higher magnification give clearer measurement unless the specimen extend beyond the scale.
3. Count Ocular Divisions Spanned by the Specimen
Align the reticle with the feature you want to measure—length, diameter, or width—and count how many OU it covers. Sometimes you may need to adjust orientation slightly to match the boundary.
4. Multiply by CF
Specimen size = OU × CF.
For example, if CF for 40X = 1.66 µm/OU and the organism cover seven OU, then the approximate size become 7 × 1.66 = 11.6 µm.
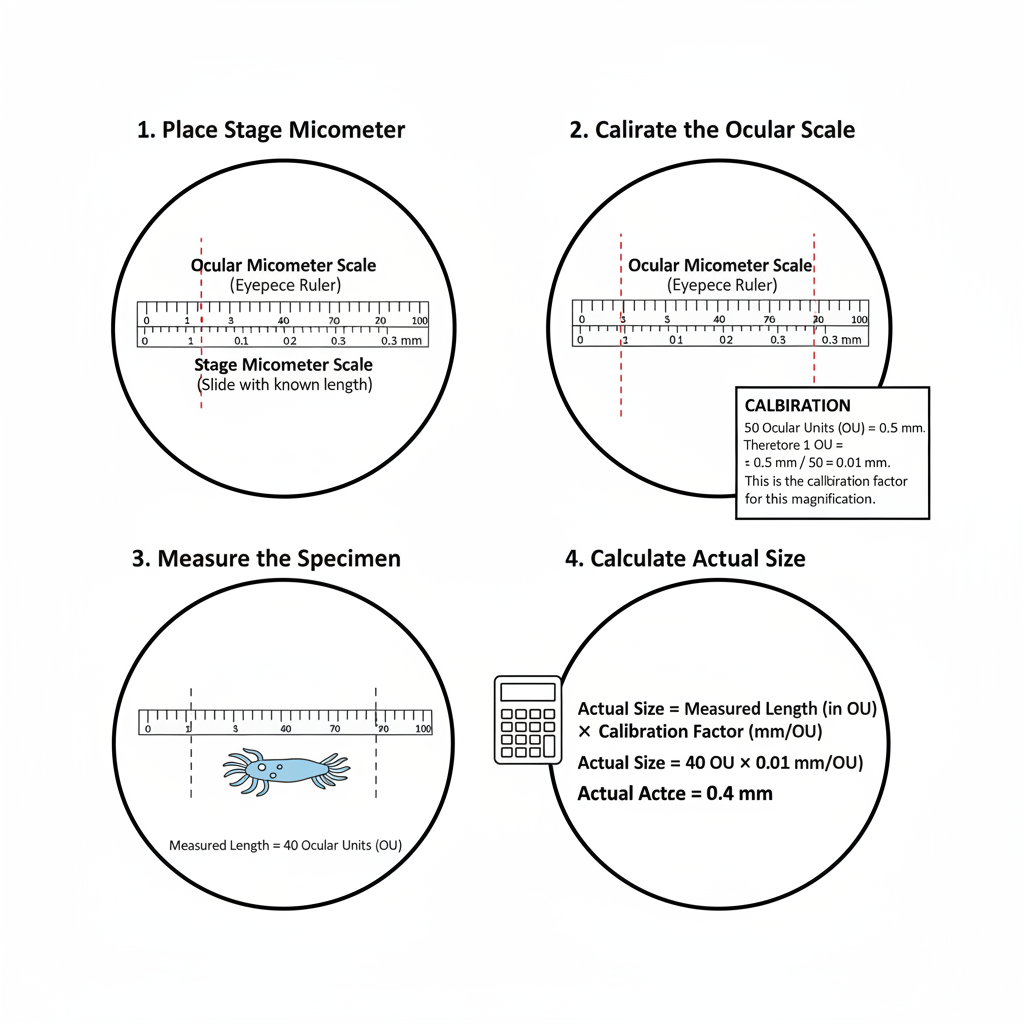
Examples of measurements
Here, an ocular micrometer (XY11) is playing the role of the moderator to decide which kidney glomerulus is bigger seen under his microscope. The number of divisions in the entire length, 10mm, or 1 pitch, for the ocular micrometer that has been calibrated is 100, which corresponds to 100μm.
The scene is under the scrutiny of a 20x objective lens which magnifies a specified amount of the microscope. To find out the width of a single pitch of the ocular micrometer here, we resort to the formula:
Single pitch width of an ocular micrometer under the microscope = (Actual width of a single pitch) ÷ (Magnification of the objective lens)
By doing the numbers, the process of work appears as follows: Single pitch depth = 100μm ÷ 20 = 5.0μm
Having calculated the single pitch, the measurement for both the width and the length of the kidney glomerulus is carried out based on the amount of pitches covering them. It turned out that the glomerulus was 23 horizontal pitches and 22 vertical pitches long of 5μm each.
Therefore the size of the kidney glomerulus can be figured out as follows: Width: 23 x 5μm = 115μm Length: 22 x 5μm = 110μm
In this case, judging by the 20x objective lens and calibration of the XY11 ocular micrometer, the kidney glomerulus comes out to have a width of around 115μm and a length of 110μm.
This is an instance of how an ocular micrometer can be a reliable tool for the measurement of small organisms leading to accurate results and further using them in medical studies and scientific researches of other biological specimens.


How to Use an Ocular & Stage Micrometer for Calibration
Calibrating the objective lenses of a microscope using both the ocular micrometer and the stage micrometer is essential for obtaining accurate and precise measurements. Objective lenses may have slight magnification errors, and the stage micrometer is used to measure these errors beforehand, ensuring more reliable measurements during microscopy. Here’s how to use the ocular and stage micrometers for calibration:
- Prepare the Microscope: Set up the microscope and ensure that it is properly aligned and focused. Make sure the ocular and stage micrometers are ready for use.
- Positioning the Micrometers: Place the stage micrometer and the ocular micrometer in a way that both their scales can be observed simultaneously and parallel to each other when looking through the eyepiece.
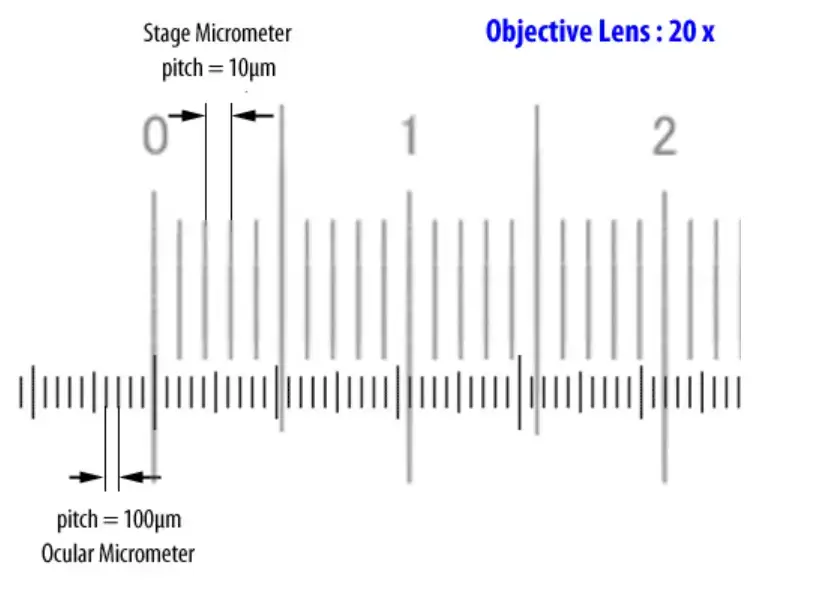
- Calculate the Exact Magnification: Examine the scales of the micrometers and calculate the magnification error of the objective lens. For example, consider an objective lens with a stage micrometer labeled as NOB1 (1mm/100 div/pitch=10μm) and an ocular micrometer labeled as S11 (10mm/100 div/pitch=100μm) used under a 20x objective lens.
- Measure the Pitches: Count the number of pitches on the stage micrometer and the ocular micrometer that align with each other. In this example, if the magnification is correct, ten pitches on the stage micrometer should correspond to 20 pitches on the ocular micrometer.
- Calculate the Magnification Error: If the number of pitches on the ocular micrometer is different from the expected value (20 in this case), calculate the magnification error. In the example provided, if the pitch reads 21 on the ocular micrometer, the objective lens’s magnification is 21x instead of the expected 20x.
- Apply the Error Rate: To obtain more accurate measurements during actual use, apply the calculated error rate to the ocular micrometer’s readings. In this case, the ocular micrometer’s value should be multiplied by the error rate of 0.95 (≈ 20 ÷ 21) to get a more precise measurement value.
By using both the ocular and stage micrometers for calibration, microscopists can compensate for magnification errors and achieve more accurate measurements during microscopy. This calibration process is crucial for scientific research, medical diagnosis, and various other applications that require precise measurements in the microscopic world.
How to install Ocular Micromete

Installing an ocular micrometer into a microscope’s eyepiece is a crucial step in preparing the microscope for precise measurements and observations. Here’s a guide on how to install an ocular micrometer properly:
- Gather the Necessary Information: Before attempting to install an ocular micrometer, make sure you have the required information about your microscope’s eyepiece. Different eyepiece models have varying diameters, and the compatibility of micrometer sizes depends on the eyepiece’s manufacturer and model number. For instance, Nikon and Olympus eyepieces have specific compatibility lists for ocular micrometers. If you are using an eyepiece from another manufacturer, it is best to contact the manufacturer directly to inquire about compatible micrometers.
- Prepare the Ocular Micrometer: The ocular micrometer is a thin glass disk with a ruled scale etched in chrome on its surface. Carefully handle the ocular micrometer to avoid any damage or scratches. Ensure that the print side of the ocular micrometer is facing the objective lens during installation.
- Match the Eyepiece Diameter: Each eyepiece model has a unique diameter to accommodate the ocular micrometer. Select an ocular micrometer that is compatible with your specific eyepiece model based on the manufacturer’s recommendations.
- Remove the Eyepiece: To install the ocular micrometer, you’ll first need to remove the eyepiece from the microscope. Most eyepieces can be easily removed by gently unscrewing or pulling them out, depending on the microscope’s design.
- Insert the Ocular Micrometer: Carefully insert the ocular micrometer into the eyepiece holder, ensuring that the print side of the micrometer is facing the objective lens. Align it properly and make sure it fits securely within the eyepiece holder.
- Reassemble the Eyepiece: Once the ocular micrometer is in place, reassemble the eyepiece back into the microscope. Ensure that it is securely and correctly attached.
- Check the Alignment: After installation, verify that the ocular micrometer is properly aligned and centered within the eyepiece. This can be done by focusing the microscope and observing the micrometer’s scale to ensure it appears clear and straight.
- Calibrate the Ocular Micrometer: Once the ocular micrometer is installed, it needs to be calibrated against a stage micrometer with known measurements to ensure accurate measurements during microscopy.
By following these steps and ensuring compatibility between the ocular micrometer and your microscope’s eyepiece, you can successfully install the ocular micrometer and use it effectively for precise measurements and observations in the microscopic world. Proper installation and calibration are essential for obtaining reliable data and making meaningful discoveries in scientific research and various applications.
How to check the front and back side of an Ocular Micrometer
Checking the front and back sides of an ocular micrometer is crucial during its installation and use in a microscope. The front side of the ocular micrometer contains the printed scale, while the back side is plain glass. Here’s a step-by-step guide on how to distinguish between the front and back sides of the ocular micrometer:
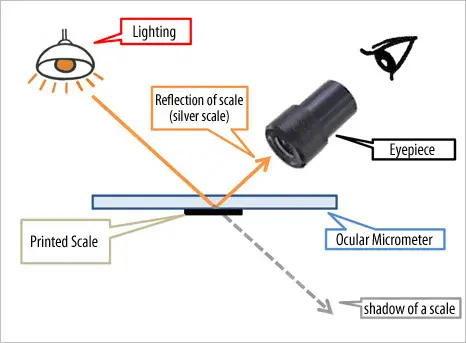
- Illuminate the Micrometer: To begin, shine a light source onto the ocular micrometer. A light source with a large surface area is recommended as it will make it easier to observe reflections.
- Observe the Reflection: Look at the ocular micrometer and observe the reflections of the light on its surface. You should see the numbers on the scale glowing in a silver color due to the chrome printing.
- Check for a Shadow: Without directly reflecting light onto the micrometer, you won’t be able to distinguish the front and back sides. Look closely for any shadow cast by the light on the micrometer.
- Identify the Front Side: If there is no shadow visible on the micrometer, it indicates that the reverse side (the back side) is in front of you.
- Identify the Back Side: Conversely, if you see a shadow on the micrometer, it indicates that the printed side is in front of you. This means you are looking at the front side of the ocular micrometer, where the calibrated scale is located.
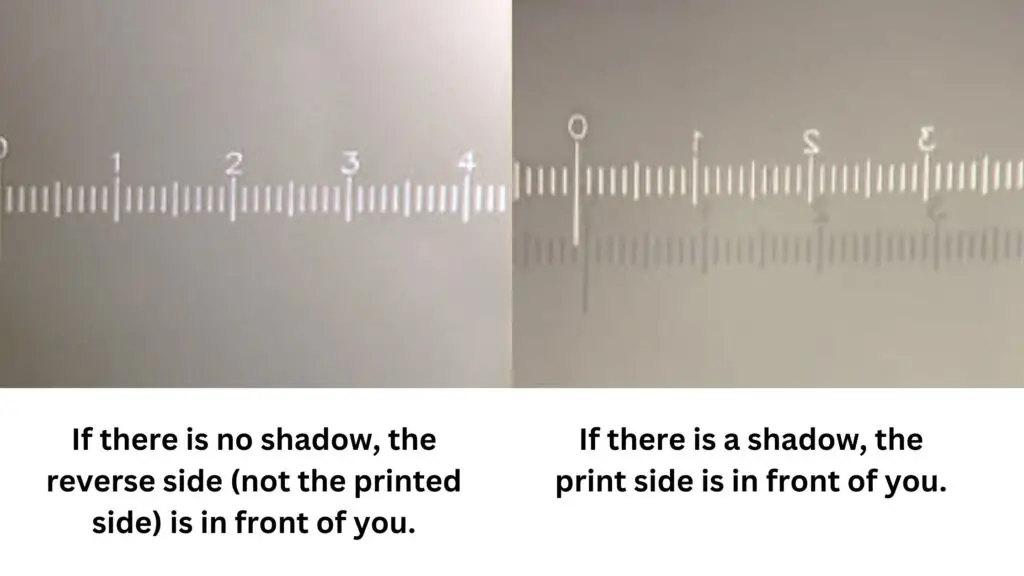
By following these steps, you can easily determine the front and back sides of the ocular micrometer. Ensuring that the printed side is facing the objective lens side (downward) during installation is essential for accurate measurements and observations during microscopy. Properly identifying the front and back sides of the ocular micrometer guarantees its correct usage, allowing scientists, researchers, and students to make reliable and precise measurements in their microscopic explorations.


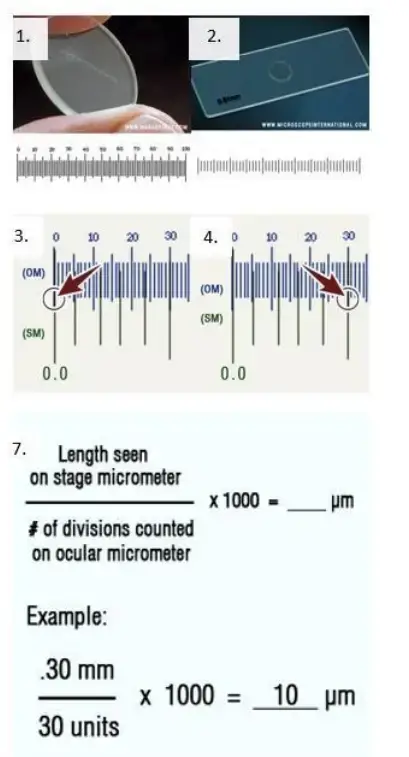
Calibration of the Ocular Micrometer Instructions
Calibrating the ocular micrometer is something that look simple at first sight, but it is important to note that the whole accuracy of microscope measurement actually depend on this step. The OM scale by itself has no real metric value, so we have to compare it directly with the stage micrometer, which carry the known distances. And, you know, if any part of this alignment is not proper, the final size estimation become quite unreliable.
1. Insert the Ocular Micrometer inside the Eyepiece
To begin with, the ocular micrometer disk is placed inside the 10X eyepiece. The disk contain many small division’s, but at this stage they are completely arbitrary. Adjust the eyepiece lens slowly until the engraved line appear clear.
2. Place the Stage Micrometer on the Stage
Now position the stage micrometer slide under the objective. This slide has very precise line’s—usually 0.1 mm and 0.01 mm marks—and it is worth mentioning that these are the true reference values used during calibration.
3. Align the Zero Marks of Both Scales
Focus the field until both scales become visible together. Then shift the stage or rotate the eyepiece slightly so that the zero of the OM lie exactly over the zero of the SM. Even a slight mismatch here may cause wrong calculation later on.
4. Locate the Farthest Superimposed Lines
Without touching the stage micrometer anymore, look towards the right side and find a point where one OM line fall directly on one SM line again. This farthest coincidence point is used because larger distance give better accuracy.
5. Count the Stage Micrometer Divisions
Count how many SM division’s lie between the zero mark and that coinciding line. Since each mark represent a fixed metric distance, this give you the total known length.
6. Count the Ocular Micrometer Divisions
In similar manner, count how many ocular divisions cover that same region on the OM scale. This step sometimes require careful observation because the OM line’s are closely spaced.
7. Calculate the Calibration Factor (CF)
Now divide the known SM distance (from step 5) by the number of OM division’s (from step 6). After getting this value, multiply by 1000 so that the final unit comes in micrometer (µm). This final number represent how much one ocular unit actually measure for that objective lens.
8. Repeat for All Objective Lens
There is no doubt that each objective change the apparent spacing of the OM scale, so steps 3 to 7 must be repeated for 10X, 40X, 100X and so on. Write down each CF separately because they are never the same.
9. Recalibrate Whenever Changes Occur
If the ocular micrometer is moved to a different microscope, or if a new objective is attached, then the entire calibration must be done again. This ensure that measurement remain dependable regardless of equipment changes.
Applications of Ocular Micrometer
- Used in biology for measuring size of cell’s, microorganism’s and small organelles, and it is important to note that such measurement help in understanding how the cell structure relate with their functions.
- In microbiology labs the OM help in estimating diameter of bacteria, fungal spores, protozoa etc., which become essential when comparing different species or growth condition’s.
- Applied in histology for checking thickness of tissue sections and various microscopic features, and you know, this often guide many diagnostic interpretation’s.
- Used in chemistry and material science to measure particle size like nanoparticles or colloidal dispersions when their physical property depend strongly on size.
- In nanotechnology research the OM help researchers to observe particle behaviour at very small scale where even few micrometer difference can affect the experiment.
- Utilized in physics labs for examining crystals, grain boundaries and other microscopic defect’s present inside materials.
- In material engineering the OM is used to measure tiny structural feature’s that influence hardness, ductility, conductivity and so on.
- Important in mechanical engineering for verifying dimension’s of very small machine components so they meet required specification.
- Used during manufacturing for checking tiny parts of devices like gear tooth edges, spring coils, or micro-machined components.
- Very helpful in quality control section of industry where inspector’s need to ensure each piece fall within the given tolerance limit.
- Applied in research and development work since accurate measurement support modelling, design testing, and development of new technologies.
- Used in education and microscopy training classes because students learn how to calibrate and measure microscopic objects in a more hands-on way.
- Useful in forensic investigation for measuring tiny fibers, tool marks or micro-evidence collected from crime scenes, which sometimes support identification.
- Applied in metallurgy labs to study grain size and microstructure of metals, and it can be said that such information decide hardness or ductility property.
- Used in geology and petrology for measuring mineral grain’s in rocks so that rock type classification and geological history can be better understood.
Advantages of Ocular Micrometer
- Provide highly accurate measurement’s of microscopic objects, and it is important to note that such precision often reach up to very small micrometer range which many other simple tools cannot give.
- Offer good reproducibility because the same object can be measured again and again with almost similar reading’s, which help in maintaining data reliability.
- Easy to use for most student’s and laboratory worker’s since the basic procedure does not require too much technical training.
- Cost-effective tool compared with other advanced measuring instrument’s, and you know, this make it suitable for many small labs or teaching setups.
- Lightweight and portable device which can be inserted into different microscope eyepiece’s without much problem.
- Versatile in application because it can be used in biology, chemistry, physics, engineering and many other research fields.
- Allow real-time measurement during live observation, so the researcher get immediate feedback regarding size of the structure being studied.
- Compatible with various types of microscopes like compound or stereo microscope, which increase its usability in different environment.
- Assist in building scientific understanding by giving dependable measurement that support deeper analysis of cell’s, particles, or material’s.
- Useful in industrial quality assurance where product dimensions must fall within exact tolerance range for proper functioning.
Disadvantages of Ocular Micrometer
- Fragile instrument since it is usually made of thin glass or plastic, and it is important to note that even small scratch or dust can disturb the engraved line’s and affect measurement.
- Using it become time-consuming because alignment of OM with stage micrometer need careful adjustment, and beginner’s often spend lot of time to get the scale properly focused.
- If calibration is not done correctly the reading’s may become inaccurate, which make the result unreliable even though the procedure look simple.
- Although cheaper than many advanced tools, for some small laboratory or teaching setup the cost of buying separate OM for different eyepiece’s may still feel like extra burden.
- Limited in use because it can measure only objects visible under microscope, and extremely small particle’s beyond resolution cannot be measured through this method.
- Difficult to use when specimen is moving, like rapidly motile microorganism’s, since keeping the scale aligned while the object shift positions lead to error.
- Provide only one-dimensional measurement, meaning it measure length along a single axis and not the full 2-D geometry of the specimen.
- Range of measurement restricted by the number of division’s on the OM scale, so very large or very tiny structure’s may fall outside its effective limit.
- Depend fully on microscope availability, and you know, in fieldwork or industrial floor conditions a microscope setup may not always be practical.
FAQ
What is an ocular micrometer?
An ocular micrometer, also known as an eyepiece micrometer, is a small, calibrated scale located in the eyepiece of a microscope. It is used to measure the size of objects viewed through the microscope.
How does an ocular micrometer work?
The ocular micrometer has a scale engraved on a transparent disk. When an object is viewed through the microscope, the scale on the ocular micrometer is also visible. By counting the number of divisions on the ocular micrometer that match the size of the object, its size can be measured.
How is an ocular micrometer calibrated?
Ocular micrometers are calibrated by comparing the scale on the ocular micrometer with a stage micrometer, which has known measurements. The calibration factor is determined for each objective and microscope to ensure accurate measurements.
Can an ocular micrometer be used with any microscope?
Ocular micrometers come in different sizes to fit various microscope eyepieces. It is essential to ensure compatibility between the ocular micrometer and the microscope’s eyepiece before use.
What units are used on the ocular micrometer scale?
The ocular micrometer scale is typically divided into micrometers (µm) or millimeters (mm) depending on the microscope’s magnification and the application.
How do I use the ocular micrometer to measure an object?
To measure an object using the ocular micrometer, count the number of divisions on the micrometer that are equal to the length of the object. Multiply this count by the calibration factor to obtain the size of the object in micrometers.
Can an ocular micrometer be used for both biological and industrial microscopy?
Yes, ocular micrometers are versatile and can be used in various microscopy applications, including both biological and industrial microscopy, to measure the size of microscopic structures and particles.
Are ocular micrometers easy to install?
Installing an ocular micrometer requires some care and precision to ensure proper alignment with the eyepiece. Following the manufacturer’s guidelines and using the correct size for your microscope’s eyepiece will help facilitate the installation process.
Is it necessary to recalibrate the ocular micrometer if I change objectives?
Yes, recalibration is essential if you change objectives on your microscope. Different objectives may have varying magnifications, and the ocular micrometer’s calibration factor needs to be adjusted accordingly for accurate measurements.
Can the ocular micrometer be used with digital microscopes?
Yes, ocular micrometers can be adapted for use with digital microscopes. Some digital microscopes have built-in software that allows users to calibrate measurements directly on the digital image. Alternatively, digital calibrators can be used with ocular micrometers to measure objects on digital microscope images accurately.
- https://www.cdc.gov/labtraining/docs/job_aids/basic_microscopy/Calibration_Ocular_Micrometer_508.pdf
- https://www.mecanusa.com/Microscope-Accessories/Microscope-Micrometer-Calibration.htm
- https://www.mecanusa.com/Microscope-Accessories/Microscope-Reticle-Ocular-Micrometer.htm
- https://www.ruf.rice.edu/~bioslabs/methods/microscopy/measuring.html
- https://www.researchgate.net/figure/Ocular-micrometer-calibrated-with-a-stage-micrometer-With-the-10X-objective-the-tenth_fig8_234111617
- http://www.brunelmicroscopes.co.uk/micrometers.html