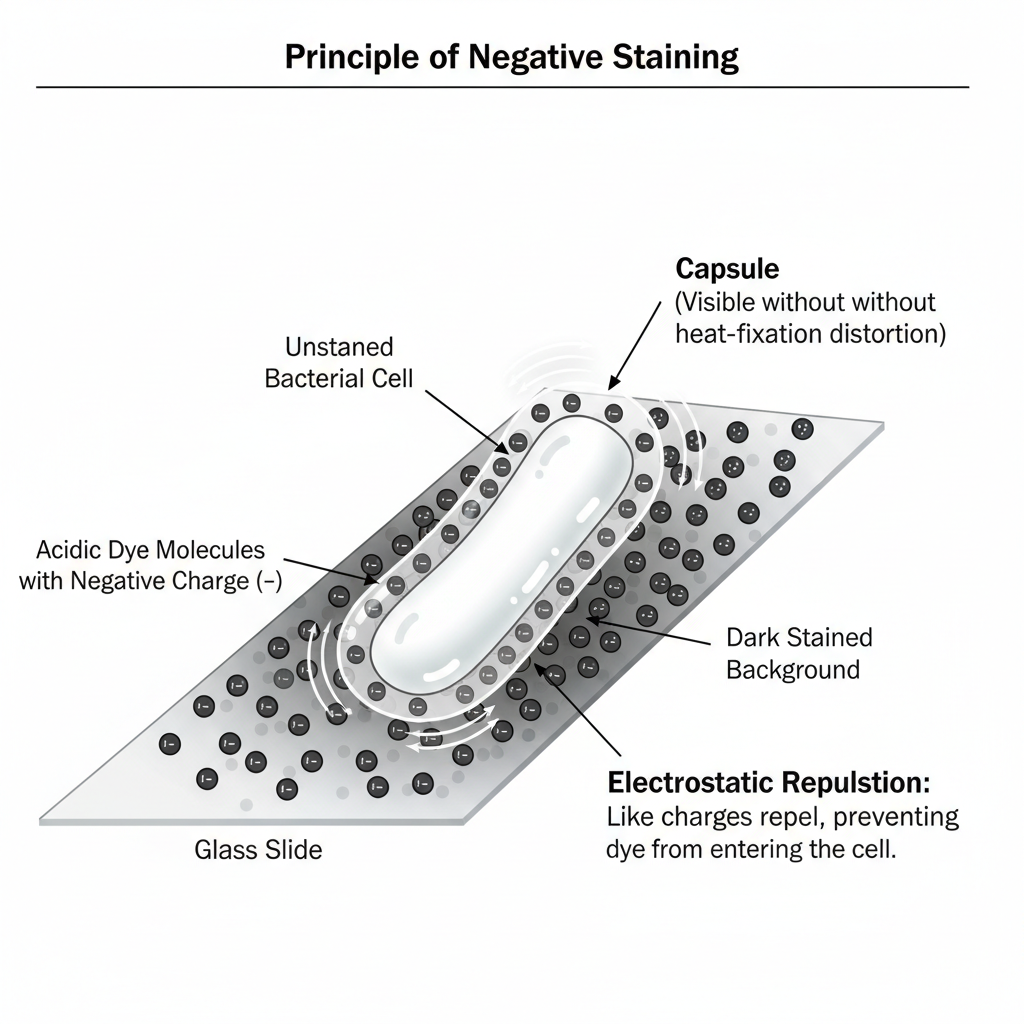
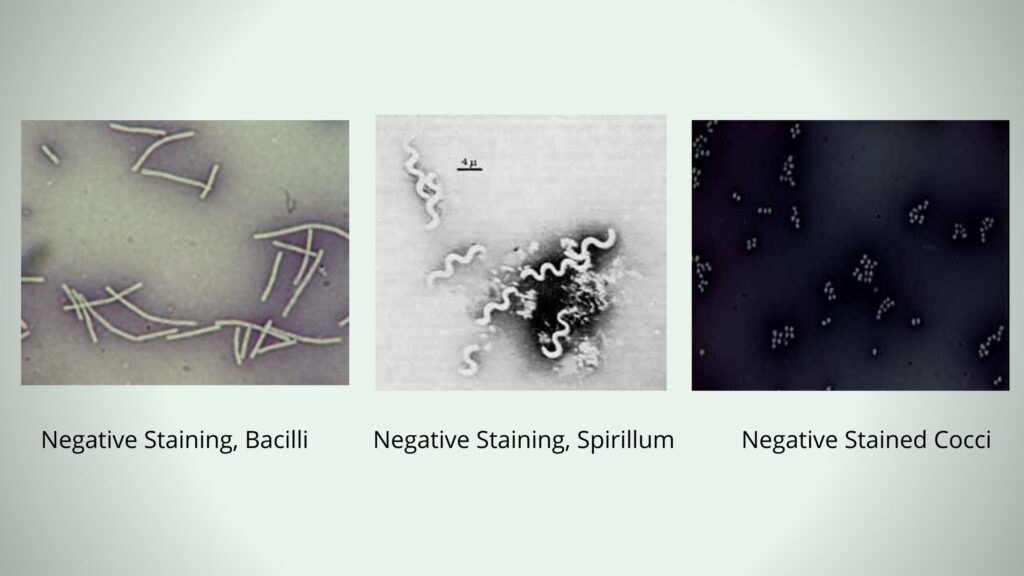
Negative staining is the process in which the background around a specimen is coloured, while the specimen itself remains clear and unstained. It is an indirect staining method, and it is based on the principle that most bacterial cell surfaces carry a negative charge, therefore the acidic dyes (India ink or Nigrosin) are repelled by the cells. It is the negatively charged chromogen that cannot enter the cell wall and thus it gets deposited around the cells, forming a dark background while the cells appear as bright and colourless outlines.
It is the method where the natural size, shape and arrangement of the cells are preserved because no heat fixation is required. The smear is allowed to air dry, so there is no shrinkage or distortion. This method is mostly used for observing delicate structures and is useful in demonstrating bacterial capsules where the capsule appear as a clear halo around the unstained cell. It is also used for organisms that are difficult to stain with basic dyes such as spirilla.
Objective of Negative Staining
- The technique is used to observe microorganisms or other specimens under a microscope without altering their natural morphology. It is particularly useful for delicate structures or organisms that are difficult to stain with traditional methods.
Principle of Negative Staining
The principle of negative staining is the process where an acidic dye is used that carry a negative charge on its chromogen, and this charge is repelled by the negatively charged bacterial cell surface. It is the electrostatic repulsion that prevent the dye molecules from entering inside the cell or attaching on the cell wall, so the stain is only deposited around the cells on the glass slide. The organism therefore remains unstained and appears as a clear outline while the background turns dark. It is the contrast formed between the dark background and the bright cell that allow clear observation of the normal size and shape of the cells, and delicate structures like capsules are also visible without distortion because heat fixation is not used in this method.

Requirement for Negative Staining
Reagents for Negative Staining
Acidic (Anionic) Dyes–
- Nigrosin solution
- India ink (carbon particle suspension)
- Congo red dye
Specific Reagents–
- Acid-alcohol (ethanol with HCl)
- Crystal violet (1% solution)
- Copper sulfate (20% solution)
Heavy Metal Salts for TEM–
- Uranyl acetate (1–3%)
- Uranyl formate (0.75–1%)
- Sodium or potassium phosphotungstate (2%)
- Ammonium molybdate (1–2%)
- Lanthanide acetates (samarium, gadolinium, etc.)
Wetting or Fixing Agents–
- Bacitracin
- Formic acid
Equipment and Material
General Materials–
- Clean glass microscope slides
- Spreader slide for preparing thin films
- Inoculating loop
- Inoculating needle
- Toothpicks for mixed samples
- Bunsen burner for sterilizing loop and needle
- Bibulous paper (used in some capsule stain methods)
Microscopy–
- Light microscope
- Oil immersion objective (100X)
- Immersion oil
TEM-Specific Equipment–
- EM grids (carbon-coated)
- Forceps and filter paper
- Glow-discharge unit for hydrophilic grid surface
- Carbon evaporator for preparing carbon substrate
Step-by-Step Procedure of Negative Staining

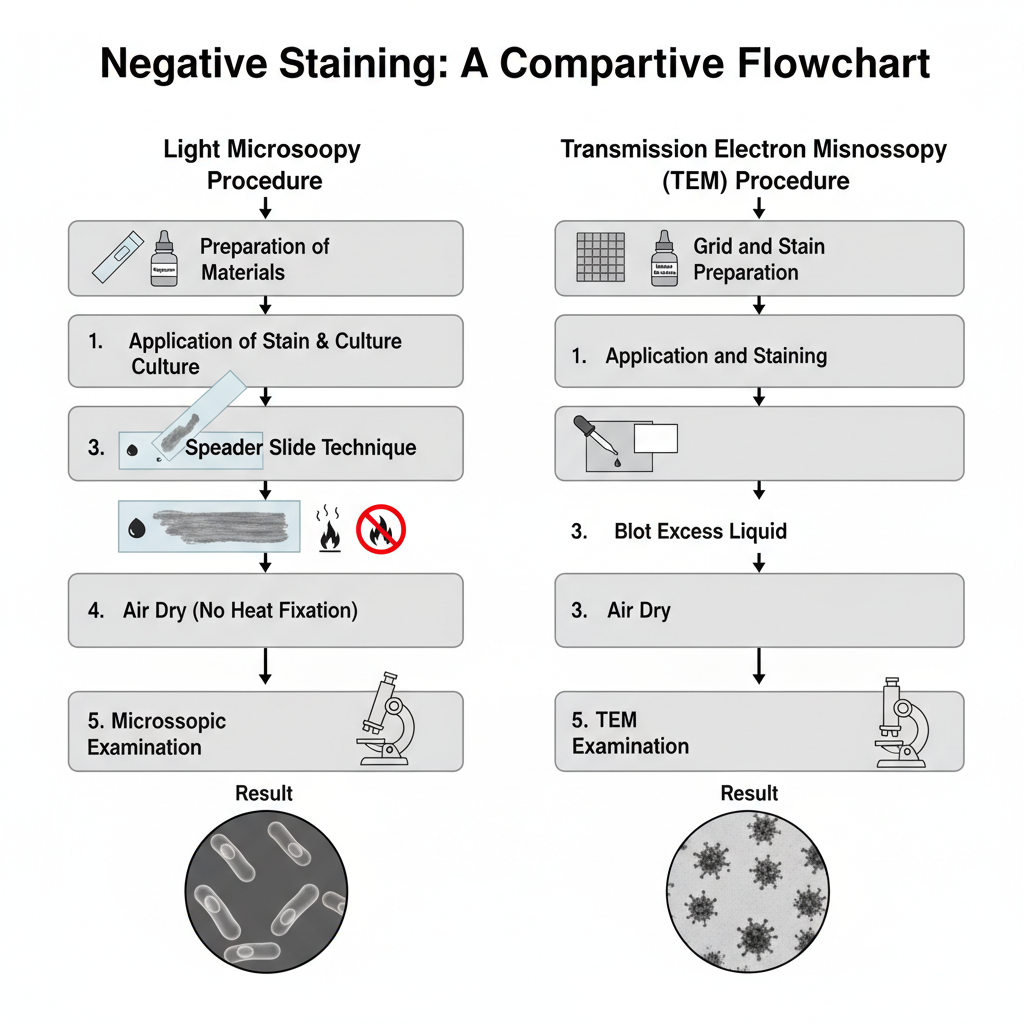
Standard Light Microscopy Procedure
1. Preparation of materials–
- Clean glass slides are prepared free of grease.
- An acidic stain such as nigrosin or India ink is selected.
2. Application of stain–
- A small drop of stain is placed near one end of the slide.
- A small amount of culture is taken aseptically and mixed into the drop.
- The organism is mixed gently without spreading the drop.
3. Spreader slide technique–
- A second clean slide is placed at the centre of the primary slide.
- It is tilted at an acute angle (30–45°) and brought back to touch the drop.
- The drop spreads along the edge of the spreader slide.
- The spreader slide is pushed forward smoothly to make a thin smear.
4. Drying–
- The smear is allowed to air dry completely.
- Heat fixation is not used as it cause shrinkage or distortion.
5. Microscopic examination–
- The dried smear is observed under the light microscope.
- The thin area is focused under oil immersion where the cells appear clear against a dark background.
Transmission Electron Microscopy (TEM) Procedure
1. Grid and stain preparation–
- Heavy metal stains like uranyl acetate or phosphotungstate are prepared.
- EM grids are made hydrophilic using glow discharge.
2. Application and staining–
- The sample is mixed with stain or adsorbed first on the grid.
- A small volume is placed on the grid and left for adsorption.
- Excess is blotted with filter paper.
- The grid is air dried before examination.
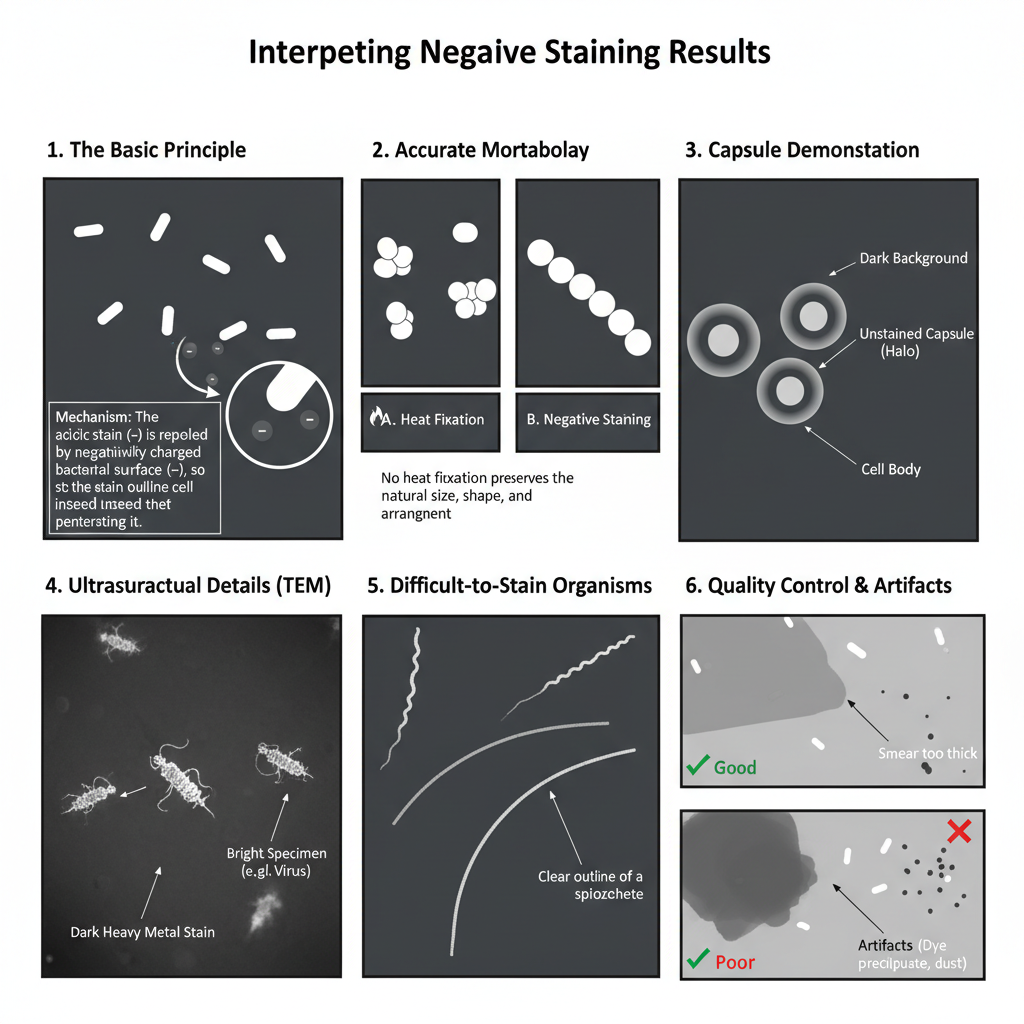
Result Interpretation of Negative Staining

- High-contrast silhouette
- It is the dark background that appears due to the acidic stain, while the cells remain clear or colourless.
- The bacterial surface repels the stain so the dye is deposited around the cell and not inside it.
- The cell outline is seen sharply against the opaque background.
- Accurate morphology observation
- The natural size and shape of the cells is observed because no heat fixation is used in this method.
- The arrangement of cells (chains or clusters) is also seen clearly as distortion is absent.
- Capsule demonstration (halo appearance)
- Encapsulated organisms show a clear halo around the cell body.
- It is the unstained capsule that forms the clear zone between the dark background and the inner cell.
- In some preparations, a three-layer appearance is seen i.e. dark background, clear capsule, and the stained cell body in centre.
- Ultrastructural details under TEM
- The specimen appears bright while the heavy metal stain forms a dark surrounding.
- Fine structures like surface depressions, viral capsids or protein outlines is interpreted clearly because electrons passes through the specimen.
- Detection of difficult-to-stain organisms
- Organisms that do not take basic stains properly is outlined by the negative stain.
- Spiral forms or certain Mycobacterium is identified by observing their external boundary.
- Quality control and artifacts
- A thin, uniform smear is required because thick smear causes the stain to become too opaque.
- Dye precipitates or dust particles is sometimes seen as specks and must not be confused with cells.

Uses of Negative Staining
- It is used for accurate determination of cell morphology and size since the cells is not exposed to heat fixation. The cells do not shrink and the natural shape is preserved.
- It is used for visualization of bacterial capsules. The capsule appears as a clear halo around the cell because capsular materials do not take basic stains.
- It is used for observing difficult-to-stain organisms. This includes spirilla, spirochetes, and organisms having waxy cell walls like Mycobacterium spp.
- It is used for visualization of delicate external structures. Fragile structures such as flagella, pili and fimbriae is seen clearly because they are not damaged by heat.
- It is used in Transmission Electron Microscopy (TEM) where heavy metal salts is applied to increase contrast of viruses, macromolecules and membranes.
Advantages of Negative Staining
- It is advantageous because the cell morphology is preserved. The method does not use heat fixation, so the cells is not shrunken and the natural arrangement is maintained.
- It gives accurate measurement of cell size since the organisms is not exposed to heat or strong chemicals. The true dimensions are seen in the smear.
- It is useful for demonstrating the capsule. The capsule appears as a clear halo surrounding the cell when the background is stained.
- It helps in observing delicate external structures. Fragile structures like flagella, pili and fimbriae is not destroyed since the technique is gentle.
- It is used for imaging difficult-to-stain organisms. Spirilla and Mycobacterium species which resist basic dyes can be visualized easily.
- It produces high contrast. The colourless unstained cells is seen sharply against a dark background which helps in observing outlines and structural details.
- It is a simple and quick technique. Only a single acidic dye is required and the steps are fewer which decreases the chances of error.
Limitations of Negative Staining
- It cannot differentiate between types of bacteria. It shows only morphology and arrangement, but chemical properties like Gram reaction is not detected.
- It may form artifacts when old or unfiltered stain is used. Dye precipitates or drying crystals can appear and these is sometimes mistaken for cells.
- It depends on smear thickness. A thick smear becomes too dense and the light cannot pass properly, so the cells is obscured.
- It has limited resolution in TEM. The negative stain gives around 18–20 Å resolution which is lower than advanced methods.
- It may cause structure distortion during TEM preparation. Flattening of molecules or collapse of fragile assemblies can occur when drying.
- It is unsuitable for pH-sensitive samples. Some acidic stains can affect such samples leading to degradation.
- It has safety concerns in TEM work. Reagents like uranyl acetate are toxic and mildly radioactive and need careful handling.
FAQ
Q1. What is negative staining?
It is a staining technique where the background is stained while the cells remain unstained. It is used mainly to observe the natural morphology of microorganisms.
Q2. What is the principle of negative staining?
It is the principle that acidic dyes carry a negative charge, so they are repelled by the negatively charged bacterial cell surface. The stain deposits around the cell forming a dark background.
Q3. What is the purpose of negative staining?
The purpose is to observe the true morphology, size, and arrangement of cells without distortion, and to visualize structures like capsules and delicate appendages.
Q4. How does negative staining work?
It works by spreading an acidic dye with the sample so the dye does not enter the cell. When the smear dries, the background becomes dark and the cells appear clear and colorless.
Q5. What stains are used in negative staining?
Common stains used are Nigrosin, India ink, Congo red, and sometimes eosin.
Q6. Why are acidic stains used in negative staining?
It is because acidic stains have negatively charged chromophores. These is repelled by the cell surface, so only the background gets stained.
Q7. What is the difference between positive and negative staining?
In positive staining the basic dye stains the cell directly as the dye is attracted to the cell. In negative staining the acidic dye stains only the background and the cell remains unstained.
Q8. What are the advantages of negative staining?
– It preserves the cell morphology since no heat fixation is used.
– It shows accurate cell size.
– It helps to visualize capsules and delicate structures.
– It is simple and quick with good contrast.
Q9. What are the limitations of negative staining?
– It cannot differentiate bacterial types.
– Artifacts may form when stain quality is poor.
– Thick smears obscure cells.
– In TEM, some distortion or flattening may occur and the resolution is limited.
– Acidic stains can damage sensitive samples.
Q10. What is the procedure for negative staining?
A drop of acidic stain is placed on a slide. The sample is mixed with the stain. A second slide is used to spread the mixture into a thin smear. It is air dried and then observed under the microscope.
Q11. Do we heat fix in negative staining?
No, heat fixation is not used because it would shrink or distort the cells.
Q12. What gets stained in negative staining?
The background gets stained, while the cells appear clear and unstained.
Q13. How does negative staining compare to Gram staining?
Negative staining is a simple stain used for morphology, while Gram staining is a differential stain used to classify bacteria based on cell wall properties. Negative staining does not involve heat fixation but Gram staining does.
Q14. Why is nigrosin used as a negative stain?
It is used because nigrosin is an acidic dye with a negative charge. It provides a dark, opaque background and does not penetrate the cell.
Q15. What are the applications of negative staining?
– Observation of cell morphology and arrangement.
– Detection of capsules.
– Visualization of fragile appendages.
– Examination of difficult-to-stain organisms.
– In TEM, it is used to increase contrast of viruses and macromolecules.
- AAT Bioquest. (2023, March 16). How does negative staining help us visualize capsules? https://www.aatbio.com/resources/faq-frequently-asked-questions/how-does-negative-staining-help-us-visualize-capsules
- Ahern, H. (n.d.). Differential staining techniques. In Microbiology: A Laboratory Experience. Milne Publishing. https://milnepublishing.geneseo.edu/suny-microbiology-lab/chapter/differential-staining-techniques/
- Aryal, S. (2022, August 10). Negative staining- Principle, reagents, procedure and result. Microbiology Info. https://microbiologyinfo.com/negative-staining-principle-reagents-procedure-and-result/
- CellaVision. (2022). What are the main problems you encounter when Gram staining? https://www.cellavision.com/problems-Gram-staining
- Creative Biolabs. (2025). Mastering Gram staining to differentiate Gram-positive and Gram-negative bacteria. Live Biotherapeutics. https://live-biotherapeutic.creative-biolabs.com/mastering-gram-staining-differentiate-gram-positive-negative-bacteria.htm
- Expert technical report on negative staining methodology [Technical report]. (n.d.).
Moyes, R. B., Reynolds, J., & Breakwell, D. P. (2009). Preliminary staining of bacteria: Negative stain. Current Protocols in Microbiology, 15(1), Appendix 3F. https://doi.org/10.1002/9780471729259.mca03fs15 - Raymond, J., Boorse, G., & Mason, A. (2022). Negative stain. In Red Mountain Microbiology. Maricopa Open Digital Press. https://open.maricopa.edu/redmountainmicro/chapter/negative-stains/
- Scarff, C. A., Fuller, M. J. G., Thompson, R. F., & Iadaza, M. G. (2018). Variations on negative stain electron microscopy methods: Tools for tackling challenging systems. Journal of Visualized Experiments, (132), 57199. https://doi.org/10.3791/57199
- Tripathi, N., Zubair, M., & Sapra, A. (2025). Gram staining. In StatPearls [Internet]. StatPearls Publishing. https://www.ncbi.nlm.nih.gov/books/NBK562156/
- Watson, R. (n.d.). Negative stain. The Virtual Edge. https://www.uwyo.edu/virtual_edge/units/negative_stain.html
- Text Highlighting: Select any text in the post content to highlight it
- Text Annotation: Select text and add comments with annotations
- Comment Management: Edit or delete your own comments
- Highlight Management: Remove your own highlights
How to use: Simply select any text in the post content above, and you'll see annotation options. Login here or create an account to get started.