Many plants can reproduce genetically identical offshoots or clones of themselves through asexual reproduction. These offshoots then become independent plants. This is known as vegetative reproduction or vegetative propagation. Fragmentation is one way that vegetative propagation can occur. This means that a part of a plant can be regrown into a new plant. There are other methods of vegetative reproduction, such as the production of runners, bulbs, or tubers. This type of asexual reproduction can be done either naturally or artificially and it is faster than seed propagation. It can also allow superior plants to produce unlimited copies without any variation.
Vegetative Propagation Definition – What is vegetative propagation?
Vegetative propagation is an asexual method of plant reproduction that occurs in its leaves, roots and stem. This can occur through fragmentation and regeneration of specific vegetative parts of plants.
New plants may be produced from vegetative parts of the plant such as roots, stems and leaves. This type of reproduction is known as vegetative propagation.
- Vegetative propagation is the use of vegetative structures, such as stem, root, and leaf.
- Stem, roots, and leaves – can contain buds or develop buds. Roots and stems can be used to grow new individuals.
- It is useful in the raising of several commercial crops.
- Vegetable crops, fruit crops, plantation crop, ornamentals, and cash crops.
Vegetative Propagation Features
- Many crops that are propagated from seeds taken from springs don’t look like the parent plants which produced them.
- Some valuable plants, which do not produce seeds, can be successfully propagated using vegetative methods.
- Some plants can produce seeds that are difficult to germinate.
- Vegetatively propagated plants are sometimes more resistant to disease and can be used as propagules.
- The propagation method is extremely economical.
- It is easy to propagate valuable varieties.
- This helps to reduce or eliminate the long juvenile periods in shrubs and trees.
- Cloning and maintenance
- Encourages the creation of desirable clones.
- Unwanted vegetative growth is controlled
- Only limited parts of plants can be used.
- It can be done at any time of year.
- Many plants can be grown in a limited amount of time and space.
- High success rate
Organs Used In Propagation
- Asexual propagation involves reproduction from vegetative parts of plants
- It is possible because many plants have vegetative organs that can regenerate.
- Stem cuttings can form adventitious roots.
- Root cuttings are a great way to regenerate new shoots.
- The leaves can be used to regenerate new shoots and roots.
- To create a continuous vascular connection, a stem and root can be combined.
- Some plants produce certain specialised vegetative structures like – bulbs, corms, tubers, rhizomes, tuberous roots, pseudobulbs, etc. These organs are primarily modified parts of plants that are used for food storage.
Types of Vegetative Propagation
Plant reproduction is dependent on the participation of humans. Man has the ability to control plant growth. Before we can distinguish between vegetative propagation and its types, it’s important to understand the two main methods a plant can reproduce sexually: Natural and Artificial.
Natural Vegetative Propagation
- Epiphyllous Bud
- Scaly Bulbs
- Corms
- Tubers
- Stolons
- Tip Layer
- Root Sprouts
Artificial vegetative propagation
- Cutting
- Grafting
- Layering
- Tissue Culture
Methods/Techniques of Natural Vegetative Propagation
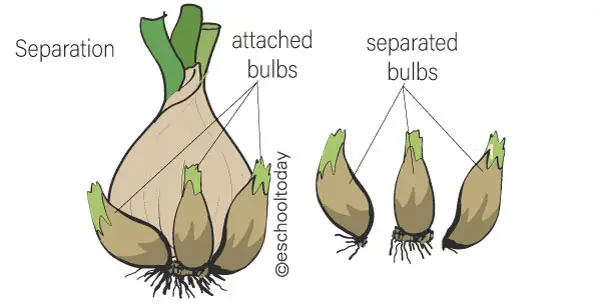
1. Bulbs
- Monocot plants are used this bulbs for reproduction and storage.
- Specialized organ composed of a basal, short, fleshy stem with a growing point at its apex, enclosed by thick fleshy skins.
- The outer scales are fleshy and contain reserved food materials. The inner ones are leaf-like, protecting the growing point.
- The axils of scales are the best places to grow miniature bulbs, called bulblets.
- Bulblets that are formed above ground are known as bulbils.
- Begining of growth period – adventitous roots form – bottom of basal plate. Eg: Lillies, Amaryllis, Allium (onion), Garlic, etc.
2. Corms
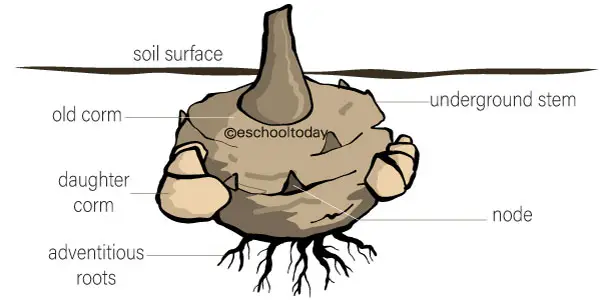
- Corms are bulb-shaped underground stems that are larger than the rest.
- These vegetative structures are surrounded by papery foliage and store nutrients in fleshy, hard stem tissue.
- Corms and bulbs are often confused due to their physical appearance. Corms have solid tissue, while bulbs only have layers of leaves.
- Corms are capable of producing adventitious roots, and have buds that can develop into new plant shoots.
- Crocus, gladiolus and taro are just a few of the plants that grow from corms.
3. Tubers
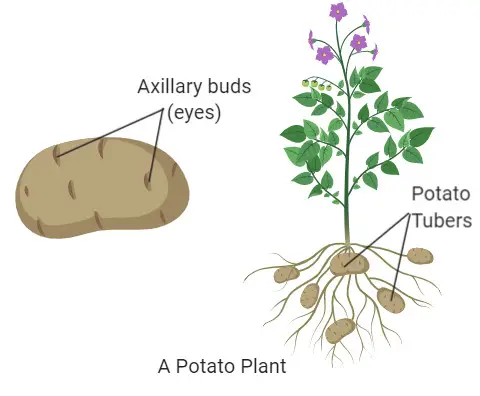
- Tubers can be vegetative organs made from roots or stems.
- Stem tubers are formed from runners or rhizomes that have become swollen due to storing nutrients.
- The tuber’s upper surface is responsible for a new shoot system (stems, leaves) while its bottom surface creates a root system.
- Stem tubers include potatoes and yams.
- Root tubers are formed from modified roots to store nutrients. These roots may become larger and give rise to new plants.
- Root tubers include sweet potatoes and dahlias.
4. Rhizomes
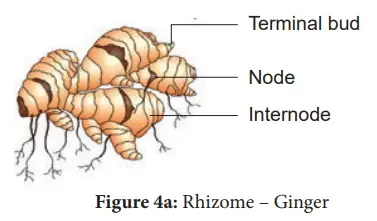
- The development of rhizomes may allow for vegetative propagation.
- Rhizomes are modified stems that grow horizontally on the ground or below it.
- Rhizomes are places where growth substances like proteins and starches can be stored.
- Rhizomes can expand and produce roots and shoots. These may develop into new plants.
- This is how certain grasses, lilies and irises reproduce.
- The edible plant rhizomes are ginger and turmeric.
5. Tuberous Roots
- Certain perennials produce thick tuberous roots.
- Feature the internal and exterior characteristics of atypical roots.
- Theylacknodes, internodes, and stem tuber differ from each other.
- The crown is where buds are made, and the opposite end is where newroots are. Eg: Sweet potato,Dahlia, etc.
6. Plantlets
- Plantlets are vegetative structures made from plant leaves.
- These tiny, young plants are made from meristem tissue that is located at leaf margins.
- Plantlets become roots when they reach maturity and then drop their leaves.
- The roots take root in the soil and form new plants.
- Kalanchoe is an example of such a plant.
- Some plants, such as spider plants, may produce runners that can be used to grow plantlets.
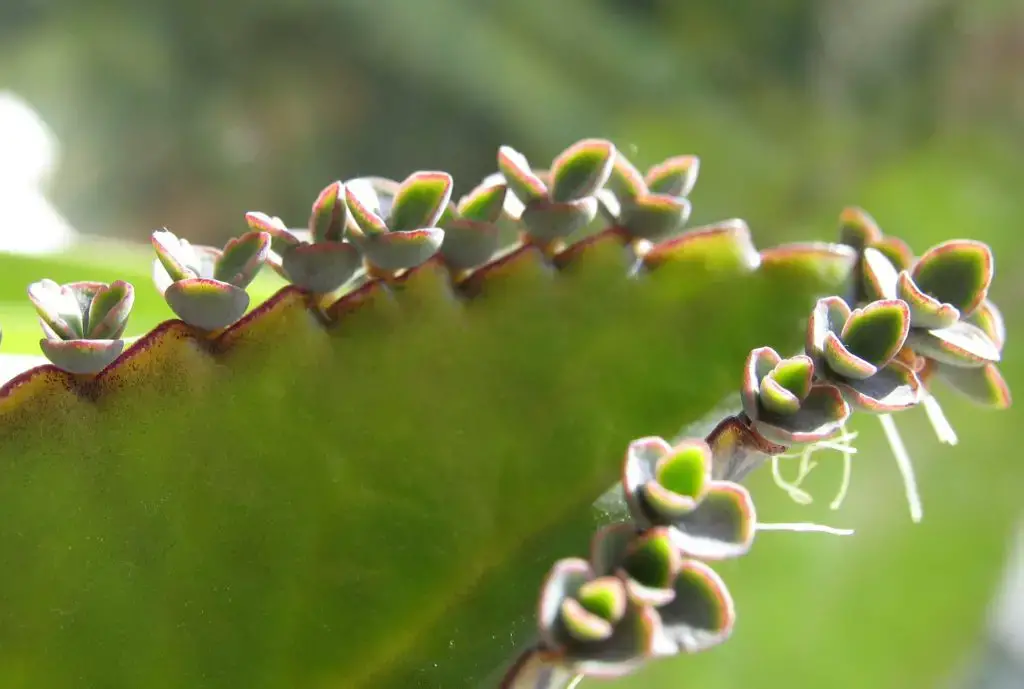
Some plants exhibit modifications in their vegetative structure, or method of growing – which can lead to their natural vegetative growth – runners and stolons as well as offsets, suckers, crowns, and stolons.
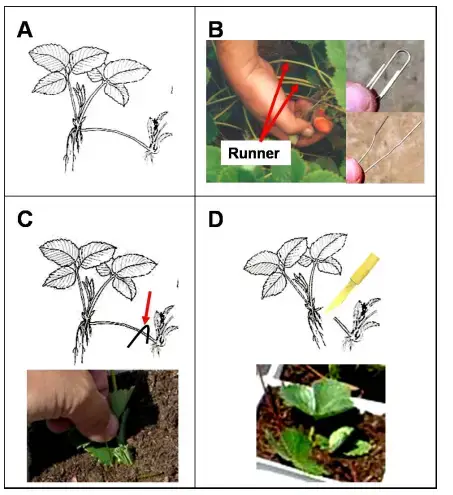
1. Runners
- Runners, also known as stolons or rhizomes, exhibit horizontal growth at the soil’s surface.
- They are not like rhizomes and they come from existing stems.
- Running runners develop roots as they grow from the buds at their tips or nodes.
- In runners, intervals between nodes (internodes), are much more evenly spaced than in rhizomes.
- Nodes that allow shoots to develop are where new plants emerge.
- This is the case with currants and strawberry plants.
2. Stolons
- Horrizontally-growing stems – when they come in contact with soil, they produce adventitious roots. Eg: Cynadon.
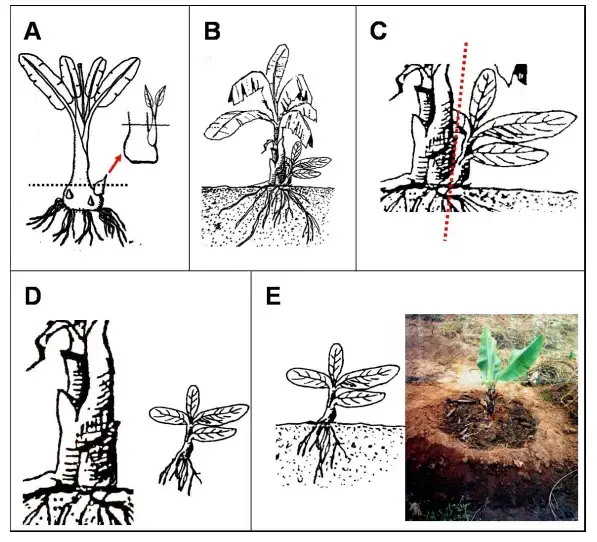
3. Offsets
- Lateral shoots, or branches, are shortened and thicker than main stem, with rosette-like appearance.
- Cut them away from the main stem. Eg: Date palm, Pineapple, etc.
4. Suckers
- The shoot that emerges from below ground on a plant, or from an adventitious root bud.
- For separation, dig out the parent plant and remove it. Murraya (curry leaves), Raspberry, and others.
Artificial Vegetative Propagation
1. Cutting vegetative propagation
- A portion of the stem, root, or leaf is removed from the parent plant and placed in favourable conditions to encourage the growth of roots and shoots. This creates a new independent plant that is identical to the parent.
- Sometimes, cuttings are treated with hormones to stimulate root development.
- The most important method of propagating ornamental shrubs and evergreens, fruits, or vegetable crops.
- Commercially widely used in green house propagation.
- You can start many new plants in a small space with very few stock plants.
- It is simple, inexpensive, and quick.
- There is no problem with compatibility with root stock or poorgraft union.
- Lack of variation leads to greater uniformity
- The parent plant reproduced perfectly with no genetic changes.
Selecting the Right Material
- Choose stock plants that are free from diseases and capable of moderately vigorous growth.
- Stock plants should not be damaged by frost, drought or defoliated by insects. They must also be protected from stunted growth caused by excessive fruitingor mineral deficiency.
- Stocks should be uniform, true-to-type, pathogenfree, and growing in the right nutritive conditions (not starving).
Methods of Vegetative Propagation by Cutting
Hardwood Cuttings
There are two types of hardwood cuttings: those taken from deciduous trees (e.g., grape, apple and plum), and those taken from evergreen trees (e.g. olive and Granadilla). After the leaves have fallen, hardwood cuttings can be taken from deciduous trees in winter.
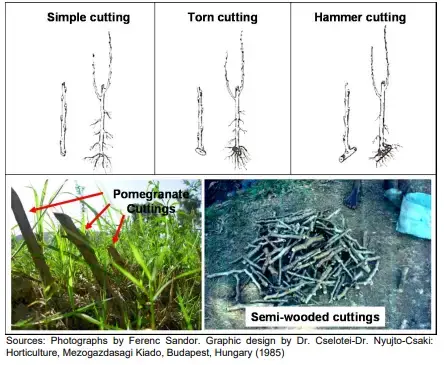
Simple Cuttings
- This is a simple way to remove 4-6 buds from a stem.
- The stem’s top is removed at an angle.
- If the cutting was made from evergreen plants, you should remove the two bottom leaves and plant them immediately.
- The shoots will then develop from the buds above soil, and the roots from the soil nodes.
- This method is commonly used in the Gooseberry, Quince, Fig, and Olive.
Torn Cuttings
- This is done at the stem’s bottom where it joins the mother plant.
- This technique is very old and is seldom used today.
Hammer Cuttings
- This is where a piece of twig and a stem are joined.
- Gooseberry cuttings are a difficult plant to root, so the extra piece of twig is helpful in developing root systems.
Semi-Wooded Cuttings
- These cuttings are typically made from evergreen woody plants that were taken during the growing season.
- They are removed before the wood turns brown and hardens.
- The leafy shoot tip is where cuttings can be taken.
- Closed propagation systems are best for rooting cuttings.
- Once the cuttings have established their root systems, each one can be transplanted into a larger container.
- This propagation method is used to reproduce coffee, kiwi and pomegranate, macadamias, mango, granadilla, and litchi plants.
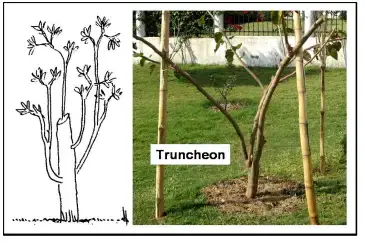
Truncheons
- Truncheons can be described as branches that are about the same thickness as an arm.
- They can be used to grow new plants.
- They measure approximately 170-180cm in length.
- The truncheon can be saved by cutting the top of each branch at an angle.
- To create a hard layer on the cut end of the truncheon before planting it, you should keep it under shade for a few more days.
- The truncheon might not root if the cut end isn’t covered with the hard layer. You should plant the truncheon in a 60 cm-deep hole.
- This method works best at the end of the dormant period, when the plant is still growing slowly.
- This can be used for most trees that drip white sap after they have been cut.
Root Cuttings
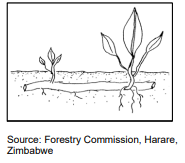
- You should take root cuttings at a distance of 1 meter from the tree trunk.
- These cuttings should measure between 20-25 cm in length and 1-1 cm thick.
- These cuttings should be placed horizontally in the soil, about 10 cm below the surface. They will then shoot.
- This method is used to propagate guava, blackberry, raspberry, and breadfruit.
2. Vegetative Propagation by Bud Grafting or Budding
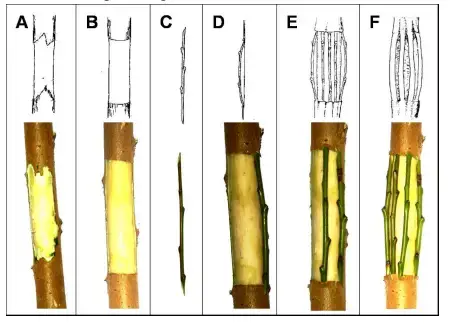
Budding is the most popular method for plant propagation in commercial nurseries. First, you must attach a single bud to the stem of your rootstock. The stem or branch must not exceed 2 cm in diameter. This method is not applicable to young rootstock plants, or small branches of larger plants. Use bud wood, bud sticks or bud sticks that are in their current season of vigorous growth for best results. The top and bottom parts of the branch should be removed. If the tip buds have not yet matured, the bottom buds could contain a cluster of buds. These buds can also be too weak for budding. The stick measures approximately 30 cm in length. Leave a leaf petiole of approximately 1-1.5 cm on the stem after removing the leaves.
Budding is when the bark starts to peel off the stock. The bark can be slipped by irrigation a few days prior to budding. Bud grafting should be done into the root neck or in a higher area of the plant. Budding should be done at least 15-20 cm above the root neck to avoid the scion from rooting into the soil. The method of bud-grafting can be used in two different times. It can be done at the start of the growing season. This is a risky time for bud grafting. The new shoot may not be strong enough to withstand freezing temperatures during winter. Budding at the dormant stage is another option. The bud will be dormant from then on. As growth starts, the top growth must be removed with a sloping cutting 5-7mm above the buds. Every growth, except for the inserted buds, must be removed every week.
Begin the preparation of the buds by slicing the wood under the bud and 2 cm above it. This will leave 5-7mm between the bud and the top. Only a small amount of wood is visible under the bud due to the depth of the cut. It is not necessary to remove the wood beneath the bud.
Methods of Vegetative Propagation by Bud Grafting or Budding
a. T-budding
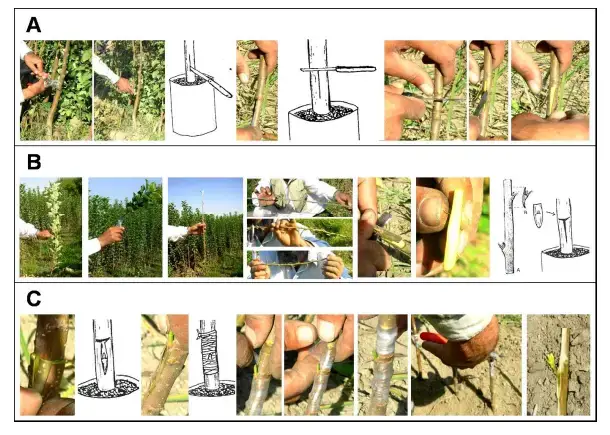
- The stock’s “T” cut is made about 20-25cm above the surface.
- It has a 2 cm vertical cut and a 7-8 cm horizontal cut.
- The two bark flaps can be opened by a slight twist of the budding knife.
- The bud should then be placed under the bark flaps by pushing down.
- You must remove any bud that is not above the horizontal cut.
- The flaps can then be sealed tightly.
- The incision should then be sealed with budding tape.
- This should be tightly wrapped around the stem.
- The incision must be tied at the bottom or top.
- If the tape has not fallen off, it should be removed after 3-4 weeks.
- The condition of the buds can be determined by the shield and petiole.
- If the shield becomes shriveled or the petiole doesn’t fall off, it is possible that the bud has died. In this case, you should repeat the budding process.
b. Inverted T-budding
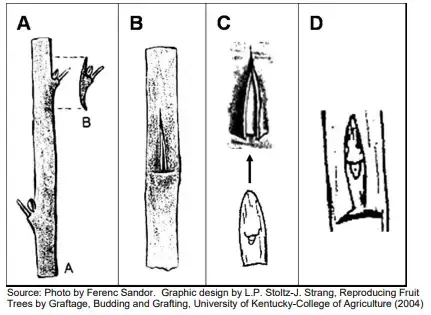
- Inverted T-budding is the same technique as normal T-budding, except that the horizontal cut is made at the bottom of the incision.
- The bud is removed from the stick using the above-mentioned method.
- The T-budding method is currently used for most fruit trees.
- Inverted T-budding is a more efficient method of propagating fruit trees. This is because the hormones are intercepted below bud and the downward flow of the hormones is more effective.
- The union will be stronger and healing will take place faster than the traditional T-budding method.
c. Chip-budding
- Chip-budding doesn’t use protective bark flaps like T-budding, but it does use slipping bark.
- First, cut a piece of stock about 2 to 2.5 cm in length.
- The depth should be 1/4 to 1/5 of its diameter.
- The cutting can be done by making a horizontal cut at the bottom.
- If necessary, the bud can be removed.
- The stock and bud stick must have the same diameter.
- Stock and scion should be placed in a way that the cambia of the stock and bud can match as closely as possible.
- This method is very risky and should be avoided.
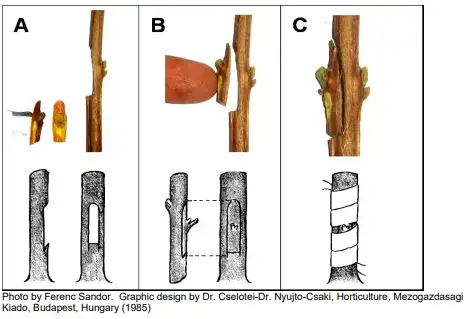
d. Patch Budding
- A rectangular patch of bark was removed from stock and replaced with a similar-sized patch of bark containing a bud of the plant to be propagated.
- Bud is placed in the cut and wrapped with polythene.
e. I – Budding
- Two transverse cuts were made from stock and joined at the center by a vertical cut.
- A rectangle or square is used to cut bud patch from the desired variety.
- For the insertion of Budpatch, two flaps of bark are placed on the stock.
- After the bud has been inserted, it will be wrapped in polythene tape.
f. H- Budding
- Similar to the ‘I’ method, here two vertical cuts can be made parallel to one another and joined by a horizontal cut in the middle.
- A rectangular patch bud of a selected variety is placed by removing the flaps and cutting the region.
Advantages Of Budding
- To reproduce clones which are unsuccessful by cutting, layering, grafting or other sexual methods.
- To grow plants in special ways.
- You only need a very small amount of scion buds.
3. Layering vegetative propagation
- Method of propagation in which the adventitious roots form on a stem while it’s still in contact with or attached to mother plants.
- Rooted-layered stem can be dismantled to make a new plant that grows on its own roots.
- It is a natural way to reproduce in plants such as gooseberry, chlorophytum and strawberries.
- Many types of plants can be artificially induced.
Factors Affecting Layering
- Nutrition: Stem attaches to the plant during rooting.
- Stem treatment: Cutting, twisting, etc. so that more nutrients and hormones concentrate near the point of treatment. Rooting takes place there.
- Light extrusion: It is important to eliminate light from the parts of the stem where roots are to develop – blanching and etiolation.
- Use of root-promoting substances: such as IBA, NAA and IAAetc-in contact with soil, apply such powder to the girdled portion of the stem.
- Other conditions: Rooting requires continuous moisture, good air circulation and moderate temperatures.
Advantages Of Layering
- Method of propagation: Some plants can be propagated naturally, such as Strawberry, Adiantum or Hydrocotyl.
- To propagate plants from cuttings that don’t root easily
- Layering is less expensive and requires less labor.
- This is used to quickly produce large plants.
Disadvantages Of Layering
- Certain types of plants that produce low-lying branches are not allowed to layer.
- The number of plants that can be produced by layering from a mother plant is much lower than cuttings.
- To maintain very good growth, it needs to be watered daily.
Types Of Layerage
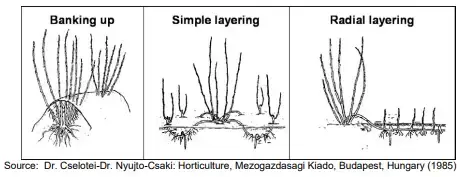
a. Banking Up
- This is the most popular method of propagating pear, quince, and apple rootstock (M-type clones).
- You will need to do some preparation before you can use this technique. We will cut the mother plant down to the surface (or as close as it is) for approximately 2-3 years. This will result in a thicker root collar.
- The thick root neck will produce custard-like stems.
- The plant must then be banked up to 10-15 cm tall (when the stems are on average 20-25 cm long).
- The rooted stems can be harvested at the end of the growing year.
b. Simple Layering
- The process involves bending a branch into a ball and covering it partially with rooting medium. However, the tip (terminal) is left exposed.
- The tip of the branch is bent sharply to an upright position about 10-15 cm from the tip.
- To induce rooting, you need to bend sharply.
- The rooted segment of the branch can then be separated and transplanted. Eg. Rose
c. Tip Layering
- Rooting takes place near the tip of the current season’s shoot. The rooting medium is placed on top and bent down to ground.
- Tip does not grow in length but instead produces a large root system and a young, healthy vertical shoot.
- Eg: Jasminum
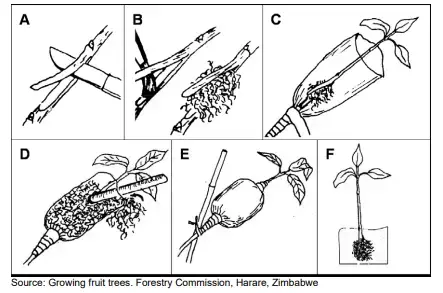
d. Air Layering
- This is done on stems that are less than one year old.
- The bark strip is approximately 2 cm in width and placed on the stem at 20 cm from its tip (just below the leaf stalk or join).
- After the cut is complete, a rooting agent is applied to the strip and rooting material placed underneath.
- The cut is then covered with a thin, clear plastic bag that is opened at both ends.
- Before the bag is sealed, rooting material should be placed inside.
- This must be done during heavy rains, when the humidity is high.
- This method is used to propagate guava, litchi, macadamia, and mango.
e. Mount Layering
- Also known as stool layering, which is the act of bringing a plant to the ground during the dormant season.
- To encourage root formation, soil is placed around the base of newly-developed shoots.
- This method uses plants with strong branches that resist bending and are capable of producing a lot of shoots. Eg: Psidium.
f. Trench Layering
- This is the act of growing a plant or branch in a horizontal position in a trench’s base.
- The shoot bases are protected by soil being filled in around new shoots.
- These shoots are the base for root development. They can later be separated and transplanted.
- Eg: Apple.
g. Radial or Chinese Layering
- The whole stem is then bent into a trench 10 cm in depth and covered with soil.
- The suckers must then be banked up to 2/3 their height on a consistent basis.
- This happens when the sucker grows to a height of 10 cm above the surface, leaving only 1/3 of the plant unaffected.
- This method is mostly used to propagate Gooseberry and Currant.
3. Vegetative Propagation by Layering
Grafting is the art of joining two pieces of live plant tissue. They grow, develop and unite as one plant. These two pieces are stock and scion.
- Stock: Also known as root stock, or under stock, it is the lower portion of the graft that develops the root system of the transplanted plant. It can be a seedling or a rooted cutting, as well as a layered plant.
- Scion: These are small pieces of detached shoot containing many dormant buds. This is the top portion of graft, from which new stems and branches are formed. It should be of the desired cultivar and free from diseases.
Grafting is possible
- With in a Clone – eg Peach.
- There are clones of one species. For example, Fir.
- There are many species that can be compared, e.g., Citrus, Plum, Pinus.
- Between genera – eg: Tobacco X Tomato, Datura X Tomato, Brinjal X Potato
- Between families – eg. Helianthus annus (Compositae), X Meliotus alaba (Leguminosae).
Incompatibility in grafting: Results in variousdisorders such as –
- The yellowing of leaves.
- Falling off leaves
- Trees can die too early.
- Overgrowth beyond or below the graft union.
- Components are broken off at graft union.
Advantages Of Grafting
- It is useful when cutting, layering, division, and other sexual methods are not satisfactory.
- This is used to obtain special forms of plant growth.
- To repair damaged parts of trees.
- This will allow the top work (changing cultivars), of established plants.
- To accelerate the maturation of seedlings.
Formation Of Graft
- To initiate contact with fresh cut stock tissue, a freshly cut scion is brought in capable of meristematic activity.
- The cambial region of both is now within close proximity.
- To encourage growth in new cells and surrounding cells, humidity and temperature should be favorable.
- Outer cell layers of cambial region of scion &stockproduce parenchyma cells that soon intermingle&interlock – to form callus tissue.
- The callusinline contains cambium layers that are intact scion and stock. This creates new cambial cells.
- The new cambial cells create new vascular tissues-xylem towards the inside and phloem toward the outside. This is the prerequisite for a successful graft union.
- The healing of graft unions is similar to the healing of a wound.
- There is no intermingling or mixing of cells in the graft union region. Cells from stock and scion retain their own identity.
- Only when stock and scion can be compatible, graft union will be permanently successful.
- If you want graft union to be permanently successful, it is important that there is proper polarity
Types Of Grafting
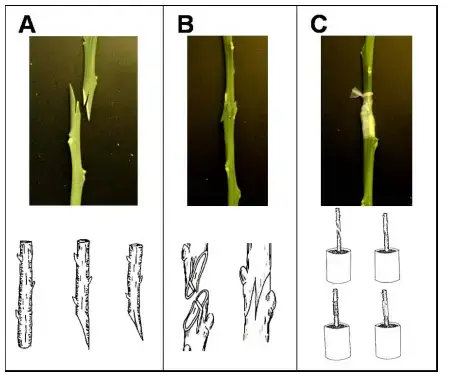
a. Whip Grafting
Whip graft can be useful for plants that are able to unite easily. This technique is suitable for apples, mangoes, and pears. This method can be used for top, stem, or root grafting. The scion’s diameter should be equal to the rootstock, which can range from a pencil size to 10-15 mm.
- Simple Whip Grafting: This is a method of grafting that involves a simple slope cut on the rootstock and scion. Both parts must perfectly overlap. One rule should be observed in all cases: The larger the root stock and scion, the greater the surface to be cut.
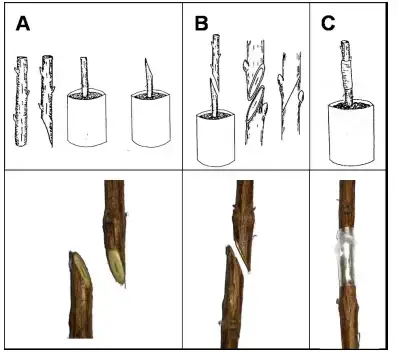
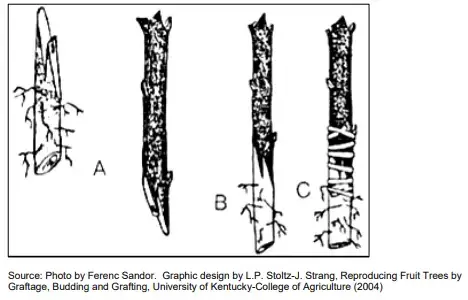
- English (Tongue) Whip Grafting: English (Tongue or Tongue) Whip Grafting is a more common method of grafting, especially for apple and pear trees. It is used for grafting thin stems. It can be used to graft tops, roots, or stems. Two to three buds should be present in the scion. The graft should be placed below the bottom bud. The first cut should be a 2-5 cm sloped cut at the base of the scion. The second cut is 1/3cm away from the tip. This process is repeated for the rootstock. The tongue grafting process is used primarily to graft on M4 rootstock (semi dwarfing – 5m high) and M9 rootstock (very dwarfing (-3m high) in apple propagation.
- Root Tongue Grafting: Root transplantation is done on a rootstock seedling. However, the rootstock must not be in the dwarf category. It causes rooting of the plant. A piece between 8-10 cm in length and a bit more scion is used. Root grafting can be done when the apple rootstock or scion is dormant. This technique is not recommended for pears.
b. Cleft Grafting
This technique has been used throughout history of horticulture. It is also one of the most common methods for fruit propagation. This method is best suited to apple and pears. However, it can also be used in tropical regions for the propagation of avocado and mango trees. This method is also used for guava and citrus trees. The scaffold limb in top and side work is typically wider than the scion. For tree propagation, both the rootstock as well as the scion should be equal in size.
- Top Cleft Grafting: The scaffold limb should measure 4-6cm in width. It should be straight and grow vertically. It must be free of spurs, knots, and cankers. To prevent the limbs from splitting or peeling, the amputation point must be cut. The stock should be cut across the middle to a depth approximately 15 cm. Cut the scion to 20 cm in length and then make two sloping cuts of approximately 4-5 cm each. You should insert the wedge of the knife into the middle of the split. The stock and scion will then be joined in such a way that both cambia are in contact. Two dormant, unattached scions are usually used for each side of the split.
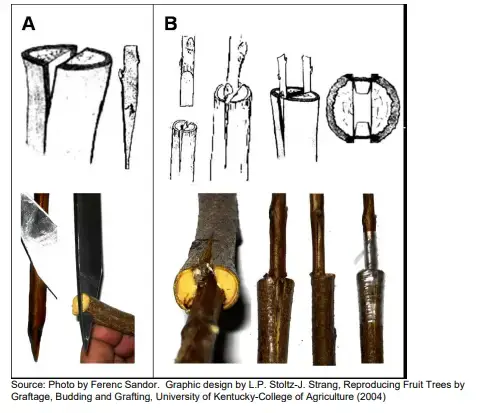
- Side Cleft Grafting: Side Cleft Grafting is similar to top grafting, but the grafting takes place on the upper side of the limb. The grafting scion will not begin to grow until the limbs have been amputated. The stock is then divided with a diagonal about 3-4 cm in length and 1/2 cm in depth. Finally, the stock is joined to the scion at its base. Next, tie and wax the transplant. To prevent the scion drying out, cover it with a thin, plastic bag. The bag can be taken off after 7-10 days. Cut the scion closest to the point of grafting when it starts shooting.
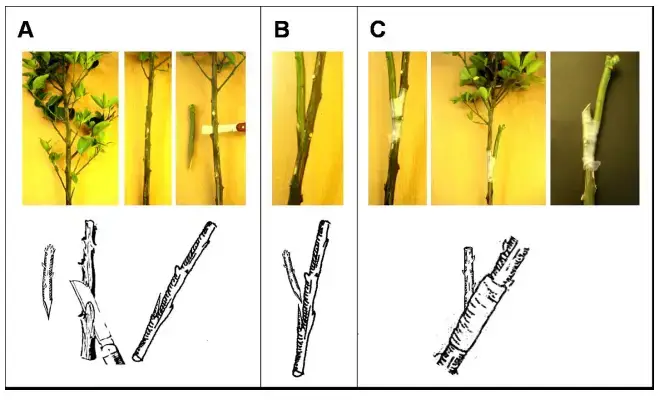
c. Bark Grafting
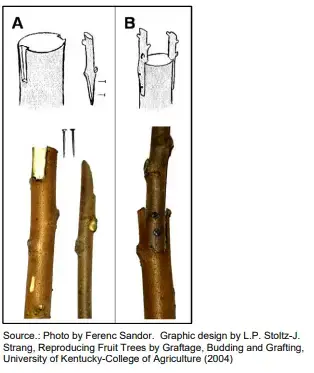
Bark grafting can be used when the stock size is too big for whip grafting. This is the most difficult method of grafting. This method is best practiced and experienced. This technique is used for grafting pear, apple, and other nuts.
- Top Bark Grafting: This method should only be used if the dormant Scion is available. When the bark starts to slip, you should graft it. First, cut straight across the trunk (4-6 cm in diameter). The scion must be cut across the trunk. A sloping cut of approximately 4-6 cm should then be made above the top buds (7-8 mm). The scion should be joined to the stock at the surface. After the scion is joined, attach 2 nails to it and then wax it. To prevent sprouts and shoots, keep the trunk below its joining point.
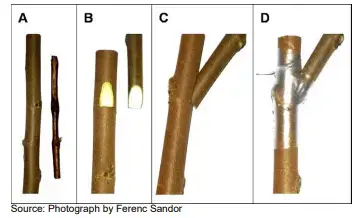
- Side Bark Grafting: Side Bark Grafting is a technique that’s very similar to top bark grafting. The square is approximately 2-3 cm in length and 8-10 cm in width. The joining part of the square is tied. The joining part is not tied with nails. After the scion starts shooting, the branch above the joining point should also be removed. This is the most common method used during the growing season.
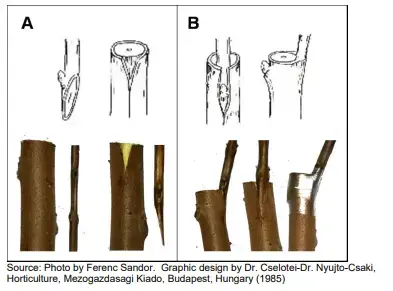
- Slipping Bark Grafting: Slipping Bark Grafting is a technique that looks similar to budding. It can be used during the same time period as budding, once the bark has loosened from the stock. First, cut off the stock. From the stock’s point of origin, cut a 15-20 cm length along the bark. This is the same cut as for T-budding, but only the bark should be cut for slip bark grafting. It is very simple to prepare the scion. Make a slight sloping cut along the stick. The two bark flaps may be opened by a slight twist of the grafting knives. The scion should then be placed under the bark flaps by pushing it down. The incision should then be sealed with budding tape. This should be tightly wrapped around the stem.
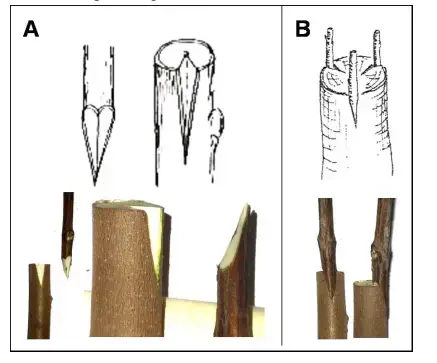
- Wedge Grafting: Wedge Grafting is one of the most challenging propagation methods. A high level of skill is required to perform good quality wedge-grafting. This technique is used to work on the tops and sides of trees. Graft small trees into the trunk. For larger trees, graft the main branches. The stock might be larger than the scion. This method can be used in the dormant phase. Like in all other cases, the scion should have at least 3 buds. It should also be between 20 and 25 cm long. Cut the base of your scion into a long wedge. Make sure it slopes inward and downward. To cut the stub to its center, use a thin-bladed circular saw. To fit the cuts on your scion, widen the cuts using a round-bladed knife. Place the scion in the cut. Tap the scion in place if it matches the cut in your stub. Make sure that both the stock and scion are in direct contact with each other. Cover the graft union area and the end of your scion with grafting glue.
- Bridge Grafting: This technique can be used to repair or propagate damaged branches or trees. Bridge grafting is similar to slipping grafting. It involves grafting beneath the bark. First, clean the bark from the trunk or branch that has been damaged. Next, cut a horizontal wedge in the bark. Next, cut 3-6 scions depending on the area that is damaged and then graft each end under the bark.
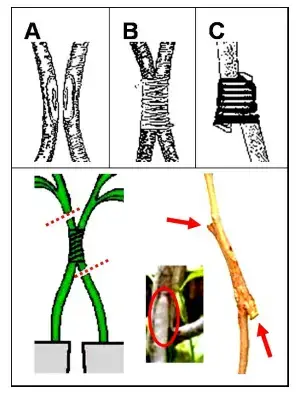
- Approach Grafting: Mango and macadamia trees are difficult to graft. The approach grafting method is recommended in these cases. These techniques are different from other methods in that the scion is attached during the grafting process. Two plants are needed. The rootstock will be one and the scion the other. Both stems should be cut at the same height. Attach the stems to each other and tie with tape. Once the grafts are joined, cut the top of rootstock plants just above the joining point. Then remove the bottom of scion plants with a small cut just below the joining points.
d. Green Grafting
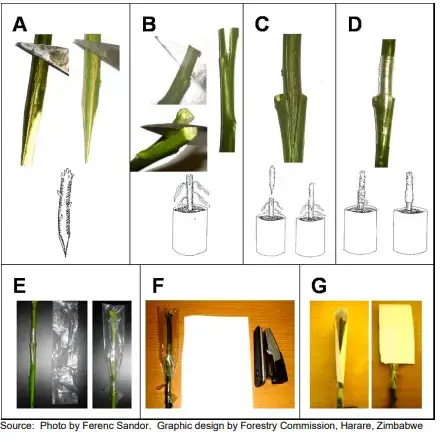
It can be very difficult to graft wooded parts in some cases, such as grafting gooseberry. The two choices are either top grafting (when the stock was cut back) or side grafting. Both use whip or cleft grafting. To produce a fruit tree, top cleft grafting requires a 20 cm cut in the scion and the removal of all leaves. Make sure the top bud remains healthy and well-developed. Two sloping cuts should be made, each measuring 2-5 cm in length. The top of the rootstock should be cut 20-40 cm higher than the surface. One straight cut should be made across the middle, approximately the same length as that on the scion. Join the two pieces together. Finally, tie and wax both ends.
Advantages of vegetative propagation
There are present various advantages of vegetative propagation such as;
- Vegetative reproduction has many advantages, not least that the offspring are clones from their parents.
- A plant with positive traits can pass on its genetic information to its offspring. Commercial growers may be able to clone certain plants to maintain consistency in their crops.
- Plants can also be propagated vegetatively to avoid the complicated and costly process of producing sexual reproduction organs like flowers and subsequent seeds and fruit.
- Vegetative propagation allows plants to avoid the immature seedling stage and get to the mature phase quicker. This increases the likelihood of a plant reaching maturity in nature. Commercially, this saves farmers time and money by allowing faster crop turnover.
- Vegetative reproduction has many benefits in biology research and can be used for afforestation. Forest geneticists and tree-breeders most commonly use vegetative propagation to move genes from trees to a convenient location. This is usually called a gene bank or clone orchard or seed orchard. These locations are where the genes can be recombined to produce pedigreed offspring.
- According to some studies, vegetative reproduction may be a trait that makes a species of plant more likely become invasive.
- Vegetative reproduction is more efficient than sexual reproduction and can increase populations faster than other forms of reproduction. It may also contribute to recovery after disturbances (such as floods or fires).
Key Advantages of vegetative propagation
- The large amount of plants grown within a short time. Seedless plant propagation is possible.
- It aids in the preservation of valuable parent characters for subsequent generations.
- It is a quicker method of reproduction than sexual reproduction.
- rates of survival – the survival rate for the child is almost 100%, whereas in the case of seed-grown plants, it’s between 1-10 percent.
- The process of vegetative propagation is more quick, simple and cost-effective method of increasing the number of plants that are either not viable or have extended seed dormancy.
- It also assists us in introduce plants to new regions in which seed germination is not able to grow plants due to changes in the soil or the environmental conditions.
- Plants such as Bermuda grass or doobgrass (Cynodon dactylon) are a few species that only produce tiny amounts of seeds, are generally propagated by vegetative means.
- Vegetative propagation is only the one known method of multiplication for plants such as bananas fruit, grapes with seeds, oranges as well as jasmine and rose that are no longer able to produce seeds by sexual reproduction.
- Grafting is a method of physical and physiological connection of two individuals to gain the greatest economic benefit i.e. excellent quality of two varieties could be combined into one plant.
- The best aspects of a race variation can be kept for the duration of time.
- The most significant benefit in vegetative propagation is the fact that the plants created will have the same characteristics and hereditary potential that the parents plants. It’s not possible with the seeds that are raised as it is a blend of characters of both parents.
Disadvantages of vegetative propagation
- Higher production costs than seed propagation due to increased labor.
- Genetic diversity is declining
- Depending on the species and time of year, special propagation structures might be necessary.
Frequently Asked Questions
How Pistia perform vegetative propagation?
In Pistia vegetative propagation occurs by offset where one intemode long runners grows horizontally along soil surface and gives rise to new plants either from axillary and terminal buds.
What is vegetative propagation?
New plants may be produced from vegetative parts of the plant such as roots, stems and leaves. This type of reproduction is known as vegetative propagation.
How mint perform vegetative propagation?
In mint, vegetative propagation occurs via sucker. Sucker is the soft slender branch that arises from the base of the shoot. It grows horizontally and rises above the soil to form new plants.
How potato perform vegetative propagation?
Vegetative propagation in potato takes place through Stem.
What are the advantages of vegetative propagation?
Quicker and more certain.
Produces identical quality as the parent.
Plants that do not have viable seed, can be reproduced.
Flowers produced are of superior quality.
Desirable character of fruit can be maintained.
The vegetative propagation by leaves occur in——
Ans: the vegetative propagation by leaves occur in Bryophyllum
Explain how new Bryophyllum plants can be produced from the leaves of the old plant?
(a) Bryophyllum can be reproducible through vegetative propagation using either the stem, or its leaves. The leaves of the Bryophyllum plant are adorned with distinct buds on their margins, which can become detached from the leavesand drop to the ground, and grow back to form new plants.
(b) The money plant can be propagated through vegetative propagation with a portion of its stem that has at the very least one leaf. The stem’s one end is immersed in water and, after a couple of weeks, the new root begin to appear near the place at which the leaf was attached. The stem is gradually transformed into the cash plant.
Why is vegetative propagation practiced for some plants?
Formation of new plants or individuals from the vegetative parts of a plant body is called Vegetative propagation. Some plants propagate only by vegetative reproduction because, they are not able to perform sexual reproduction.
Which part of potato is used for vegetative propagation?
Potato tubers part of potato is used for vegetative propagation.
What is vegetative propagation give two suitable examples?
Vegetative propagation is a method of asexual reproduction where new plants are derived from the vegetative portions of plants. It is not a method of creation from seeds and spores to aid in the propagation of plants. Plants with vegetative parts like runners, rhizomes tubers and others. can be used as propagules to assist in creating new plants.
Some examples of the vegetative process are. Eyes of potatoThe potato’s surface is covered with several buds known as eyes. Each of these buds when they are buried in soil transforms into a plant that is the same as its parent.
2. The leaf buds on Bryophyllum: The leaves of Bryophyllum plants are adorned with a variety of buds along their edges. The buds on the leaves can expand and transform into tiny plants once the leaves fall off their plant, and then come into contact with soil that is moist.
Vegetative propagation in dahlia and asparagus is done by which part?
vegetative propagation in dahlia and asparagus is done by Tubers. Tubers bear buds, which can develop into new plants if covered with moisture soil, example sweet potato, dahlia, yam, tapioca and asparagus.
Give an example of vegetative propagation by leaves.
Begonia and Bryophyllum are examples of vegetative propagation by leaves. This is a form of asexual reproduction in which new plants grow from the buds growing on the margin of the leaves. These buds are reproductive in nature and when they fall on the ground they germinate and form a new plant.
what is meant by vegetative propagation?
Vegetative propagation is an asexual method of plant reproduction that occurs in its leaves, roots and stem. This can occur through fragmentation and regeneration of specific vegetative parts of plants.
what are the disadvantages of natural vegetative propagation?
1. Does not produce new varieties.
2. Leads to overcrowding around the parent plant.
References
- https://www.ndsu.edu/pubweb/chiwonlee/plsc210/topics/chap12-propagation/chap%2012-propagation-asexual-slides%20%232.pdf
- https://teresas.ac.in/wp-content/uploads/2018/10/VEG.-PROPAGATION-PPT.pdf
- https://www.fs.usda.gov/treesearch/pubs/33076
- https://www.sparknotes.com/biology/plants/lifecycle/section3/
- https://saveplants.org/best-practices/vegetative-propagation/
- https://www.sas.upenn.edu/~dailey/VegetativePropagationTechniques.pdf
- http://www1.biologie.uni-hamburg.de/b-online/ibc99/koning/vegpropn.html
- https://www.vedantu.com/biology/vegetative-propagation
- https://www.thoughtco.com/vegetative-propagation-4138604
- https://www.toppr.com/guides/biology/reproduction-in-organisms/vegetative-propagation/
- Text Highlighting: Select any text in the post content to highlight it
- Text Annotation: Select text and add comments with annotations
- Comment Management: Edit or delete your own comments
- Highlight Management: Remove your own highlights
How to use: Simply select any text in the post content above, and you'll see annotation options. Login here or create an account to get started.