A blood smear is a simple diagnostic preparation where a drop of peripheral blood is spread on a clean slide, and it is dried for staining. It is the process used for observing blood cells and also for detecting parasites after staining methods like Giemsa. It is an important technique because it helps in demonstrating the number of blood cells and the morphology of each type. It is also used in detecting different hematological disorders where the shape and the number of cells are examined.
A thin blood smear is the smear prepared by spreading the blood as a thin film across the slide. It is mainly used for demonstrating and differentiating leukocytes. In this smear, the cells are spread in a single layer and each cell is seen clearly. It is the smear used for Differential Leukocyte Count (DLC) where the morphology of neutrophils, lymphocytes, monocytes, eosinophils, and basophils is clearly observed. Erythrocytes and platelets are also identified properly because the thin spreading allows the cells to remain separate.
A thick blood smear is the smear where a larger drop of blood is spread in a smaller circular area, forming a thick layer. It is used for the diagnosis of blood protozoan parasites. It is the process used in detecting malarial parasites and other blood abnormalities like anemiae. In this smear, the RBCs are lysed during staining, and the parasites get concentrated, so it becomes easier to detect them when present in low numbers. This smear is not used for observing the morphology of blood cells because the cells overlap and individual structures cannot be identified clearly.
Both thick and thin smears are used depending on the function needed, and the smear must be completely dry before staining for better results. These are important in demonstrating different blood cells and also in quantifying them to understand different disorders.
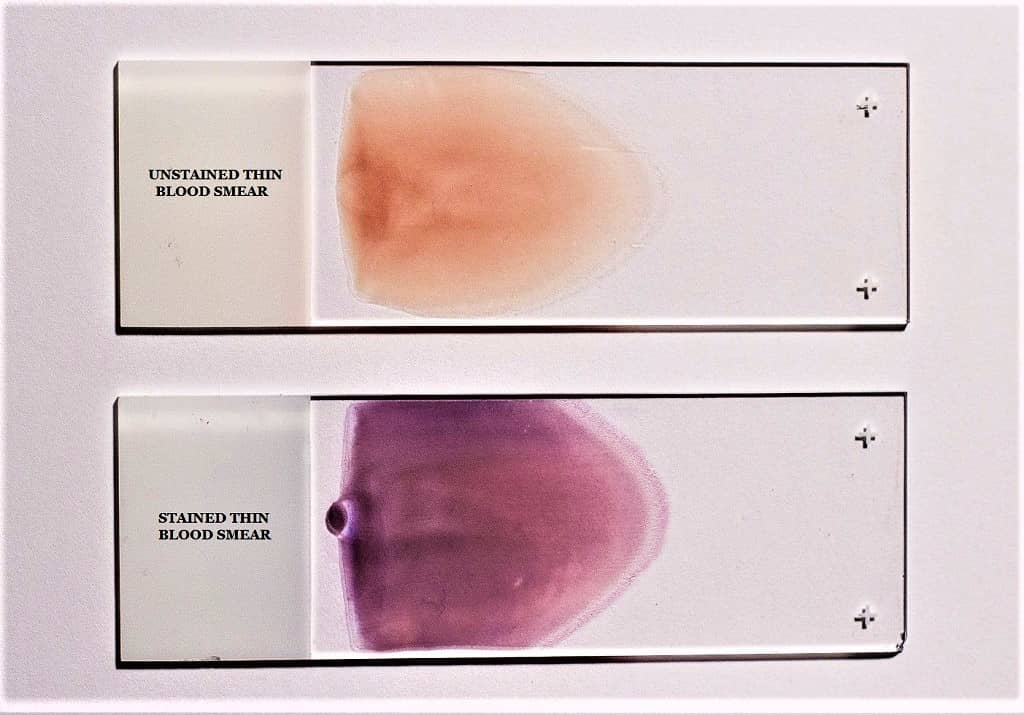
Requirements for Thick Blood Smear and Thin Blood Smear
– Sterile syringe and needle
– EDTA vials for collecting peripheral blood
– Tourniquet used during blood collection
– 70% isopropyl alcohol for cleaning the site
– Sterile lancet when finger-prick blood is taken
– Microscopic glass slides for preparing the smear
Thick Blood Smear Preparation
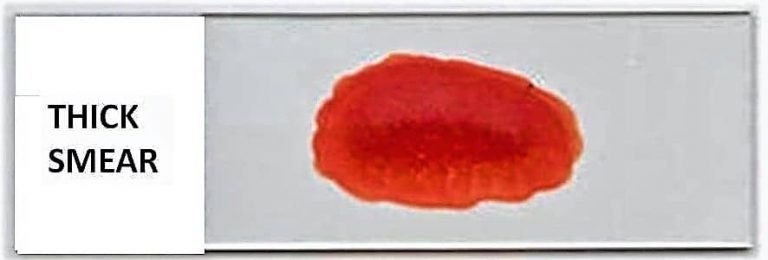
Principle of Thick Blood Smear
A thick blood smear is prepared on the principle that a larger volume of blood is placed in a small area, forming a dense layer where the red blood cells become dehemoglobinized during staining. It is the process in which the RBCs are lysed and the remaining blood components get concentrated in the smear. This concentration is almost many times higher than a thin smear of equal area, so the parasites present in the blood are easily detected. It is mainly used because the thick smear increases the sensitivity for parasite detection, especially in conditions like malaria where the parasite load may be low.
In this smear, the blood forms a thick layer and after lysis of RBCs the parasites appear clearly against a clearer background. It is the method used to detect different stages of parasitic forms, but the morphology of the parasites cannot be fully examined here. For species identification, the thin smear is required because the thick smear does not preserve the detailed morphology. It is the reason why thick smears are used for primary detection and thin smears are used for confirmation of species.
Procedure of Thick Blood Smear Preparation
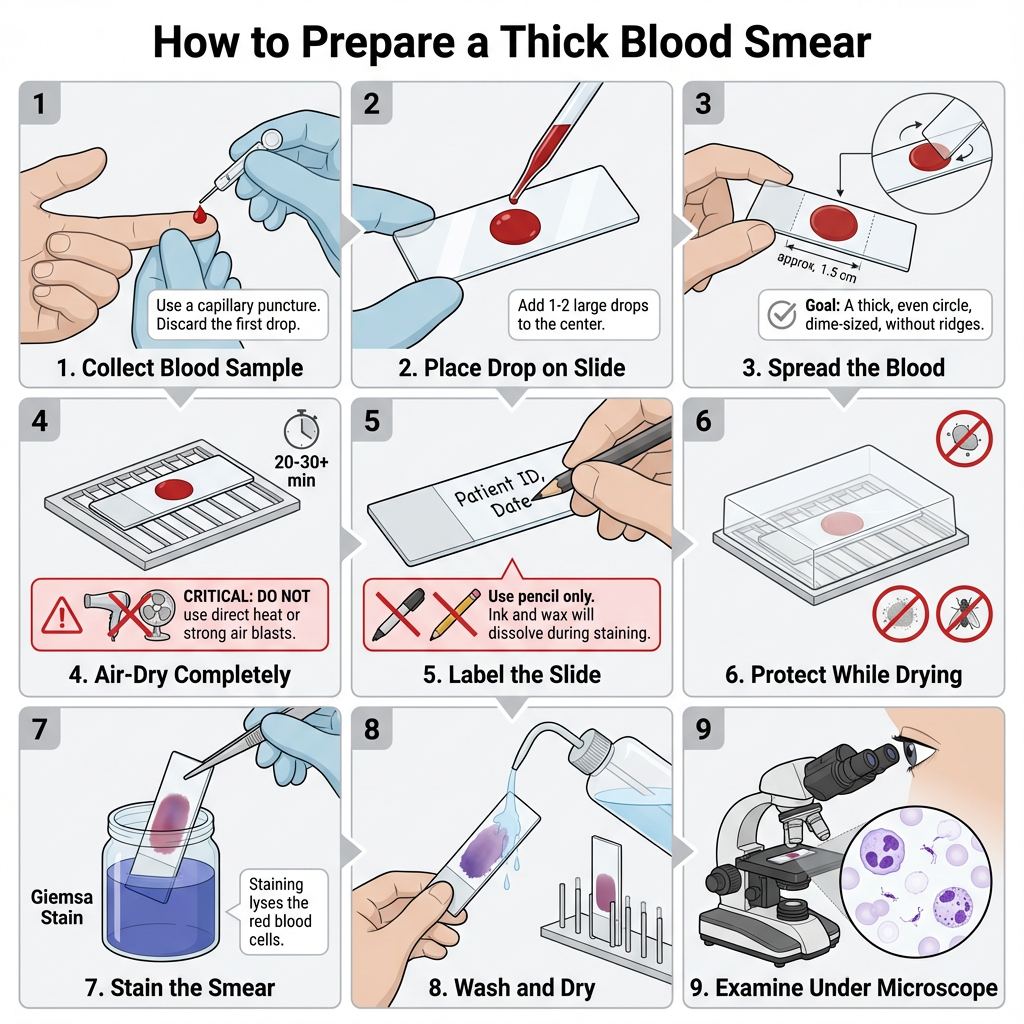
- Collect blood sample by venipuncture or capillary puncture. If venipuncture is used the blood is transferred into a clean test tube. If capillary (finger or heel) puncture is used discard the first drop and collect the subsequent drop.
- Using a clean capillary tube or pipette transfer one or two large drops of blood to the center of a sterile, grease-free microscope slide.
- Holding the slide between thumb and index finger, gently shake or tilt the slide to spread the blood into a circular area about 10 mm in diameter. The smear should be thick but not layered into ridges.
- An alternative spreading method is to use the corner of a second slide or an applicator stick to spread the drop in a circular pattern until the area is approximately dime-size (1.5 cm2) if a larger area is desired.
- Place the slide on a flat surface and allow the smear to air-dry completely. It is allowed to dry for 20–30 minutes as a minimum. At room temperature drying may take longer.
- Do not blast air directly from a source onto the smear as this may distort the film. Avoid direct heat or methanol fixation for thick smears as these will impair subsequent staining.
- Label the opaque end of the slide with patient name, identification number and date using a lead pencil or glass marking pencil. Do not use ink, markers, or wax pencils as they dissolve during staining.
- If staining will be delayed for several hours, the dry thick smear may be briefly immersed in clean water to lyse excess red cells before staining to reduce detachment during staining.
- Protect drying slides from dust and insects while on the drying rack. Place on a horizontal surface and, if needed, use a fan or lukewarm air to speed drying but avoid hot air that may heat-fix the smear.
- When the smear is completely dry proceed with Romanowski-type staining (for example Giemsa) following the staining protocol. The reaction is as follows– stains penetrate and red cells are lysed revealing parasites and white cell morphology.
- After staining, wash and examine under the microscope using appropriate oil-immersion lens if required.
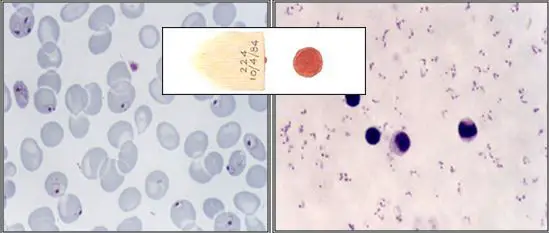
The proper density of a thick smear is one that when placed wet over printed paper makes the words difficult to read.
Blood collected in anticoagulant-treated tubes may require extra care as smears may detach during staining.
Avoid repairing thick smears with methanol or heat. If delay occurs briefly immerse in water to lyse red cells rather than heat-fix.
Uses
- It is used for detection of blood-borne parasites (for example malaria) and for concentrating cellular elements for microscopy.
Thin Blood Smear Preparation
Thin smears consist of a layer of blood with progressively decreasing thickness toward the feathered border. In the feathered border, the cells should be arranged in a monolayer without touching.
Principle of Thin Blood Smear
The Thin Peripheral Blood smear is created by placing a drop of well-mixed blood between 1 and 2 mm in diameter and 1/4 inch from the margin of a clean microscope glass slide. The drop should be positioned in the center of the glass slide. These margins are left on the glass slide in order to obtain a region where the cells can be enumerated and differentiated. Using a second slide as a spreader, the blood is striped into a thin film in the shape of a tongue, and then allowed to dry. For microscopic examination, the blood smear is then fixed and stained with Romanowski stain.
Procedure of Thin Blood Smear
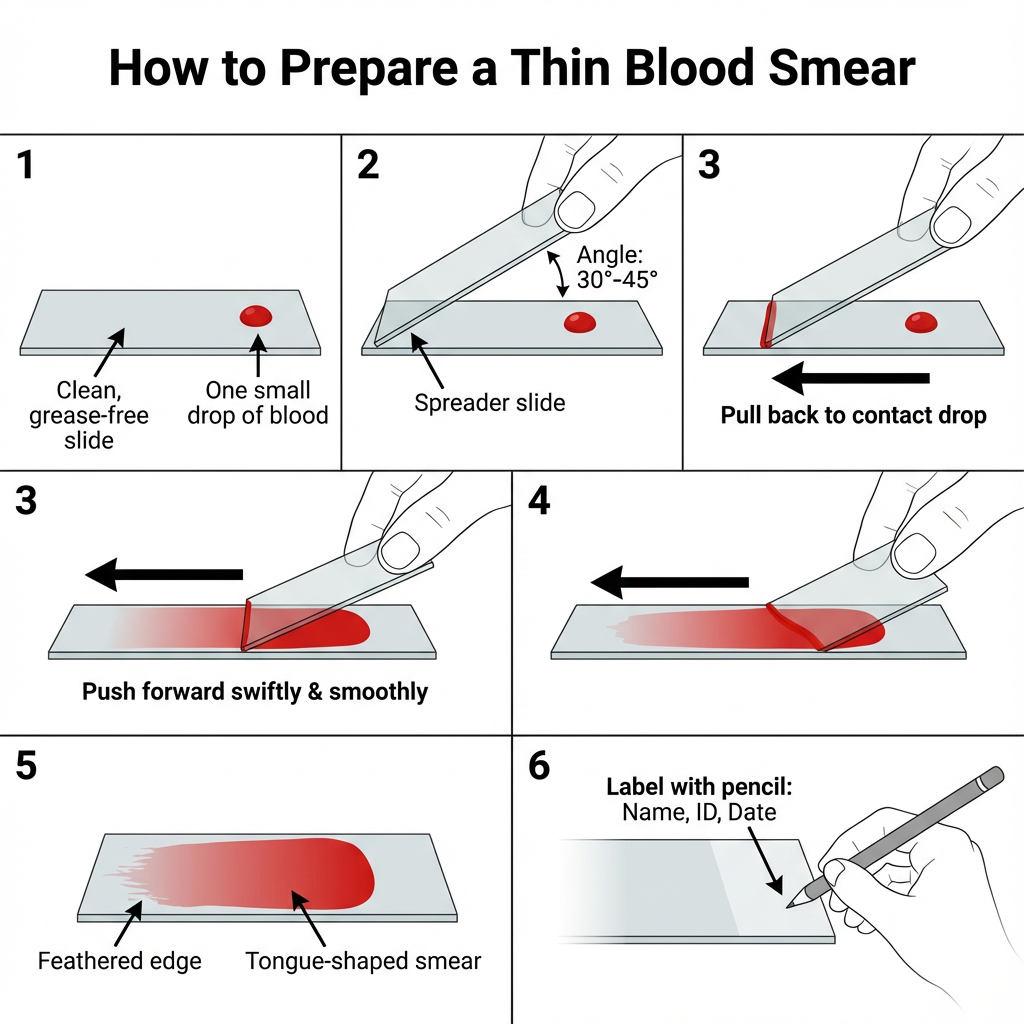
- Collect blood sample by capillary puncture or venipuncture. If venipuncture is used the blood is placed in a clean test tube. If a finger or heel puncture is used discard the first drop and collect the next drop.
- Using a capillary tube transfer one small drop of blood onto one end of a clean, grease‑free microscope slide. Leave about 1 cm margin around the drop.
- Place the slide on a flat surface and grasp it with the index finger and thumb of the left hand (if right‑handed).
- Hold a clean spreader slide at an angle of 30°–45° on the specimen slide. The edge of the spreader should touch the slide surface.
- Pull the spreader slide backward until it makes contact with the blood drop. Allow the blood to spread along the edge of the spreader.
- Push the spreader forward swiftly and smoothly to draw the blood into a thin film. The smear produced is tongue‑shaped and should have a feathered edge.
- An alternative method is to place two drops at the edge of the slide and make two smooth streaks using the spreader at the same angle.
- Allow the smear to air‑dry completely. It is important that no air is blown directly onto the smear to avoid distortion.
- Label the opaque end of the slide with Name, Identification Number and Date using a lead pencil. Wax markers or pens should not be used because these are removed during staining.
- When the smear is fully dried stain using the appropriate Romanowski stain according to the staining procedure.

Uses of Thin blood smears
- It is used for studying red cell and white cell morphology.
- It is also used for identification of malaria parasites in the thin area.
Giemsa Staining of Thick and Think Blood Smear
Giemsa stain is the most trustworthy approach for staining both thick and thin blood films. Eosin and methylene blue (azure) constitute Giemsa solution. The cytoplasm is stained blue with methylene blue, while the nucleus is stained red with eosin.
Determines the quantity of transparencies to be stained. Staining each slide requires approximately 3 mL. If you need to stain 16 microscope slides, you can create 50 mL of Giemsa working solution. Two typical effective solutions are:
- 10% Giemsa stain working solution: The 10% Giemsa stain working solution is utilized in hospitals and diagnostic labs for rapid diagnosis. It is marginally more expensive as more stain is utilized.
- 3% working solution: This method is primarily used to stain microscope slides for educational or epidemiological objectives.
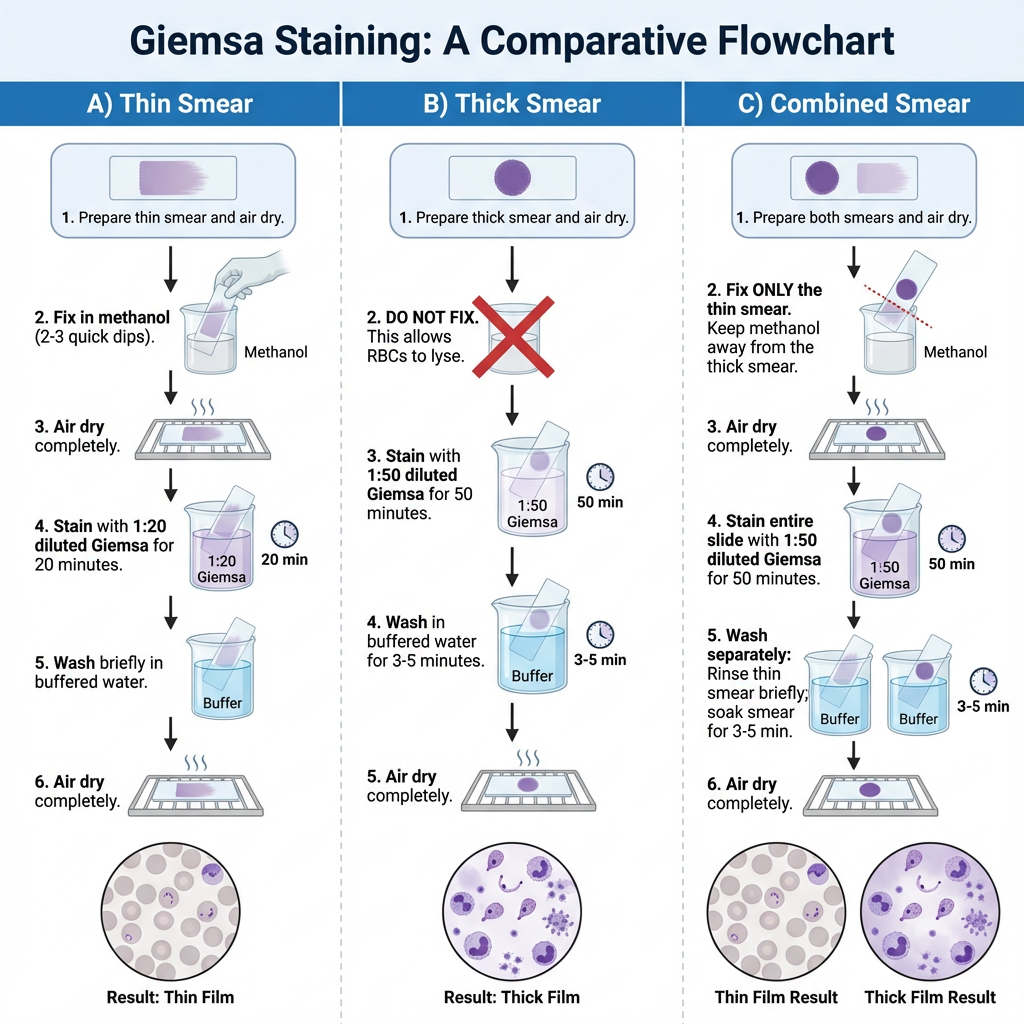
Staining the Thin blood smear with Giemsa stain
- A thin blood deposit is prepared on a clean dry slide, and it is allowed to air-dry naturally.
- The air-dried thin blood smear is fixed in absolute methanol. It is done by dipping the slide rapidly two times in a Coplin jar containing absolute methanol.
- The slide is taken out from the methanol and it is kept for natural drying.
- A 1:20 diluted Giemsa stain is prepared. It is the process where 2 ml of Giemsa stock stain is added into 40 ml of phosphate buffer solution in a clean Coplin jar. Distilled water can be used in place of buffer but staining results is different.
- The methanol-fixed smear is stained for 20 minutes with the diluted Giemsa stain (1:20, v/v). The slide is placed inside the Coplin jar or the stain is poured over the smear so that it fully covers the thin smear.
- The stained slide is washed by dipping it in and out of a Coplin jar containing buffered water or distilled water once or twice.
- Excessive washing in phosphate buffer solution is avoided because the smear may become decolorized.
- The stained smear is kept for proper air-drying so that the stain is fixed on the slide.
Staining the Thick blood smear with Giemsa stain
- A thick and viscous blood smear is prepared on a clean dry slide and it is allowed to air-dry.
- The smear is not dried with heat or inside an incubator because heat will attach the smear strongly to the slide and RBC lysis is not occur properly.
- For rapid malaria diagnosis, the thick smear can be made slightly thinner, kept for air-drying for about one hour and then stained.
- A diluted Giemsa stain is prepared for thick smear staining. It is 1:50 dilution where 1 ml Giemsa stock stain is mixed with 49 ml phosphate buffer solution. Distilled water can also be used but the staining results is different.
- The completely air-dried thick smear is stained for 50 minutes with diluted Giemsa stain (1:50, v/v). The slide is placed in the Coplin jar or the stain is poured over the smear so that the thick film is fully covered.
- After staining, the smear is washed by soaking in buffered water or distilled water for 3 to 5 minutes.
- The stained slide is then air-dried properly so that the stain is fixed on the film.
Staining the Thin and thick blood smear on the same slide with Giemsa stain
- A thin smear and a thick smear is prepared on the same clean slide by dividing the slide into two parts. The thin smear is made on one side and the thick smear on the other side and both are allowed to air-dry.
- The air-dried thin smear is carefully fixed in absolute methanol. It is done by dipping only the thin smear side into a Coplin jar containing absolute methanol for 2 to 3 dips. The slide is slightly tilted so that methanol vapors can reach the dense smear without touching it.
- Even a small amount of methanol entering the thick smear will stop the RBC lysis, so the thick smear must remain unfixed.
- The slide is taken out from the Coplin jar and both the thin and thick smear sides are kept for complete air-drying before staining.
- A 1:50 diluted Giemsa stain is prepared. It is made by mixing 1 ml of Giemsa stock stain with 49 ml phosphate buffer solution in a clean Coplin jar. Distilled water can be used but staining results is different.
- The fully air-dried slide is stained for 50 minutes with the diluted Giemsa stain (1:50, v/v). The slide is placed on a staining rack or in a Coplin jar so that the stain covers both smears evenly.
- During staining, the slide is positioned with the thick smear facing downward to avoid debris falling over the thin smear.
- The thin smear side is rinsed first by dipping it rapidly in and out of a Coplin jar containing phosphate buffer for one or two dips and then keeping it on a paper towel.
- The thick smear side is washed separately with phosphate buffer or distilled water for 3 to 5 minutes. The dense smear is kept fully submerged but the thin smear must not come in contact with water to avoid decolorization.
- After washing, the slide is air-dried completely so that the stain becomes fixed on both smears.
Microscopic examination
Examining the thick film
- Blood film stained with Giemsa should be placed on the microscope stage with the label to the left. Align the dense film with the tenfold objective lens.
- Activate the microscope, optimize the light source, and locate the focus by peering through the ocular and 10x objective.
- Examine the blood film for parasites and other blood components. Select a portion of the film that is uniformly stained with white blood cells.
- Apply a drop of immersion oil to the dense film. To prevent cross-contamination, guarantee that the oil applicator never contacts the slide. Permit the 40x objective to avoid contact with the lubricant.
- Transfer the 100x oil immersion objective to the chosen portion of the dense film. Utilize the adjustment for precise focus to see the image. Raise the mechanical stage to prevent slide damage.
- Using the fine adjustment, concentrate on the cell elements and confirm that the film is suitable for routine examination; 15-20 white blood cells per thick film field will yield an acceptable film thickness. Films that contain fewer white blood cells per field will necessitate a more thorough examination.
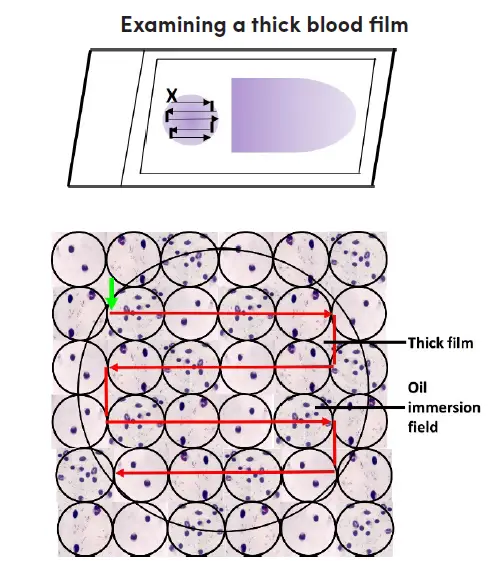
- Examine the slide in a methodical manner. Start at the upper left of the film (indicated by a green arrow pointing vertically) and work your way horizontally to the right, field by field.
- When you reach the opposite end of the film, move the slide gently downwards, then to the left, field by field, and so on. Throughout the examination of each field, incessantly focus and refocus with the fine adjustment for efficient examination.
- Examine the dense film under the oil immersion objective, horizontally or vertically, field by field. Focus by using the precise adjustment.
- A minimum of one hundred high-power fields must be investigated before a thick film can be deemed “parasite-free.” The entire dense film should be scanned if possible.
- If parasites are discovered, 100 additional fields should be scanned to enhance the likelihood of identifying mixed infections.
- Identify and record all observed species and stages.
Examining Thin Films
After analyzing the thick blood film, the thin blood film must always be examined to identify parasite species or mixed infections. Thin film, unlike thick film, permits the visualization of parasite and red cell morphology. Examine the extremity or edge of the thin film where it is feathery.
- Place a drop of immersion oil on the thin film’s feathered edge.
- Change from the 10x oil immersion lens to the 100x oil immersion lens.
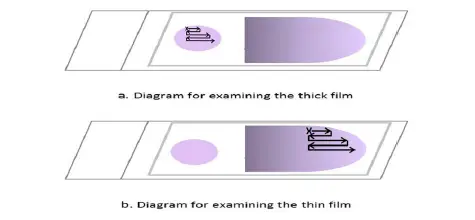
- Examine the feathery end of the thin film’s edge, where there is minimal overlap between adjacent red cells. Follow the movement pattern depicted in Figure 2. Move along the edge of the film, then move the slide one field outwards, then one field inwards, and so on.
- Examine the thin film until the presence and species of malaria parasites are confirmed. Identify and record all observed species and stages in the malaria blood microscopy register.
Uses of blood smears
- Blood smear is used to study the size, shape, and arrangement of blood cells in routine hematological examination.
- It is used for detecting parasitic infections such as malaria, where the parasite stages can be observed inside RBCs.
- It helps in identifying abnormal RBC morphology like sickle cells, target cells, or spherocytes which is important in diagnosing different anemias.
- It is used to evaluate WBC differential count and to detect abnormal leukocytes in conditions such as leukemia.
- Platelet number and platelet morphology is examined from a blood smear to assess clotting-related disorders.
- It is used as a supportive tool in diagnosing infections where toxic granulation or abnormal WBC responses can be seen.
- Blood smear is also used for checking hemoparasites in animals during veterinary investigations.
- It is used to confirm automated hematology analyzer results when doubtful or abnormal values is obtained.
Advantages of blood smears
- Blood smear preparation is simple and inexpensive, and it does not require advanced laboratory instruments.
- It provides direct visualization of RBCs, WBCs, and platelets, allowing clear observation of cell morphology.
- It is useful for detecting blood-borne parasites like Plasmodium species in malaria diagnosis.
- Abnormal cells can be observed easily, which helps in identifying anemias, leukemias, and other hematological disorders.
- It supports confirmation of automated hematology reports when abnormal or doubtful results is obtained.
- Blood smear examination can be performed quickly, making it helpful in emergency diagnostic situations.
- It requires only a very small amount of blood, which is suitable for pediatric and critically ill patients.
Limitations of blood smears
- The quality of results depends on the technician’s skill, and poorly made smears can give misleading observations.
- It is not suitable for detecting very low parasite levels because parasites may be missed in scarce infections.
- Staining errors or improper fixation can distort cell morphology, affecting interpretation of RBCs, WBCs, and platelets.
- Blood smears provide only qualitative or semi-quantitative information and does not give exact cell counts.
- Thick and thin smear preparation takes time to dry, which may delay diagnosis in some situations.
- It may fail to detect early-stage hematological disorders where changes in cell morphology are minimal.
- The method cannot differentiate some morphological abnormalities without additional biochemical or molecular tests.
Differences Between Thick Blood Smear and Thin Blood Smear
| Feature | Thick Blood Smear | Thin Blood Smear |
|---|---|---|
| Sample preparation | A thick layer of blood is spread on a slide using a dropper and then allowed to air dry | A thin layer of blood is spread on a slide using a spreader and then allowed to air dry |
| Useful | Thick blood smears are most useful for detecting the presence of parasites. | Thin blood smears helps to discover which species of parasite is causing the infection. |
| Staining | A thick blood smear is a drop of blood on a glass slide. | A thin blood smear is a drop of blood that is spread across a large area of the slide. |
| Purpose | The blood films must be laked before or during staining to rupture all the RBC so that only WBC, platelets and parasites are visualized. | The purpose is to allow malarial parasites to be seen within the RBC and to assess the size of the infected RBCs compared to uninfected RBCs |
| Fixed | It is not fixed in methanol. | It is fixed in methanol. |
| Parasite detection | Useful for detecting high parasite density, as the thick smear concentrates the parasites in a smaller area | Useful for detecting low parasite density, as the thin smear spreads the parasites out over a larger area |
| Sensitivity | Lower sensitivity due to lower parasite density in a larger field | Higher sensitivity due to higher parasite density in a smaller field |
| Interpretation | The morphology and stage of the parasites can be difficult to distinguish due to the high concentration of parasites | The morphology and stage of the parasites can be more easily distinguished due to the lower concentration of parasites |
| Time required | Faster preparation, staining, and examination process | Slower preparation, staining, and examination process |
| Diagnostic value | Useful for initial screening and rapid diagnosis in resource-limited settings | Useful for accurate species identification and monitoring of treatment response |
| Operator-dependent | Interpretation can be subjective and operator-dependent | Interpretation can be subjective and operator-dependent |
| False negatives | Parasites may be missed if the concentration is too low | Parasites may be missed if the concentration is too low |
| False positives | Other non-malarial parasites may be identified as malaria parasites | Other non-malarial parasites may be identified as malaria parasites |
FAQ
What are thick and thin blood smears used for?
Thick and thin blood smears are used for the diagnosis of blood-borne infections, particularly malaria.
What is the difference between a thick and thin blood smear?
A thick blood smear is a slide that has a thick layer of blood spread on it, while a thin blood smear has a thin layer of blood spread on it.
How is a thick blood smear prepared?
A thick blood smear is prepared by placing a droplet of blood on a slide, spreading it thickly, and then allowing it to air dry.
How is a thin blood smear prepared?
A thin blood smear is prepared by placing a droplet of blood on a slide, spreading it thinly using a spreader, and then allowing it to air dry.
What is the purpose of staining a blood smear?
Staining a blood smear helps to enhance the visibility of the parasites and to distinguish them from other cells and debris.
Which type of blood smear is more sensitive for detecting low levels of parasites?
Thin blood smears are more sensitive for detecting low levels of parasites.
Which type of blood smear is more useful for detecting high levels of parasites?
Thick blood smears are more useful for detecting high levels of parasites.
How is a blood smear examined?
A blood smear is examined under a microscope, where the presence and characteristics of parasites are assessed.
How long does it take to prepare and examine a blood smear?
The preparation and examination of a blood smear can take anywhere from 30 minutes to several hours, depending on the experience of the technician and the complexity of the sample.
Are thick and thin blood smears always used together?
In some cases, thick and thin blood smears are used together to provide a more comprehensive assessment of blood-borne infections, but in other cases, only one technique may be used depending on the clinical context and diagnostic outcome.
- https://www.vetlexicon.com/treat/felis/technique/blood-smear
- https://www.cdc.gov/dpdx/diagnosticprocedures/blood/specimenproc.html
- https://paramedicsworld.com/hematology-practicals/preparation-peripheral-blood-smear/medical-paramedical-studynotes
- https://microbeonline.com/thick-and-thin-blood-smear/
- https://www.nyp.org/healthlibrary/tests-detail/thick-and-thin-blood-smears-for-malaria
- https://microbiologyinfo.com/differences-between-thick-blood-smear-and-thin-blood-smear/
- https://www.differencebetween.com/what-is-the-difference-between-thin-and-thick-smear/
- Text Highlighting: Select any text in the post content to highlight it
- Text Annotation: Select text and add comments with annotations
- Comment Management: Edit or delete your own comments
- Highlight Management: Remove your own highlights
How to use: Simply select any text in the post content above, and you'll see annotation options. Login here or create an account to get started.